Viaduct Entrance, Continued

I ended my last post on a positive note. Sadly, my enthusiasm was perhaps premature. As soon as I started adding windows to the viaduct entrance, I ran into the sorts of issues with dimensions and proportions that so often plague projects like this, at least when you don’t have complete technical drawings at your disposal. The top of window X is supposed to be even with the top of window Y, which is about a third as tall as window X, but if I move window X to be even with window Y, it’s no longer in the right place relative to feature Z…that sort of thing. Really frustrating.

Fortunately, I’m not as much of a perfectionist as I used to be, so I pressed onward, accepting the fact that close comparisons with the original Hogwarts miniature would still reveal small discrepancies. The overall dimensions are still very accurate – welllllllll beyond the accuracy needed for a casual viewer to be able to say, “Hey, that’s Hogwarts!” And thanks to the photogrammetry I’ve been able to pull from various videos of the castle, I shouldn’t end up with any errors that snowball into large-scale catastrophes. (Famous last words?)

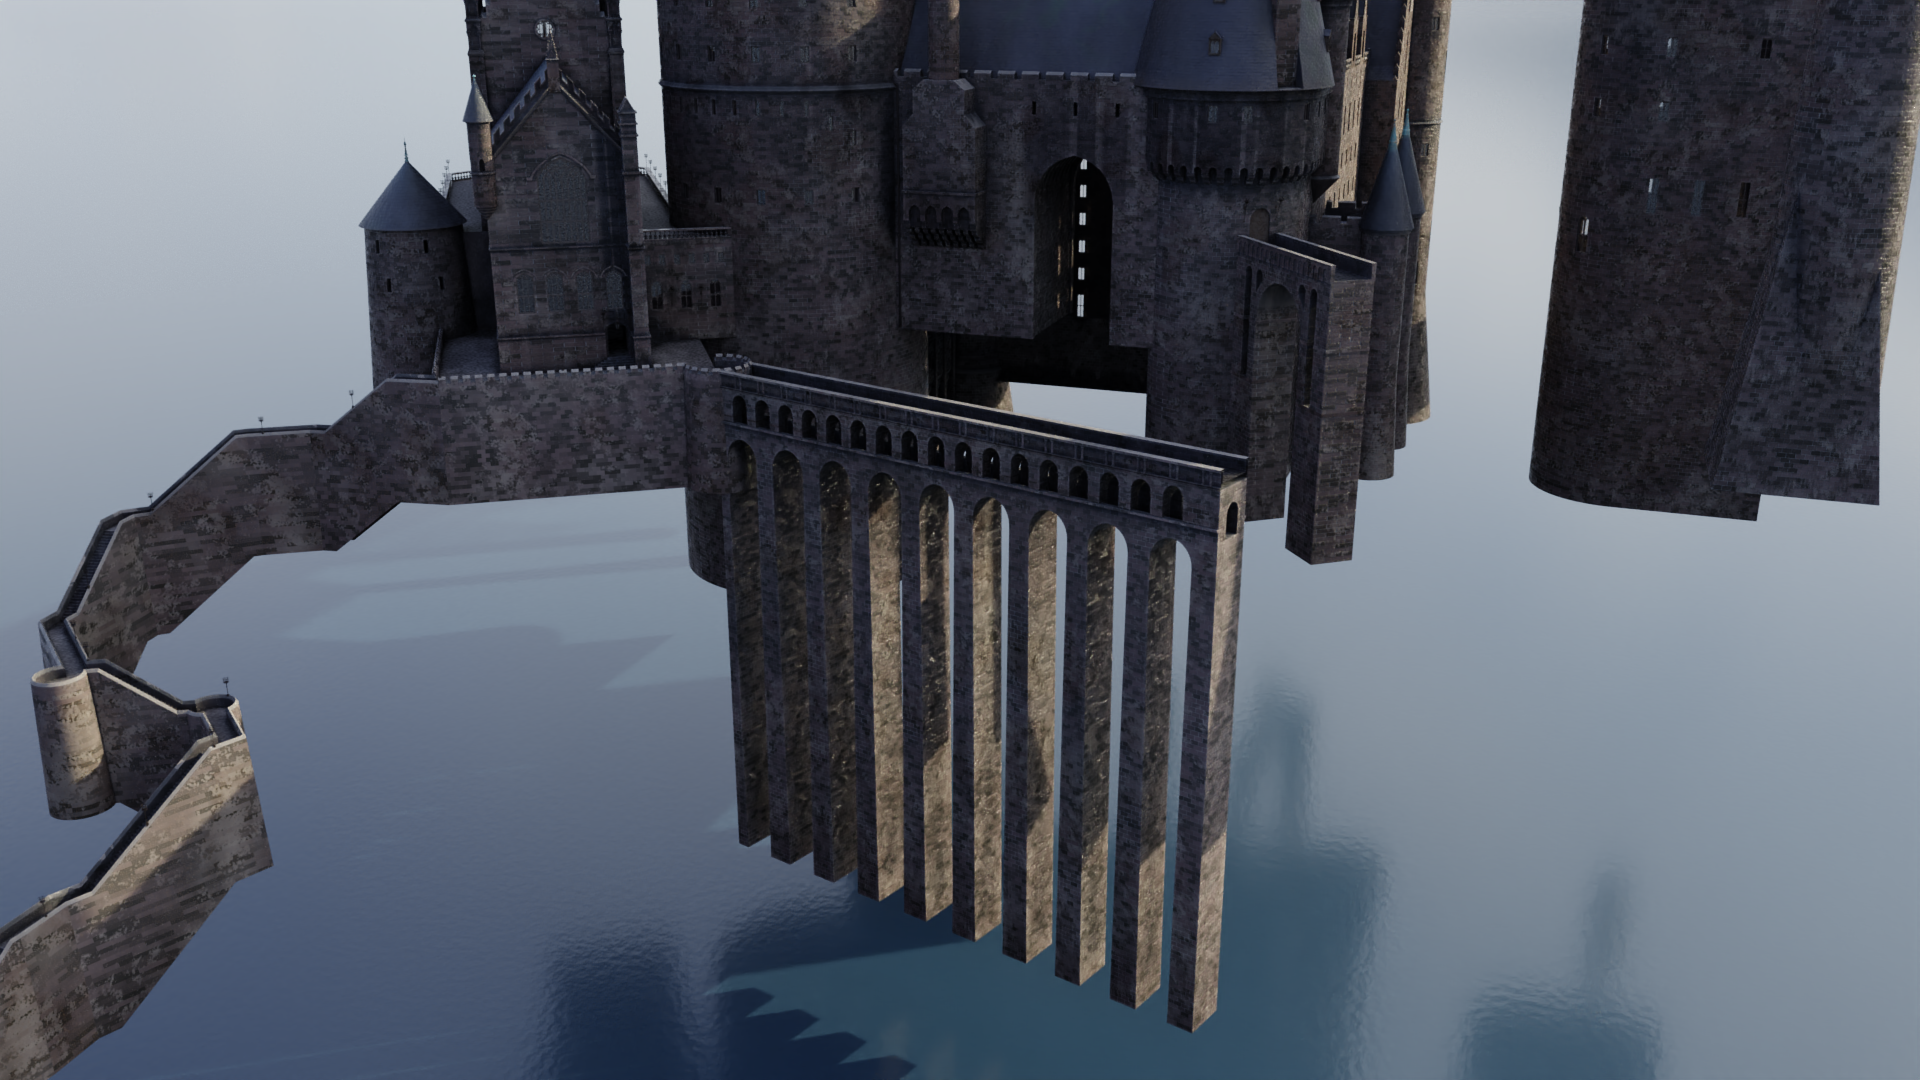
The windows look funny without nothing but sky and water on the other side, but that will be resolved when I enclose the other sides of the building. For now, the south facade at least is complete.

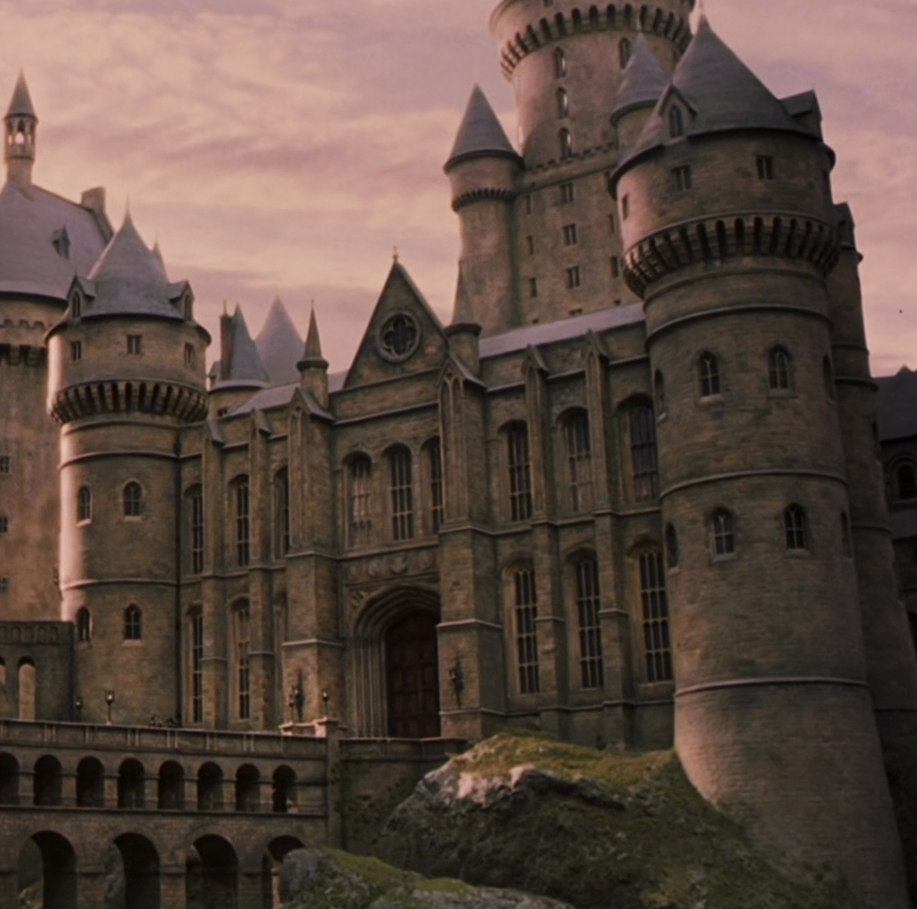
I next turned my attention to the thinner towers directly behind the ones you see here. Like the towers in front, these had their spires completely revised in Order of the Phoenix, but I’m still working on the Prisoner of Azkaban version for now. There’s still a long way to go with the Durham area of the castle, but this is already starting to really change the look of the front of Hogwarts:

One of my favorite details on these less prominent towers looks like something out of the Winchester Mystery House: a door that opens from the battered base of the tower into midair, with no balcony or stairs or anything, a good couple of stories above the ground. Take a look toward the bottom of the tower:

No idea why they included this door – nor whether it’s also present on the identical tower on the other side, though the extremely minimal photographic coverage of that area seems to suggest that it’s not. (I also know the door disappeared in the digital DH/FB version of the castle.) In any case, my model omits the door on the other tower and attempts to include as much detail on the neighboring walls as can be divined from the available reference. Those constitute one of the most hidden areas of the castle, so if you miraculously find any overhead shots that peer into it, please comment!

The beginnings of the central tower are visible right below the camera. You can also see that I’m starting to get cautious with my symmetry. While the footprint of this part of the castle was indeed symmetrical in the original Sorcerer’s Stone design, changes to the adjacent areas in the third film necessitated shortening the area on the right that corresponds to Durham’s south transept. Below I’ve given us X-ray vision so we can get an impossible angle. Take a look at the walls on the right with the three windows – those are the ones that got shortened on the opposite side.

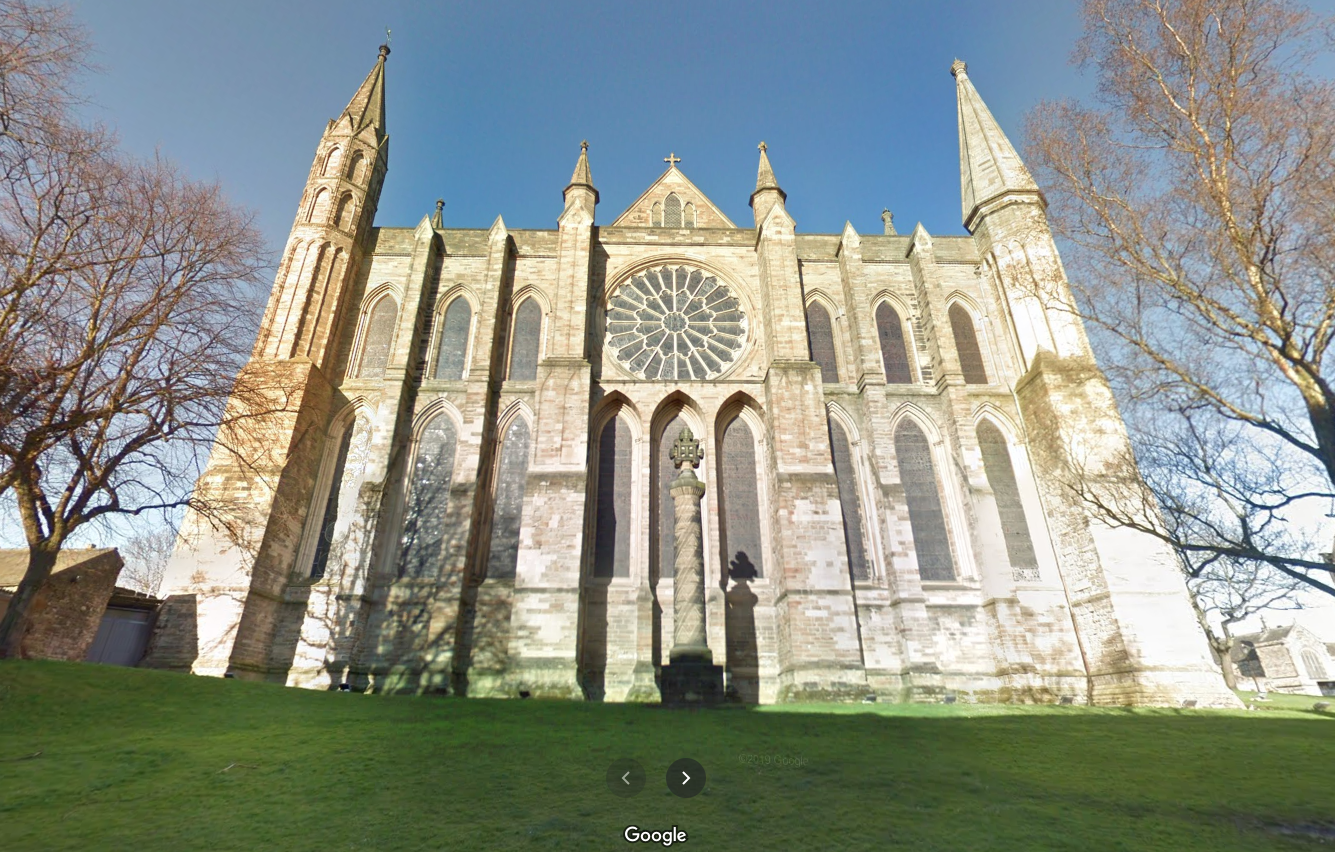
As we get to the transepts, the similarities between the Hogwarts miniature and the real-world Durham Cathedral become more and more evident. There are still discrepancies, though; I’m favoring the VFX miniature’s design in those areas, especially since this part of the actual cathedral isn’t even seen in the films.

I’ll round out today’s post with some untextured orthographic views of the entire Prisoner of Azkaban model as of this moment. Coming along!

P.S. If you haven’t subscribed to my new YouTube channel, I’d recommend it. I don’t have much content up there yet, mainly because the project is still very much a work in progress, but especially when we start getting into the final stages, I’d imagine I’ll be posting a lot of videos. I did recently post the raw visual effects shot of Hogwarts I created for the teaser for Les Fondateurs 2: La Quête de Gryffondor (The Founders 2: Gryffindor’s Quest).

(Abandoned?) Side Project: The Literary Hogwarts

Thus far, this project has focused entirely on the versions of Hogwarts seen in the films (and theme parks). But I’ve been re-reading the entire book series as well, taking notes anytime some aspect of the castle or its environs is described – after all, if you pay attention, you’ll notice that it’s a completely different castle. For a long while I had this idea that it would be cool to create a model, illustrations, and/or floor plans for the book version of Hogwarts, but I wanted to make sure I had all the information first. In the meantime, I messed around with possible overall looks in 2D, though I didn’t arrive at anything I particularly liked:

Then I finished my notes on Deathly Hallows and compiled them according to different areas of the castle and grounds. I wrote out the following guiding principles for myself:

  • The goal is to depict in 2D and/or 3D what Hogwarts and its surroundings look like in my head, factoring in all the details given in the books.
  • Where details conflict between books, priority is generally given to descriptions that occur later in the series and/or more often.
  • The word “castle” is used to describe Hogwarts, but it’s evident from the descriptions that its features don’t always line up with what one would find in a real Scottish castle from the time period. At the same time, there’s nothing to hint at the Gothic cathedral architecture we see in the films. Here, we assume that this is a thousand-year-old boarding school built by magical people, sharing a lot of architectural similarities with contemporary Muggle castles.
  • We know the layout of Hogwarts is not 100% fixed; its magical properties do cause it to behave in some unusual ways. That being said, its overall layout doesn’t seem to change, based on the details given and on the fact that students can find their way around without a map. The approach here generally assumes a fixed layout with no fudging of the available space.
  • J. K. Rowling’s two hand-drawn maps of the book layout are taken as a general guide. Where details in the maps conflict with those in the books, the latter take priority.
  • The language in the books is not always particularly precise, so there is a little room for flexibility in the interpretation.

The process I had in mind was to start with the interiors, exploring spatial relationships between the castle’s various rooms, corridors, staircases, and so on. I figured if I could figure out how Dumbledore’s office relates to Gryffindor Tower, and how Gryffindor Tower relates to the Room of Requirement, and how the Room of Requirement relates the marble staircase, etc., etc., eventually I’d have a good idea of how to bring it all together.

With this in mind, I started my first layout experiments with the ground floor, since the entrance hall, Great Hall, and marble staircase are among the most frequently (and consistently) described areas of the castle. I took a bubble diagram approach and allowed myself to get really, really messy:

The areas closest to the entrance hall and Great Hall (GH on the right) were already feeling fairly locked in, but as you move further and further away, things get less and less certain.

Moving from the castle’s ground floor to its highest peaks, I started playing around with tower size and placement, since these will greatly impact the overall look and layout of the castle. I experimented in both 2D and 3D, again allowing for extreme roughness:

The existence of a bell tower is speculative; it’s never referred to as a tower in the book, but the bell seems to boom from somewhere above, perhaps especially close to the courtyard and classroom eleven. Considering how Hogwarts is a “vast” “towering mass” of “many turrets and towers”, I don’t think I necessarily have to limit myself just to the six towers that are explicitly described.

I next looked at the seventh floor. Here’s our first (and biggest) instance of the books not agreeing with each other. In the first three books, the corridor with the portrait hole to Gryffindor Tower seems to be on the third floor, but starting in Goblet of Fire, it’s very clearly on the seventh. Here I cleaved to my guiding principles above and accepted the seventh floor as canon. My other main landmarks on this floor were the Room of Requirement (RoR) and Dumbledore’s office, so I tried to work out how they relate to each other.

This is where I started getting a little overwhelmed with this side project and stopped working on it. I was also turned off by Rowling’s misguided comments about transgender people, which didn’t help. So for now, this side project has gone dormant, possibly to be revived someday…possibly not. In the meantime, I hope you enjoy this glimpse of my process. If you’re really interested in this idea, there are some other great attempts online. I’m thinking in particular of this one and this one.

Across the Viaduct!

With the SS/COS grand staircase side project complete, let’s hop back over to the main model!

The basic layout of Hogwarts in all the films is divided into two halves – a wing to the south where you have things like the Great Hall and the marble staircase tower and Gryffindor Tower, and a north wing that’s largely based off of real-world architecture at Durham Cathedral and Alnwick Castle. There are three footpaths that connect these halves:

  • The viaduct, which is by far the most noticeable, as it’s the largest and it’s situated right out front. This one goes all the way back to Stuart Craig’s early concept designs, and it stayed virtually unchanged all the way till Deathly Hallows, when it was enlarged and reoriented to become the main route into the school. (A new stairway was added so that there were still three paths connecting the halves of the castle.)
  • The stone bridge, which is much shorter and rather higher up than the viaduct, but still quite visible. It also dates back to the early concept art.
  • The suspension bridge, which isn’t seen particularly often but remained more or less unchanged throughout the films; it just moved around a little.

Each of these was in a different state in my model: the viaduct didn’t exist at all, the stone bridge was complete, and the suspension bridge existed as an early attempt that I hid sometime last year. I decided to hold off on that till later, but I did need to get the viaduct in place so I could start work on the north wing!

There’s a lot of good reference out there, so the viaduct wasn’t particularly difficult:

You may notice I’ve begun adding some subtle atmospheric perspective or mist to some of these renders…it can really help provide some depth and separation, particularly since the entire castle is pretty homogeneous in terms of color and texture. That’s becoming more important as the castle continues to sprawl further and further out.

Anyway, with the viaduct completed, I turned my sights to the so-called viaduct entrance – as in, the entrance to the north wing from the viaduct, not the entrance to the viaduct. It’s framed by two towers that remained largely unchanged throughout the films; their spires just got a little steeper in Order of the Phoenix. They also added a window to Snape’s dungeon at the base of the one to the left, but that’s hidden from a lot of angles…and since I’m working on the Azkaban version of the castle right now, I don’t have to worry about that yet anyway.

I began adding the left tower, as well as the semicircular area at the end of the viaduct. This is also a nice silhouette of the stone bridge in the background:

Once the details started really coming together, including the shallower spires seen prior to OOTP, I mirrored the left tower to the right side as well. (The two are identical, other than the fact that one of the windows on the left tower is replaced by a door to the stone bridge.)

Here they are complete!

That smoke sim is paying dividends…I’m really digging in in this render.

The wall that connects these two towers is interesting. It forms the southernmost face of the so-called long gallery, sometimes even just referred to as the Durham building because as I said, so much of its design is based off of Durham Cathedral. That cathedral was a real-world filming location for the first two films, and there are some areas of the miniature that follow its design pretty slavishly so as to meld well with the location shoots.

This south wall, though, corresponds to an area of Durham never seen in the film. This what it looks like in real life, courtesy Google Street View:

Since they never shot any scenes right here, there was freedom to modify the design for the visual effects miniature, which looks like this:

As you can see, the miniature retains the overall shape and dimensions, but many of the details have been changed. The large rose window is replaced with a much smaller and less “churchy” version, and front doors have been added – front doors that are identical to the doors to the Great Hall, which are in turn identical to real-world doors at Christ Church at Oxford. (The doors are, however, scaled up to about twice the size – nearly 30 feet tall in the imagined real-world scale the miniature represents!) The windows are very Oxfordesque as well.

Anyway, I began adding this south wall:

I didn’t have to create those huge Oxford doors completely from scratch this time…the archways in the grand staircase side project are variations thereof, so I was able to bring one of those archways into this file and modify it appropriately. (I admit it’s kind of a hodgepodge of super-precise areas and others that are merely close to correct…ssshhh, don’t tell anyone.)

I then added the four house crests – plus the main Hogwarts crest – above the door, using bump maps to simulate the relief. Here’s a student’s-eye view from the viaduct:

It’s especially nice now that I remembered to make the windows visible! Ignore the light under the doors though.

I don’t know why I was psyching myself out prior to starting the viaduct entrance…I had this weird gut feeling that it wasn’t going to look right, or I wouldn’t be able to get the dimensions to all agree with each other, or something…but I really like the way this is turning out! Stay tuned for more updates as I add windows, the triangular area with the small rose window, and the two small spires on either side!

Side Project Complete: SS/COS Grand Staircase

Haha! It’s finished – the version of the grand staircase from the first two Potter films! Join me for a complete video tour!

To get us to this state of completion, I had to add the remaining doorways on the landings:

Then came the big window at the back. Much of the molding is taken directly from that Oxford design I created in the last post. The scene beyond the window is a bit of a cheat…I just did a nighttime render of part of the main castle model, blurred it, and dropped it in like a scenic backdrop in a real set or miniature. It’s not perfect but it gets the job done.

With these elements in place, the only thing remaining was the paintings…but I decided they’d be too much work, I’m omitting them, at least for the time being. They don’t have anything to do with my main purpose (understanding the geometry of the stairs) or my secondary purpose (examining the scale of the space).

Speaking of which, here’s the long-awaited scale comparison between the castle exterior and the grand staircase interior!

They kinda almost fit together at the intended in-universe scale! Of course, if you include all the digital extensions at the top or the extra miniature passes used to extend the bottom, that all goes out the (beautifully mullioned) window. But I think that’s kinda okay.

This concludes my work on this side project…it’s been a fun one! Now back to the main castle model.

SS/COS Moving Stairs, Continued

Let’s take a detour back to the moving staircases of Hogwarts! Thus far, as seen in this post, the environment has been very generic – just a tall rectangular space of the correct dimensions. Let’s fix that.

The biggest problem – we’re talking physically biggest – is that there’s supposed to be an extra chamber in the bottom section where the big window goes. Even if I’m not going to add the window yet, I can at least add that chamber:

Notice also the addition of a blue screen floor. This sits at the floor level of the actual set and also corresponds roughly to its footprint. Below that, I’ve lowered the main floor to reflect the slightly greater depth of the miniature. This is important because I won’t have room for the whole window if I leave the floor at set level. (The window only existed in the miniature, as far as I’m aware – though that changed in the redesigned Prisoner of Azkaban set.)

Next step is to hide the blue screen floor and add the lamps that help light the space:

(None of this is intended to look as realistic as the main castle model…the materials are very basic and these are just quick renders with Blender’s Eevee engine, which specializes in speed at the cost of physical accuracy.)

With lamps in place, let’s start adding the passageway that leads to this room from the Great Hall/Chamber of Reception area. (This was not part of the miniature as far as I’m aware, but it most definitely was part of the set.) This area is interesting because the production design draws very heavily on the real world – specifically, the steps at Christ Church Cathedral at Oxford, where the Chamber of Reception interior scenes were shot. You can see this most clearly with the large stone arches, which were built to match the ones at Christ Church, tying the sets and location shoots together into one shared imaginary space. The doors to the Great Hall set use the same arch design as well…a fact I’m grateful for, since the Warner Bros. Studio Tour was kind enough to post detailed drawings of those doors. You can see the same design on the castle exterior model as well, though I haven’t built those parts yet.

As always, things start with a confusing mess of intersecting curves that gradually coalesce into something more recognizable:

One of these arches is used as the entryway to the main room with the moving stairs:

Nice to be able to duplicate the design as needed:

Those rather ghostly outlines are caused by the same “backface culling” feature that allows us to see into the rooms from outside.

With more walls, details, and openings coming together, this area is starting to look quite a bit like the set…

…minus all the paintings, of course. As I see it, I have three basic options with those. In order of increasing difficulty:

  1. Pull a Filch and omit them entirely.
  2. Scatter the walls with a variety of paintings that look right overall.
  3. Try to match the paintings seen in the films, frame by frame, painting by painting (and fill in the gaps with option 2).

I’m currently sticking with option 1, but who knows?

In any case, there’s still more work to be done here. I need to add the rest of those smaller arched openings throughout the room, and I need to add the large, ornate window on the opposite side. Look for those in a future post! I also still hope to do some videos and scale comparisons and whatnot once this side project is complete. I might need to invest in a new GPU before then, since my current equipment is crashing if I try to render any more lamps with Eevee…

South Wing Odds ‘n’ Ends

As we’ve seen, POA featured some significant additions to the castle’s architecture, many of which were anchored by the new clock tower in the southwest corner. The last remaining piece of this section was the small gatehouse at the end of the wooden bridge. This came together easily; the only real question was how big to make the torch, since its size (relative to the building) differs significantly between the miniature and the full-sized set built at Glencoe. I ended up using the same scale as some of the castle’s other torches, which resulted in me kinda splitting the difference between the two sizes.

Believe it or not, that brings the POA additions to something of a complete state!

The south wing as a whole is still not complete, since I haven’t touched the quad interior due to scarcity of reference material. I also still need to add the walkway that connects the Chamber of Reception to the quad, but I’m holding off for the same reason.

Knowing this, I decided it was just about time to turn my attention to the castle’s north wing, much of which is derived from Durham Cathedral and Alnwick Castle. There were just a few odds ‘n’ ends to finish up first, like the fleur-de-lis pattern at the back of the Great Hall (bottom right):

Another miscellaneous item was the tree in the clock tower courtyard where Buckbeak’s executioner sits to sharpen his blade. It was fun creating its forking, branching paths by hand, following what we see in the film for the trunk and larger branches, then just going crazy with the smaller branches. I allowed Blender’s Skin modifier to bulk it all out into a basic three-dimensional form:

Whoops…I realized I’d forgotten to add the steps leading up from the courtyard to the wooden bridge. I added those, sculpted a bit more detail into the tree trunk, and used a particle system to add some leaves.

Next came ivy to help the courtyard feel a little more overgrown and wild:

I also spent some time grappling with Blender’s Mantaflow fluid simulation engine, trying to get convincing smoke to furl from the castle’s chimneys. It took the better part of a day for me to figure out that my baking errors stemmed from an apostrophe in the cache folder path (a folder descriptively named “Joe’s Stuff”). With that finally resolved, I was able to get some smoke in there:

After all the frustration, I really like how it turned out! I think that’s a nice note upon which to end the work on the south wing, at least till I can find more reference for the POA-era quad. Next we turn to the north wing, starting with the Durham section!

Completing the Wooden Bridge (POA Edition)

With the basic structure of the wooden bridge in place, I next set out to adjust the support beams below. The bridge spans a ravine and its cross beam patterns do vary. Paying close attention to their arrangement in the original miniature, I first modified the half closest to the castle:

Then it was just a matter of duplicating the structure to the far side and tweaking a spot where it’s not quite symmetrical:

This brings the bridge to a complete state…at least, without all the shaky imperfections that give the original its charm. Time to get those in there.

My weapon of choice was Blender’s Mesh Deform modifier, a nondestructive tool that allows you to manipulate one object’s shape and have it affect the shape of another. I created a much, much simpler version of the bridge – really just a 3D envelope to roughly surround it – and manually pushed different sections around to approximate the swaying structure seen in the films. Blender obligingly shifted the detailed model of the bridge to match.

Just for fun, here’s the simplified envelope visualized with a translucent material around the actual bridge model, prior to any distortion:

And when I warped that envelope (twice due to some annoying lost work), it made the detailed bridge underneath look this!

(This is after breaking apart the roof into some separate chunks with their own local coordinates so that the shingle texture would map correctly onto them.)

I’m feeling quite happy with this! It’ll look a lot better once I’ve added terrain, of course. And even just adding the gatehouse at the other end will help. I think that’ll be my next task.

Revealing the Bridge

Possibly the most noticeably new castle feature in Prisoner of Azkaban was the long, rickety wooden bridge leading from the new clock tower and courtyard to the new location of Hagrid’s hut and the Whomping Willow. (The bridge stuck around all the way through to Deathly Hallows, when it was enlarged to make its destruction more dramatic.)

As with so many things, it’s easier to build something like this in its original pristine state and then deform it appropriately. So I set out to create a perfectly straight version of the bridge with none of its characteristic undulations:

Not very recognizable yet. Adding the roof and a few more elements helps a lot:

That’s more like it!

As I began to add the trestle structures below, I threw in some textures as well:

This all came together pretty quickly, in part because everything you see above consists of a single 8-foot-long segment with an Array modifier that dynamically duplicates it 24 additional times. Then it was time to move the bridge into place as I continued to add details:

Thus far, I’d avoided all the wooden tracery that gives the bridge its ornate look. There are actually two designs used on different parts of the bridge, something I’d never noticed before. I recreated both:

Next steps will be to adjust the bottoms of the supports to match the ravine below, adjust the texturing on the roof, and ultimately bend and twist the segments of the bridge to give it its final wobbly look.

Completed: Clock Tower & Hospital Wing

Short post today. I finished the clock tower! The only two pieces I still needed to add were the big window in back and the enormous pendulum that hangs down through the entry. Both are now in place! (I’d avoided the window for ages because I couldn’t find a clear shot of the tracery. Then I randomly came across a shot of a window at King’s College Chapel and realized that it was the exact same design. Problem solved!)

Around the other side of the building, I’ve been really hesitant to finish the hospital wing because the placement of the detailing toward the bottom will depend on the detailing of the surrounding quad walls, and I haven’t been able to add those due to insufficient reference. But I bit the bullet and at least took care of the top section:

I’ll still need to add the windows and so forth down below once I’m able to complete the quad. In the meantime, I’m gearing up to probably tackle the (gulp!) wooden bridge next.

More Clock Tower Courtyard

After creating the major building blocks of the clock tower courtyard, it was just a matter of carefully putting them all together. Here’s a first render with the modeling all finished:

This, of course, is the courtyard in relatively pristine condition, but it’s supposed to be rather run-down and overgrown. As with the fountain, I used Boolean modifiers to knock out chunks of the appropriate walls and arches. The great thing about this method of destruction is it’s…well, non-destructive. Everything is still there – it’s just hidden.

As I added some different ground textures, I also started layering in vegetation – a first for this project. Blender’s hair simulation allowed me to grow pretty satisfactory grass along the courtyard. I weight-painted the distribution so so it would clump around the fountain, walls, and columns. This clumping does vary between films and between sets/miniatures; I aimed to split the difference in a way that felt natural. (I haven’t worked much with particle systems…imagine my surprise and delight when I discovered that my render times barely took a hit!)

It’ll need more work, but it’s more grass than I had before!