The 3D model of the Prisoner of Azkaban castle keeps chugging along! After completing that first greenhouse, I duplicated it three more times:
These four all share the exact same design, but then there are four more along the east side of the Durham area, and their dimensions are a little different, so I had to create (and thrice duplicate) a new variation over there:
And then at last there is Greenhouse Three, which is a smaller lean-to on the castle’s outer wall. (You can catch a glimpse of it in the above render.) This is the greenhouse where the Herbology lesson with the mandrakes takes place. It’s got its own unique design, so I took care of that next. Some of the dimensions here don’t line up quite as precisely as I’d like, but I’ve tried to minimize the number (and visibility) of compromises as much as I can:
You can also see that I’ve also added rust, adjusted the weathering of the wood, and started with the footpaths between the greenhouses. I even threw in one of the largest vines that snakes its way out of the greenhouses, visible toward the bottom right:
In the background, you’ll see that I’ve begun the curtain walls around the greenhouse area. These were actually there in the original design of the castle, even before the greenhouses were added in Chamber of Secrets; they just had to be pushed outward a bit to accommodate that addition. Here’s a better view of their progress:
See where the wall stops on the right? That’s going to be the site of the final greenhouse structure, the domed conservatory that also acts as the only way out of the greenhouse courtyard and into the grounds. But I’m going to save that for the next post. I’m hoping to even share something I’ve never seen before: an interior view of that conservatory*!
In the meantime, I’ll leave you with a slightly different aerial view of the POA model so far. Still plenty more to be done, but we’re getting closer!
* If they happened to include the conservatory interior in any of the video games, let me know! I haven’t played them but I’ve looked through longplays on YouTube and never spotted it.
I promise we’re going to get to sculpting the decorative dragons from the tops of the greenhouses, but first I wanted to share a “before and after”. A reader who goes by kronkolweg pointed out that my castle’s bricks were a little big. It had already been starting to bug me a bit, and this was just the kick I needed to get off my butt and fix it.
For the original castle miniature, one or more brick textures were hand-sculpted, molded, mass-produced in FastCast resin, and glued to the miniature’s wooden understructure before being hand-painted. There was a transition to more detailed plaster-based textures starting in Chamber of Secrets – I’m not sure if any of the original resin brick textures ultimately survived through to the final Half-Blood Prince iteration of the miniature. In any case, the overall effect is the same, and my procedural brick material mimics it without requiring me to individually texture each wall. The thing is, when I created this material (as documented here, here, and here), I had much less of the castle built, which meant I had fewer points of comparison for the scale of the bricks. Frankly, I don’t remember how much actual measurement there was, as opposed to simple eyeballing, but it’s become clear that the results are a little oversized.
So, being the Excel nut that I am, I sat down and made a spreadsheet. I took horizontal and vertical brick counts for various areas of the castle, comparing my model to the miniature. There’s a certain margin of error in the scale of my castle, and the bricks of the miniature are not necessarily of completely uniform scale, so I averaged the different measurements and arrived at my brick adjustments: a 34% reduction in width and a 21% reduction in height.
The interactive sliders below compare the old larger bricks (left) to the new smaller bricks (right):
The difference is subtle from any real distance, but it’s more accurate now, which always feels good.
With this tweak completed, I shifted my attention to those greenhouse dragons! Fortunately, they’re all identical, so I only had to sculpt one. I did so in a separate file, and – well, if you’re interested, just watch part 1 of the video.
Frankly, I can’t get enough of these sliders, so let’s compare the base mesh to the full-resolution sculpt…
…and now comparing the full-resolution sculpt to the retopologized version with normal mapped details:
If the differences seem really minor…good! The point of retopo is to vastly simplify the geometry, which makes the asset a lot more manageable. The sculpt on the left has over 1.3 million faces; the retopologized version on the right only has around 1,500. Much easier on the computer! Of course, that eliminates a lot of details; baking and applying a normal map is a way of faking those back in, hopefully with an end result that’s nearly indistinguishable from the original sculpt. (In this particular case, there are a few small artifacts in the shading, but these are not noticeable when color is applied and we move the camera away a little.)
You can watch this whole process in part 2 of the video:
The retopology process is still a lot slower, harder, and more frustrating for me than I’d like, but in the end I was satisfied with the result, so I created an appropriate material, brought the mesh over into the main castle model, and duplicated it to the appropriate spots on the single greenhouse I’d already created. Voilà!
That’s a wrap for the dragon, and for this greenhouse overall! The next steps will be to duplicate this greenhouse and create the other two design variations on it. Then I’ll be able to move on to the domed conservatory, the curtain walls surrounding the greenhouses, and hopefully some ground cover and footpaths. Be sure to subscribe to this blog and the YouTube channel for updates as they come!
Hogwarts got its greenhouses added in Chamber of Secrets. They sat undisturbed in what was formerly an open courtyard until Deathly Hallows Part 2, at which point some adjacent architecture was removed and the greenhouses expanded a bit to fill the empty space.
My own 3D recreations of these greenhouses provided some fun challenges right off the bat. As I alluded to in the previous post, I was surprised to realize that they are not all identical. I mean, I knew that there was a lean-to attached to the wall of the castle as well as a domed conservatory out front, but I’d assumed the other greenhouses were octuplets. No such luck. The ones that run parallel to the Long Gallery aren’t quite as long as the ones that run east-west along the north facade, though they’re made of the same basic building blocks.
As always, I wanted to get the details and dimensions right. Without much in the way of detailed technical drawings, I resorted to making some quick-‘n’-messy diagrams to organize my thoughts and measurements.
Quick and messy, like I said, but it really helped me figure out how to proceed with the modeling. I started framing just one wall of just one greenhouse, laying out the largest support posts every 10 feet. Some of these will eventually have sculpted dragons on top, but those’ll come in a future blog post:
Blender’s Array modifier makes it easy to just work on one segment and have all the others update accordingly. No textures at this point either – I knew the white paint would later need to be scuffed up a bit.
Adding more details, temporarily pretending that the greenhouses don’t have any doors:
The familiar question of whether to follow the miniature or the set cropped up yet again. Actually, it’s more complicated. The greenhouses didn’t show up often in the films, but they got a glorious establishing shot in Chamber of Secrets. The VFX team put together a very impressive shot that moves across the lake, over the grounds, and right through an open window into the lean-to, AKA Greenhouse Three. The shot combines the 1/24th-scale Hogwarts miniature (and CG background) with a live-action plate shot on the greenhouse set, and it’s pretty seamless, especially for the early 2000s. But the camera has to go right up to the greenhouses, exposing a lot of detail…and at 1/24th scale, some of that detail wasn’t going to hold up. So they built separate 1/8th-scale miniatures of the three greenhouses the camera would get closest to. For whatever reason, while those larger bespoke miniatures match the design of the set, the main castle miniature is slightly different. I’m mainly talking about the windowpanes – they’re narrower and more numerous in the main castle miniature.
Sooooo…what to do? Follow the set and 1/8th-scale miniature, or follow the 1/24th-scale miniature? I take these decisions on a case-by-case basis, and for the greenhouses, I ultimately went with the wider windowpanes from the set and 1/8th-scale miniature (for a variety of reasons).
Here we go – doors and details and preliminary materials.
Starting to add the beams for the roof:
Hey, it looks kinda like a greenhouse!
By this point, I had been really debating exactly how much interior detail to do. This project file just keeps getting bigger and bigger, which means my computer has an increasingly hard time keeping up. It’s thus in my best interest to only include the details I need – but of course, the greenhouses are rather transparent, and I still wanted to them to “read” correctly from the outside. Once I had them fully enclosed, I was able to see how the materials interacted with the light and decide how much interior detail I needed to include. Not much, it turns out, as long as I don’t let the glass get too crystal-clear:
Some of the geometry got slightly messy as I went around the corners of the greenhouse, trying to respect all the various reference images as much as possible, but I’m pretty happy with the result:
For a moment, I thought all I had left to do was sculpt the decorative dragons on top, but then I remembered that I needed to pop the roof hatches too – otherwise, how would the camera float in for that great shot in COS?
(These are all open at random angles, BTW…I’m anal, but not anal enough to match them exactly.)
Anyway, I’ll be sculpting the dragons next, but we’ll save that for a future post, hopefully in video form. I’ll also need to create all the other greenhouses using the same components. See you next time!
My Prisoner of Azkaban model is really coming along now. I’ve continued into the area where Durham Cathedral architecture starts to collide with Alnwick Castle architecture. I also tweaked some of the wood textures and added some narrow slits I missed on the Dark Tower.
The greenhouses will eventually sit in this area, but I’m more interested in the Alnwick stuff at the moment. First up: a short structure that’s virtually identical to the warder’s tower at Alnwick. (I mean, it kinda had to be, since they shot stuff on location there!) I’d actually already started this structure early last year. You can see it in this old render from the very beginning of this blog:
This was all done in a completely separate file, and of course it was before I had created my trusty Hogwarts brick materials. Feel free to read more about it in this early post.
Bringing this model over into the main file was relatively easy, especially since I’d built it to the same scale to facilitate this eventual migration. Here’s a rather similar angle of the exact same partial model, but properly positioned and textured:
Time to flesh out the warder’s tower. I’m going to keep calling it that, by the way; to my knowledge, it has no in-universe name. It’s simply designated as Building P on the technical drawings, and I’m not going to expect myself (much less you!) to remember that.
Anyway, since this model I’d previously started was based purely on the real-world Alnwick location, I did have to make some tweaks to match the VFX miniature built for the Potter films. (I split the difference in a few spots.)
I also had to decide what to do about the Hogwarts-style torches that flank the archway – they were temporarily installed at Alnwick for the shoot, but when they were similarly added to the miniature, they were moved inward and upward to adjacent walls closer to the archway. I went back and forth on this quite a bit before ultimately deciding to accept the location shoot as canon, not the miniature. I felt this choice was bolstered significantly by the fact that this part of the miniature was never actually seen in the films, whereas the full-sized torches are prominently visible in multiple scenes shot on location for both SS and COS. (I still think the other way would been a fully defensible choice too, though.)
Here we are with the torches added, the remainder of the structure built, and some of the remaining details incorporated:
I’m really noticing the stark architectural contrast between Durham and Alnwick. There are so many more funky angles in the Alnwick-derived areas of Hogwarts…they really stand out quite a bit compared to the rest of the school, where the footprint is dominated by right angles, octagons, and circles. This isn’t news to me, but the contrast is especially noticeable when you’ve just come off a long stretch of essentially modelling a cathedral. Alnwick Castle is a lot more haphazard and organic, and of course it was simply built for very different purposes. I like these areas of Hogwarts – and I don’t think that’s only due to nostalgia – but I can understand why Stuart Craig was eager to tidy up the castle’s profile in the later films.
Here’s a POV shot from over by the base of the bell towers with this side of the warder’s tower complete. This view would only be unobstructed in the first film because as I said, this is where the greenhouses went in.
On a COMPLETELY unrelated note, I’ve already begun laying the groundwork for the next structures I’m going to tackle. I don’t have anything to show yet, but I’ll give you a hint: there are 8.5 of them, and despite my longtime assumption that they were all the same size, they’re actually not.
Yup. Completely unrelated. Anyway, see ya next time!
Here we go – those bell towers need to be completed. I finished the intricate openings and decorative motifs in the middle parts of the towers. Fortunately, these never changed in any of the films, even when the tops of the towers changed, so I only had to create them this once!
Then, to complete the bell towers, I added the tops of the towers, which are very similar to the top of the central tower – just shrunk by about 23%, and with a few minor design differences. I was grateful for this not only because it allowed me to reuse elements from the central tower, but also because I discovered a mistake in the central tower in the process. All fixed now!
Of course, there are two versions of the bell towers: the original design, and this Prisoner of Azkaban redesign. With the latter complete, I decided to switch over and do the former as well!
Sadly, photogrammetry is no help when it comes to the original tops of the bell towers, but their simple design is pretty easy to eyeball. A few of the smallest details were educated guesses – for instance, I’ve added windowpanes in a few areas that could just be openings.
Anyway, enough talk – let’s compare the two designs! Drag the slider below to compare the original Sorcerer’s Stone design (left) to the Prisoner of Azkaban redesign (right). (The smaller tower above the Long Gallery will also come and go, since that was added in Chamber of Secrets.)
Here’s a reverse angle:
Surprise – there’s the original design of the central tower, too! I snuck that in there as well.
Viewing the whole castle from lake level, you can really see what a difference this simple redesign of these three towers made in the castle’s overall silhouette and character. My model is also looking a lot more complete overall!
Adding the wall between the bell towers was easy, since all of its elements are similar to stuff I’ve already created. I briefly considered tackling the greenhouses next, but then I got distracted by the adjacent walls that bring us to the training grounds tower and the middle courtyard, which will probably be where I go in our next blog post.
In the meantime, Ms. Rowling continues to tweet disappointingly misguided things about transgender people. For what it’s worth – if you, dear reader, happen to be trans, non-binary, or a member of any other oft-marginalized community, know that this Hogwarts (incomplete though it may be) will always be there to welcome your awesome self, and so will I.
Work on my 3D model of the Prisoner of Azkaban castle continues! The area that corresponds to Durham Cathedral’s north transept is now complete:
I shifted my way attention to the adjacent walls that correspond to the cathedral’s nave and north aisle, otherwise known at Hogwarts as the Long Gallery. I was surprised to notice that the windows and buttresses are not evenly spaced. In fact, the upper windows don’t even align with the lower windows. I fought this briefly, thinking I must be mistaken, but nope, I’m pretty positive none of this stuff lines up in the miniature – and not in ways that match the imperfections of Durham!
I wanted to match the miniature as closely as I could, so I started by adding placeholders for the bell towers at the other end of the Long Gallery to help me lock in my spacing:
The stand-ins are shorter than the talent, and their faces are kinda blank, but hey, what are you gonna do.
At this point I discovered that my entire Long Gallery area was about a foot too far east, so I took a few minutes to shift it over and swivel the viaduct accordingly (a whopping 0.25°). A foot’s not a lot – at 1:24 scale, that comes out to half an inch in the miniature – but it helps to line things up as closely as I can.
With that done, I blocked in the walls and roofs of the long gallery:
Then came the details, with all their subtly variable spacing. Here’s an orthographic view from the side – a perspective-less elevation view, in other words. All the misalignment is totally intentional, and it should be pretty accurate (although I made further tweaks after this render).
Of course, it’ll look better once the far side is enclosed as well; I’m not working on that courtyard side yet.
In the meantime, my next task was to create the 15-foot-wide octagonal tower on the roof of the Long Gallery. This was added in Chamber of Secrets; my guess is that it was a purely aesthetic decision, perhaps motivated by the fact that the establishing shot of the greenhouses shows that area more clearly than we had seen in the first film.
Pretty quick add, and it never changed in any of the later films. Just gotta make sure I exclude it from the eventual Sorcerer’s Stone version of the model!
Next up? The bell towers! While the central tower isn’t very similar to the one at Durham Cathedral, the bell towers have a lot more in common with their Durham counterparts, the North and South Galilee Towers. In fact, the basic impression of the original design in the first two films is that they’ve simply knocked a few of the pinnacles off and added a conical roof to each tower. (Closer inspection does reveal some subtle differences in the details, as with all the Durham areas.) In Prisoner of Azkaban, the conical roofs were replaced with taller belfries and octagonal spires that echo the redesigned central tower, but the lower sections still bear a striking resemblance to Durham Cathedral. They also get a lot more intricate than the central tower, which makes them a little intimidating. I decided to start with the bottom portion, which is all based off stuff I’ve already made:
Now for the hard stuff! Okay, it’s not exactly hard…it’s just…a lot.
Halfway there:
The openings are tricky. In some shots in the early films, you can very unambiguously see straight through from one side to another, but in some photos of the miniature from the Warner Bros. Studio Tour, it looks like there are interior walls. After finding other photos that seem to show straight through in the Studio Tour as well, I decided to keep mine hollow, as you see above. Hopefully that’s still accurate to the later films.
Next time we’ll finish the bell towers, add the wall between them, and continue around this northern part of the castle!
Something different today! By request, I’ve documented my 3D modeling process with a sped-up screen capture. (You’re welcome, Pete!) Watch me work on the area that corresponds to the transepts of Durham Cathedral, as well as the Prisoner of Azkaban version of the central tower. I’ve tried to keep the commentary relevant no matter whether you’re a fellow Blender user or not.
If you’re interested in more videos like this, comment here or on the video to let me know! They take some extra work but I can do more if there’s enough demand. Don’t forget to subscribe to the YouTube channel too!
Here are a few renders of the progress seen in the video. As always, click for larger versions:
After finishing the video, I put the last few touches on the central tower:
I ended my last post on a positive note. Sadly, my enthusiasm was perhaps premature. As soon as I started adding windows to the viaduct entrance, I ran into the sorts of issues with dimensions and proportions that so often plague projects like this, at least when you don’t have complete technical drawings at your disposal. The top of window X is supposed to be even with the top of window Y, which is about a third as tall as window X, but if I move window X to be even with window Y, it’s no longer in the right place relative to feature Z…that sort of thing. Really frustrating.
Fortunately, I’m not as much of a perfectionist as I used to be, so I pressed onward, accepting the fact that close comparisons with the original Hogwarts miniature would still reveal small discrepancies. The overall dimensions are still very accurate – welllllllll beyond the accuracy needed for a casual viewer to be able to say, “Hey, that’s Hogwarts!” And thanks to the photogrammetry I’ve been able to pull from various videos of the castle, I shouldn’t end up with any errors that snowball into large-scale catastrophes. (Famous last words?)
The windows look funny without nothing but sky and water on the other side, but that will be resolved when I enclose the other sides of the building. For now, the south facade at least is complete.
I next turned my attention to the thinner towers directly behind the ones you see here. Like the towers in front, these had their spires completely revised in Order of the Phoenix, but I’m still working on the Prisoner of Azkaban version for now. There’s still a long way to go with the Durham area of the castle, but this is already starting to really change the look of the front of Hogwarts:
One of my favorite details on these less prominent towers looks like something out of the Winchester Mystery House: a door that opens from the battered base of the tower into midair, with no balcony or stairs or anything, a good couple of stories above the ground. Take a look toward the bottom of the tower:
No idea why they included this door – nor whether it’s also present on the identical tower on the other side, though the extremely minimal photographic coverage of that area seems to suggest that it’s not. (I also know the door disappeared in the digital DH/FB version of the castle.) In any case, my model omits the door on the other tower and attempts to include as much detail on the neighboring walls as can be divined from the available reference. Those constitute one of the most hidden areas of the castle, so if you miraculously find any overhead shots that peer into it, please comment!
The beginnings of the central tower are visible right below the camera. You can also see that I’m starting to get cautious with my symmetry. While the footprint of this part of the castle was indeed symmetrical in the original Sorcerer’s Stone design, changes to the adjacent areas in the third film necessitated shortening the area on the right that corresponds to Durham’s south transept. Below I’ve given us X-ray vision so we can get an impossible angle. Take a look at the walls on the right with the three windows – those are the ones that got shortened on the opposite side.
As we get to the transepts, the similarities between the Hogwarts miniature and the real-world Durham Cathedral become more and more evident. There are still discrepancies, though; I’m favoring the VFX miniature’s design in those areas, especially since this part of the actual cathedral isn’t even seen in the films.
I’ll round out today’s post with some untextured orthographic views of the entire Prisoner of Azkaban model as of this moment. Coming along!
P.S. If you haven’t subscribed to my new YouTube channel, I’d recommend it. I don’t have much content up there yet, mainly because the project is still very much a work in progress, but especially when we start getting into the final stages, I’d imagine I’ll be posting a lot of videos. I did recently post the raw visual effects shot of Hogwarts I created for the teaser for Les Fondateurs 2: La Quête de Gryffondor (The Founders 2: Gryffindor’s Quest).
Thus far, this project has focused entirely on the versions of Hogwarts seen in the films (and theme parks). But I’ve been re-reading the entire book series as well, taking notes anytime some aspect of the castle or its environs is described – after all, if you pay attention, you’ll notice that it’s a completely different castle. For a long while I had this idea that it would be cool to create a model, illustrations, and/or floor plans for the book version of Hogwarts, but I wanted to make sure I had all the information first. In the meantime, I messed around with possible overall looks in 2D, though I didn’t arrive at anything I particularly liked:
Then I finished my notes on Deathly Hallows and compiled them according to different areas of the castle and grounds. I wrote out the following guiding principles for myself:
The goal is to depict in 2D and/or 3D what Hogwarts and its surroundings look like in my head, factoring in all the details given in the books.
Where details conflict between books, priority is generally given to descriptions that occur later in the series and/or more often.
The word “castle” is used to describe Hogwarts, but it’s evident from the descriptions that its features don’t always line up with what one would find in a real Scottish castle from the time period. At the same time, there’s nothing to hint at the Gothic cathedral architecture we see in the films. Here, we assume that this is a thousand-year-old boarding school built by magical people, sharing a lot of architectural similarities with contemporary Muggle castles.
We know the layout of Hogwarts is not 100% fixed; its magical properties do cause it to behave in some unusual ways. That being said, its overall layout doesn’t seem to change, based on the details given and on the fact that students can find their way around without a map. The approach here generally assumes a fixed layout with no fudging of the available space.
J. K. Rowling’s two hand-drawn maps of the book layout are taken as a general guide. Where details in the maps conflict with those in the books, the latter take priority.
The language in the books is not always particularly precise, so there is a little room for flexibility in the interpretation.
The process I had in mind was to start with the interiors, exploring spatial relationships between the castle’s various rooms, corridors, staircases, and so on. I figured if I could figure out how Dumbledore’s office relates to Gryffindor Tower, and how Gryffindor Tower relates to the Room of Requirement, and how the Room of Requirement relates the marble staircase, etc., etc., eventually I’d have a good idea of how to bring it all together.
With this in mind, I started my first layout experiments with the ground floor, since the entrance hall, Great Hall, and marble staircase are among the most frequently (and consistently) described areas of the castle. I took a bubble diagram approach and allowed myself to get really, really messy:
The areas closest to the entrance hall and Great Hall (GH on the right) were already feeling fairly locked in, but as you move further and further away, things get less and less certain.
Moving from the castle’s ground floor to its highest peaks, I started playing around with tower size and placement, since these will greatly impact the overall look and layout of the castle. I experimented in both 2D and 3D, again allowing for extreme roughness:
The existence of a bell tower is speculative; it’s never referred to as a tower in the book, but the bell seems to boom from somewhere above, perhaps especially close to the courtyard and classroom eleven. Considering how Hogwarts is a “vast” “towering mass” of “many turrets and towers”, I don’t think I necessarily have to limit myself just to the six towers that are explicitly described.
I next looked at the seventh floor. Here’s our first (and biggest) instance of the books not agreeing with each other. In the first three books, the corridor with the portrait hole to Gryffindor Tower seems to be on the third floor, but starting in Goblet of Fire, it’s very clearly on the seventh. Here I cleaved to my guiding principles above and accepted the seventh floor as canon. My other main landmarks on this floor were the Room of Requirement (RoR) and Dumbledore’s office, so I tried to work out how they relate to each other.
This is where I started getting a little overwhelmed with this side project and stopped working on it. I was also turned off by Rowling’s misguided comments about transgender people, which didn’t help. So for now, this side project has gone dormant, possibly to be revived someday…possibly not. In the meantime, I hope you enjoy this glimpse of my process. If you’re really interested in this idea, there are some other great attempts online. I’m thinking in particular of this one and this one.
With the SS/COS grand staircase side project complete, let’s hop back over to the main model!
The basic layout of Hogwarts in all the films is divided into two halves – a wing to the south where you have things like the Great Hall and the marble staircase tower and Gryffindor Tower, and a north wing that’s largely based off of real-world architecture at Durham Cathedral and Alnwick Castle. There are three footpaths that connect these halves:
The viaduct, which is by far the most noticeable, as it’s the largest and it’s situated right out front. This one goes all the way back to Stuart Craig’s early concept designs, and it stayed virtually unchanged all the way till Deathly Hallows, when it was enlarged and reoriented to become the main route into the school. (A new stairway was added so that there were still three paths connecting the halves of the castle.)
The stone bridge, which is much shorter and rather higher up than the viaduct, but still quite visible. It also dates back to the early concept art.
The suspension bridge, which isn’t seen particularly often but remained more or less unchanged throughout the films; it just moved around a little.
Each of these was in a different state in my model: the viaduct didn’t exist at all, the stone bridge was complete, and the suspension bridge existed as an early attempt that I hid sometime last year. I decided to hold off on that till later, but I did need to get the viaduct in place so I could start work on the north wing!
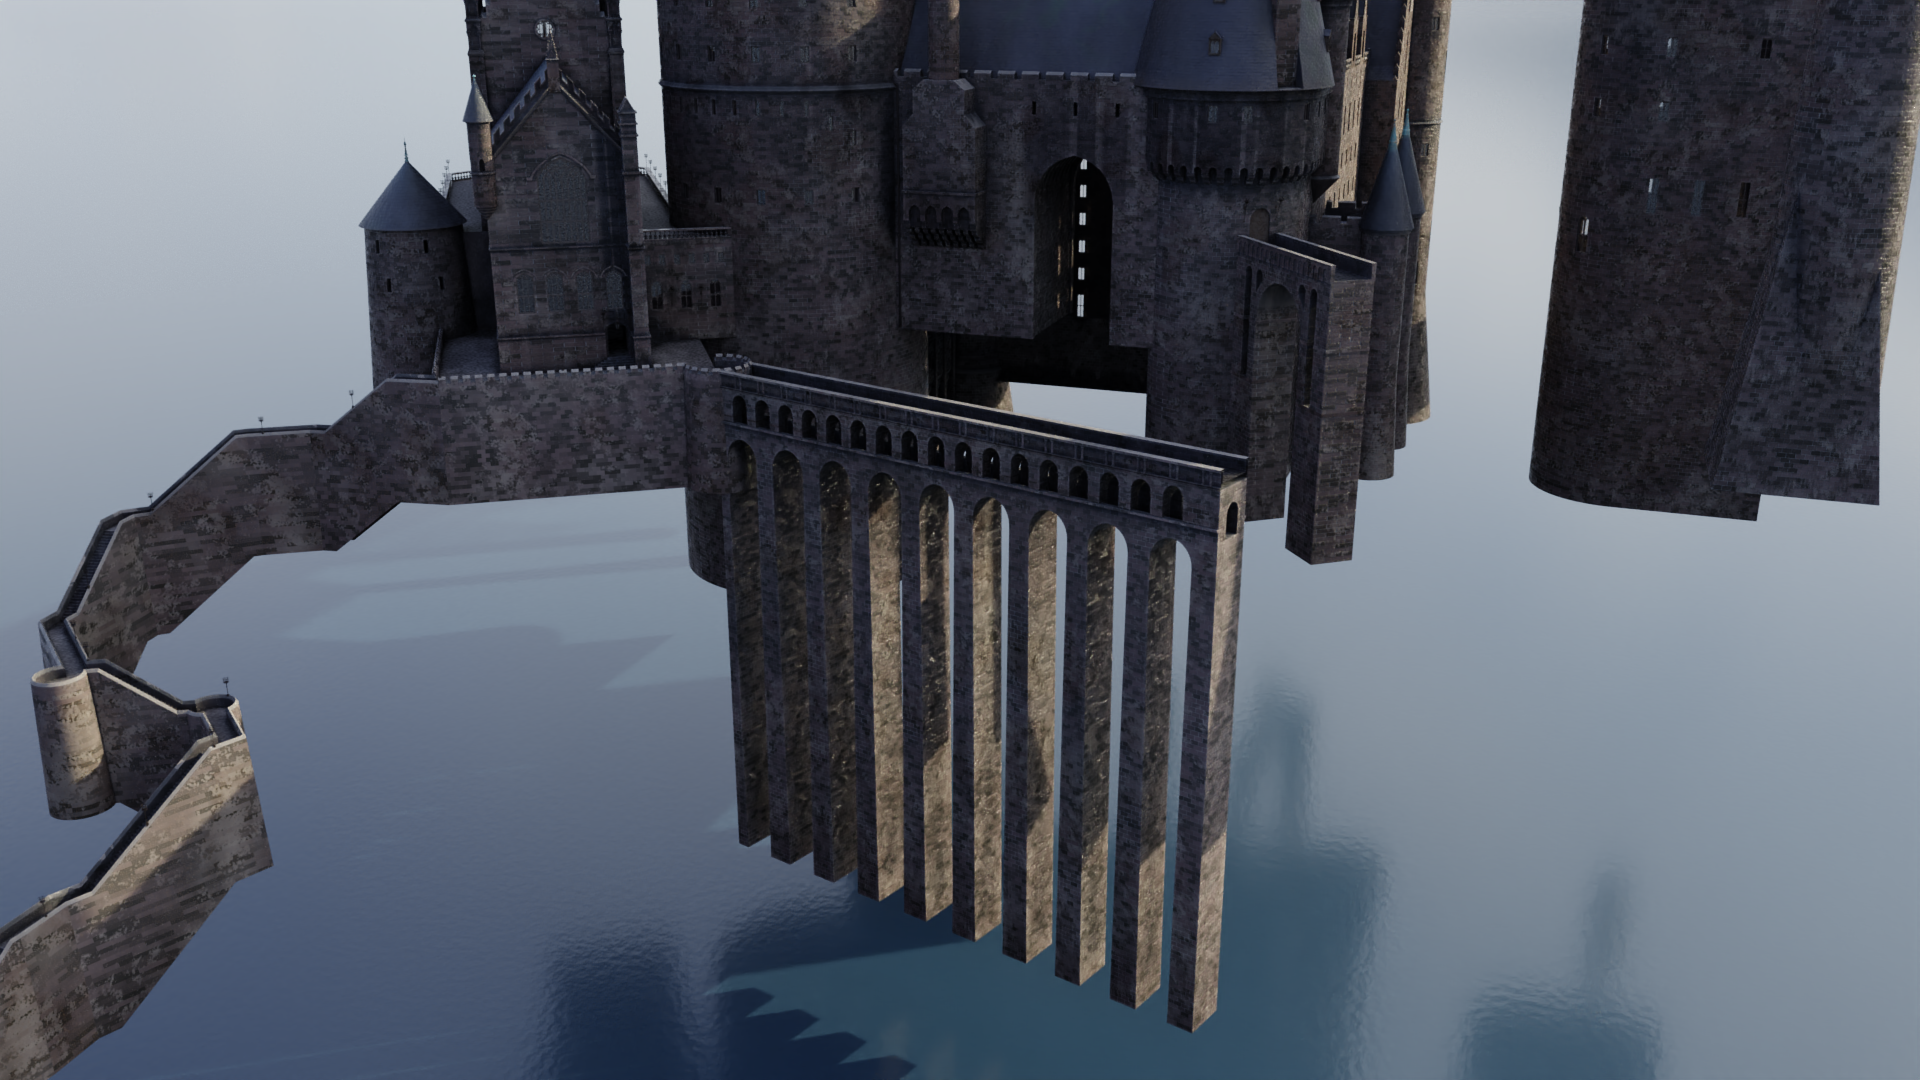
There’s a lot of good reference out there, so the viaduct wasn’t particularly difficult:
You may notice I’ve begun adding some subtle atmospheric perspective or mist to some of these renders…it can really help provide some depth and separation, particularly since the entire castle is pretty homogeneous in terms of color and texture. That’s becoming more important as the castle continues to sprawl further and further out.
Anyway, with the viaduct completed, I turned my sights to the so-called viaduct entrance – as in, the entrance to the north wing from the viaduct, not the entrance to the viaduct. It’s framed by two towers that remained largely unchanged throughout the films; their spires just got a little steeper in Order of the Phoenix. They also added a window to Snape’s dungeon at the base of the one to the left, but that’s hidden from a lot of angles…and since I’m working on the Azkaban version of the castle right now, I don’t have to worry about that yet anyway.
I began adding the left tower, as well as the semicircular area at the end of the viaduct. This is also a nice silhouette of the stone bridge in the background:
Once the details started really coming together, including the shallower spires seen prior to OOTP, I mirrored the left tower to the right side as well. (The two are identical, other than the fact that one of the windows on the left tower is replaced by a door to the stone bridge.)
Here they are complete!
That smoke sim is paying dividends…I’m really digging in in this render.
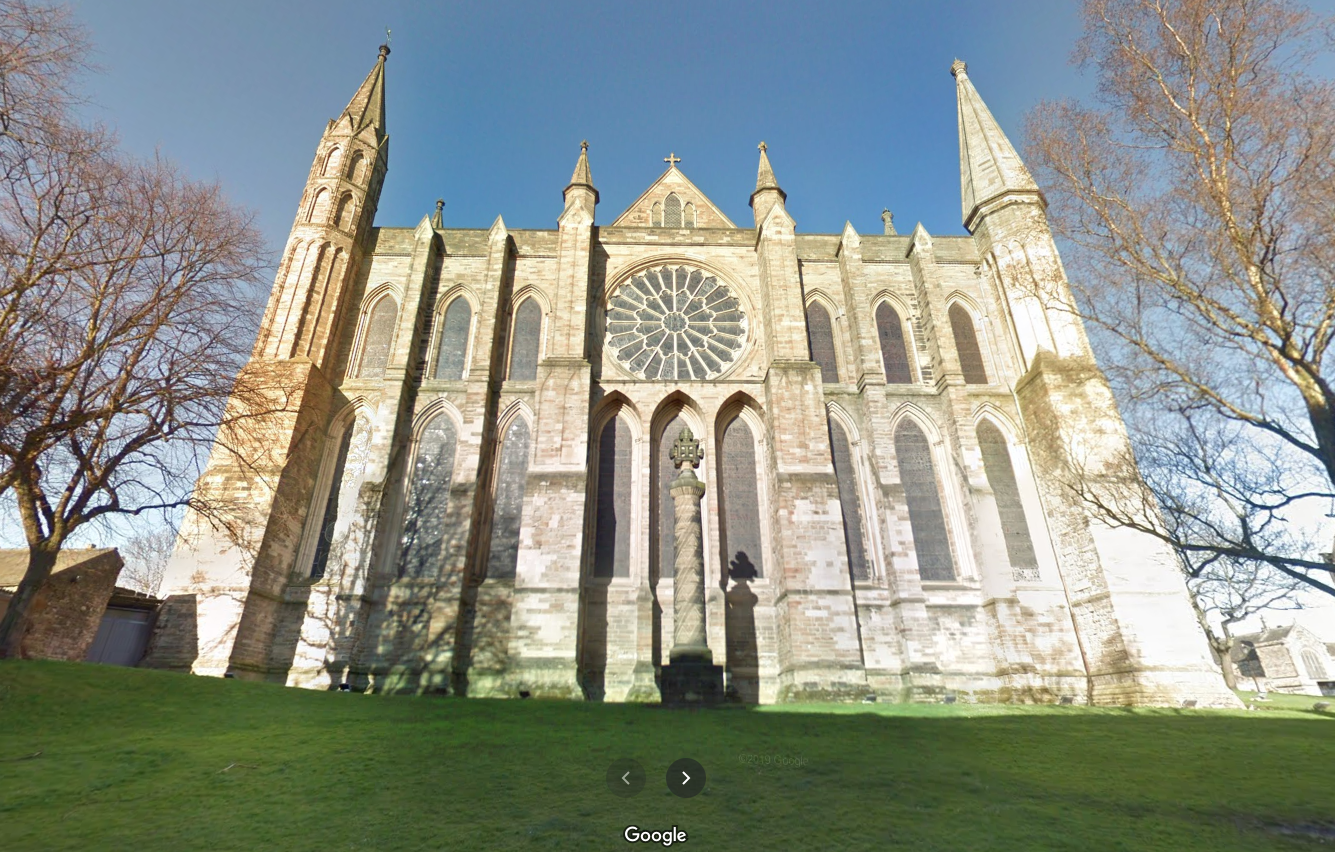
The wall that connects these two towers is interesting. It forms the southernmost face of the so-called long gallery, sometimes even just referred to as the Durham building because as I said, so much of its design is based off of Durham Cathedral. That cathedral was a real-world filming location for the first two films, and there are some areas of the miniature that follow its design pretty slavishly so as to meld well with the location shoots.
This south wall, though, corresponds to an area of Durham never seen in the film. This what it looks like in real life, courtesy Google Street View:
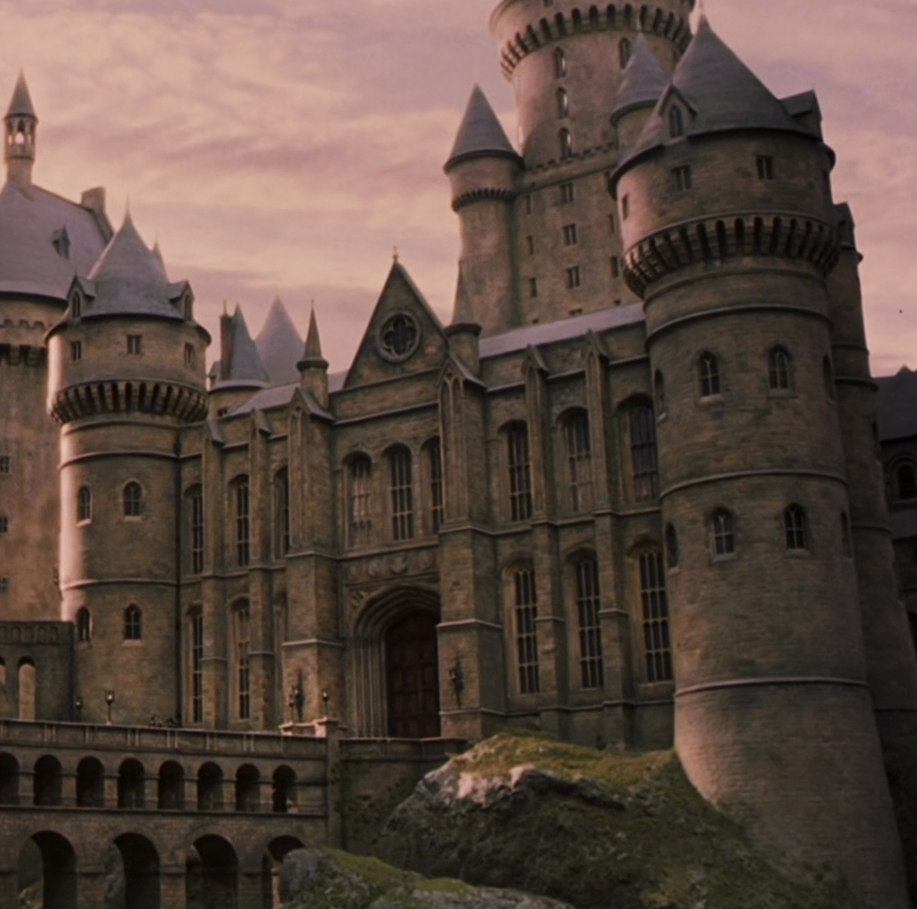
Since they never shot any scenes right here, there was freedom to modify the design for the visual effects miniature, which looks like this:
As you can see, the miniature retains the overall shape and dimensions, but many of the details have been changed. The large rose window is replaced with a much smaller and less “churchy” version, and front doors have been added – front doors that are identical to the doors to the Great Hall, which are in turn identical to real-world doors at Christ Church at Oxford. (The doors are, however, scaled up to about twice the size – nearly 30 feet tall in the imagined real-world scale the miniature represents!) The windows are very Oxfordesque as well.
Anyway, I began adding this south wall:
I didn’t have to create those huge Oxford doors completely from scratch this time…the archways in the grand staircase side project are variations thereof, so I was able to bring one of those archways into this file and modify it appropriately. (I admit it’s kind of a hodgepodge of super-precise areas and others that are merely close to correct…ssshhh, don’t tell anyone.)
I then added the four house crests – plus the main Hogwarts crest – above the door, using bump maps to simulate the relief. Here’s a student’s-eye view from the viaduct:
It’s especially nice now that I remembered to make the windows visible! Ignore the light under the doors though.
I don’t know why I was psyching myself out prior to starting the viaduct entrance…I had this weird gut feeling that it wasn’t going to look right, or I wouldn’t be able to get the dimensions to all agree with each other, or something…but I really like the way this is turning out! Stay tuned for more updates as I add windows, the triangular area with the small rose window, and the two small spires on either side!