Wow, I did not mean for the last couple months to slow down so much! I’ve been busy with some unrelated projects. My apologies for the radio silence! But I thought I’d at least share a brief update.
As you can see in the new render above, I’ve been continuing to work on the training grounds tower – the version that existed from Chamber of Secrets through Order of the Phoenix. I can see why Stuart Craig took the opportunity to replace it with a much simpler tower in Half-Blood Prince, but I do have a soft spot for this rather charmingly awkward design.
One thing I’d never really thought about was the huge number of very diverse and irregularly spaced windows on this structure. I decided to start carving out the holes before worrying about the frames and panes; that way I could easily make adjustments. My reference images are limited for some of these areas…I’ve had to accept that some of my window holes may be off by a few feet or have a slightly different design:
It ain’t perfect, but it’s a start. The bottom parts of these walls are the hardest, at least if the goal is to be accurate to the miniature. You would think they’d be identical to the corresponding spots at Alnwick Castle – spots that are even seen in the backgrounds of the location shoots in the first film – but you’d be wrong. I’ve seen enough to know that there are differences…just not enough to know exactly what every window looks like. Looked, I suppose I should say…it’s certainly not part of the model anymore, and who knows what happened to it.
Anyway, as I said, I’m pretty focused on some other projects at the moment, so I apologize if there’s another long gap before my next post!
With the SS/COS grand staircase side project complete, let’s hop back over to the main model!
The basic layout of Hogwarts in all the films is divided into two halves – a wing to the south where you have things like the Great Hall and the marble staircase tower and Gryffindor Tower, and a north wing that’s largely based off of real-world architecture at Durham Cathedral and Alnwick Castle. There are three footpaths that connect these halves:
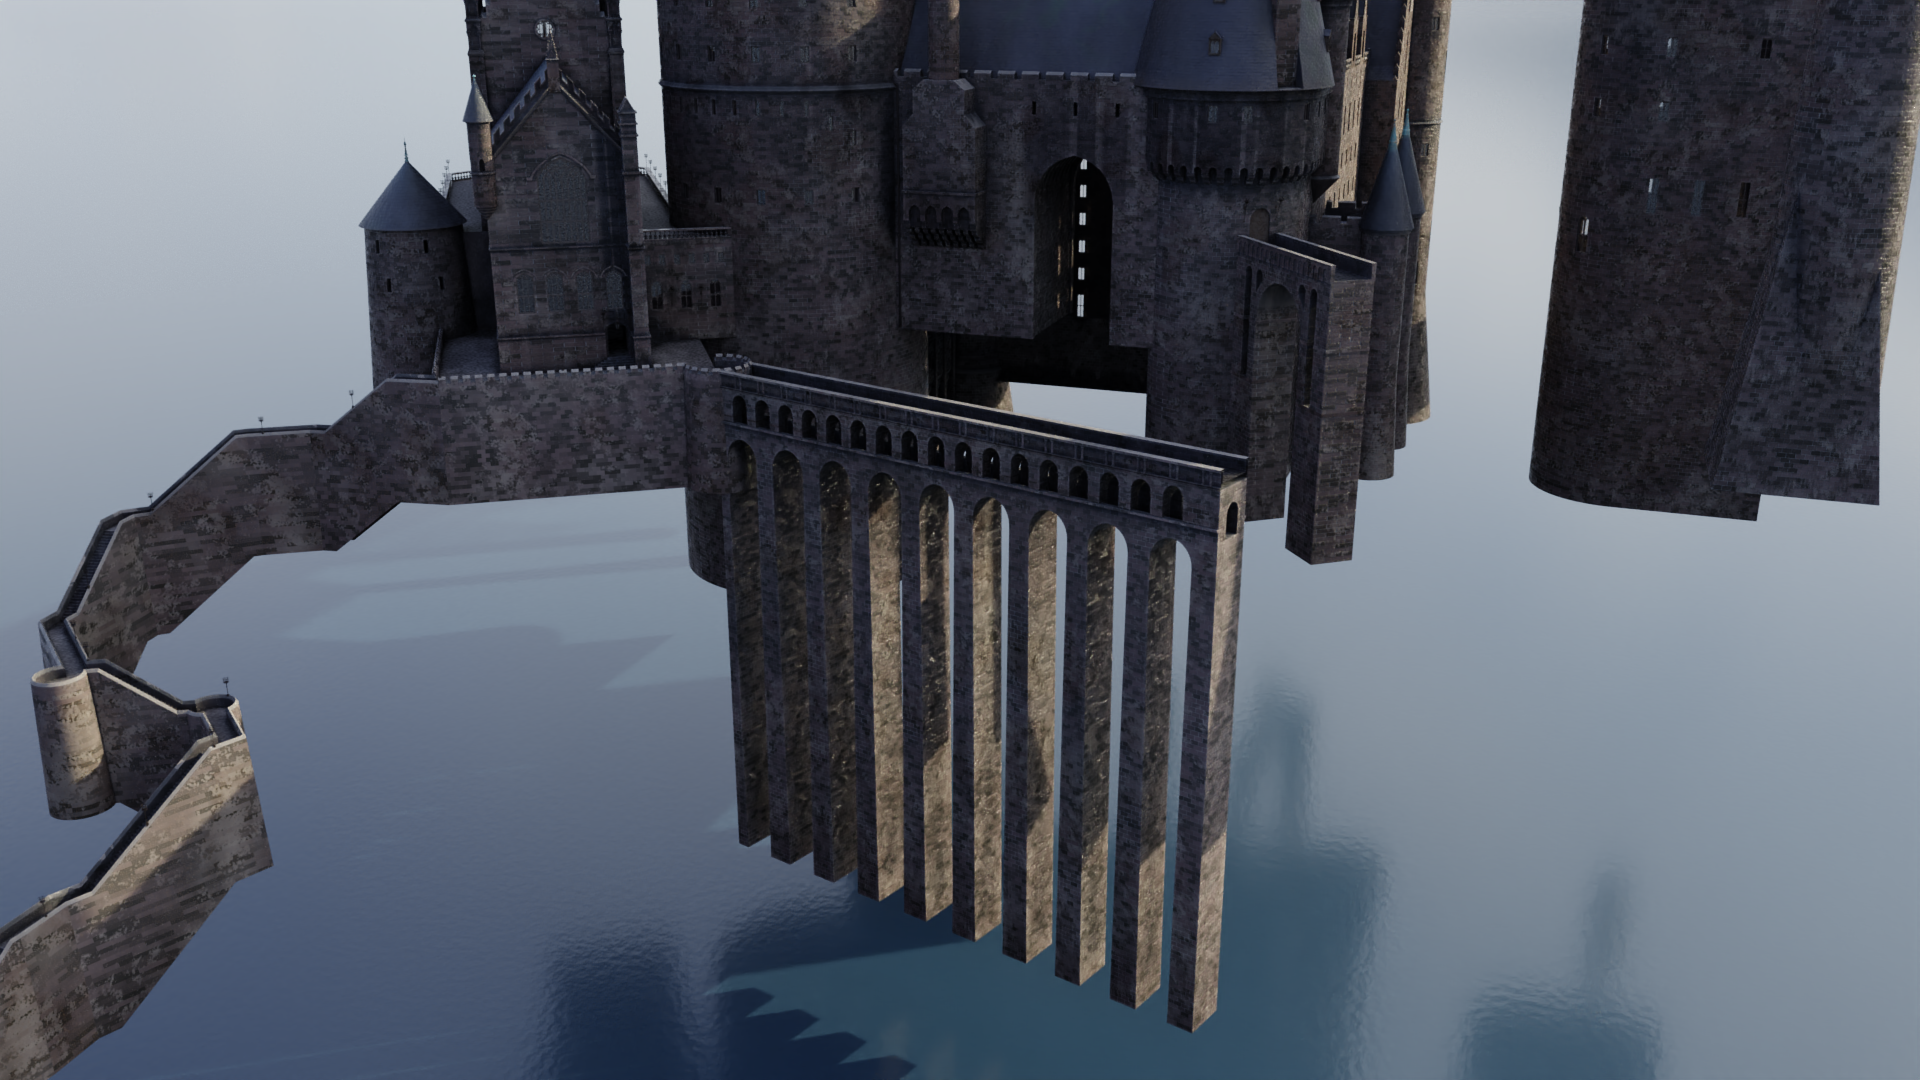
The viaduct, which is by far the most noticeable, as it’s the largest and it’s situated right out front. This one goes all the way back to Stuart Craig’s early concept designs, and it stayed virtually unchanged all the way till Deathly Hallows, when it was enlarged and reoriented to become the main route into the school. (A new stairway was added so that there were still three paths connecting the halves of the castle.)
The stone bridge, which is much shorter and rather higher up than the viaduct, but still quite visible. It also dates back to the early concept art.
The suspension bridge, which isn’t seen particularly often but remained more or less unchanged throughout the films; it just moved around a little.
Each of these was in a different state in my model: the viaduct didn’t exist at all, the stone bridge was complete, and the suspension bridge existed as an early attempt that I hid sometime last year. I decided to hold off on that till later, but I did need to get the viaduct in place so I could start work on the north wing!
There’s a lot of good reference out there, so the viaduct wasn’t particularly difficult:
You may notice I’ve begun adding some subtle atmospheric perspective or mist to some of these renders…it can really help provide some depth and separation, particularly since the entire castle is pretty homogeneous in terms of color and texture. That’s becoming more important as the castle continues to sprawl further and further out.
Anyway, with the viaduct completed, I turned my sights to the so-called viaduct entrance – as in, the entrance to the north wing from the viaduct, not the entrance to the viaduct. It’s framed by two towers that remained largely unchanged throughout the films; their spires just got a little steeper in Order of the Phoenix. They also added a window to Snape’s dungeon at the base of the one to the left, but that’s hidden from a lot of angles…and since I’m working on the Azkaban version of the castle right now, I don’t have to worry about that yet anyway.
I began adding the left tower, as well as the semicircular area at the end of the viaduct. This is also a nice silhouette of the stone bridge in the background:
Once the details started really coming together, including the shallower spires seen prior to OOTP, I mirrored the left tower to the right side as well. (The two are identical, other than the fact that one of the windows on the left tower is replaced by a door to the stone bridge.)
Here they are complete!
That smoke sim is paying dividends…I’m really digging in in this render.
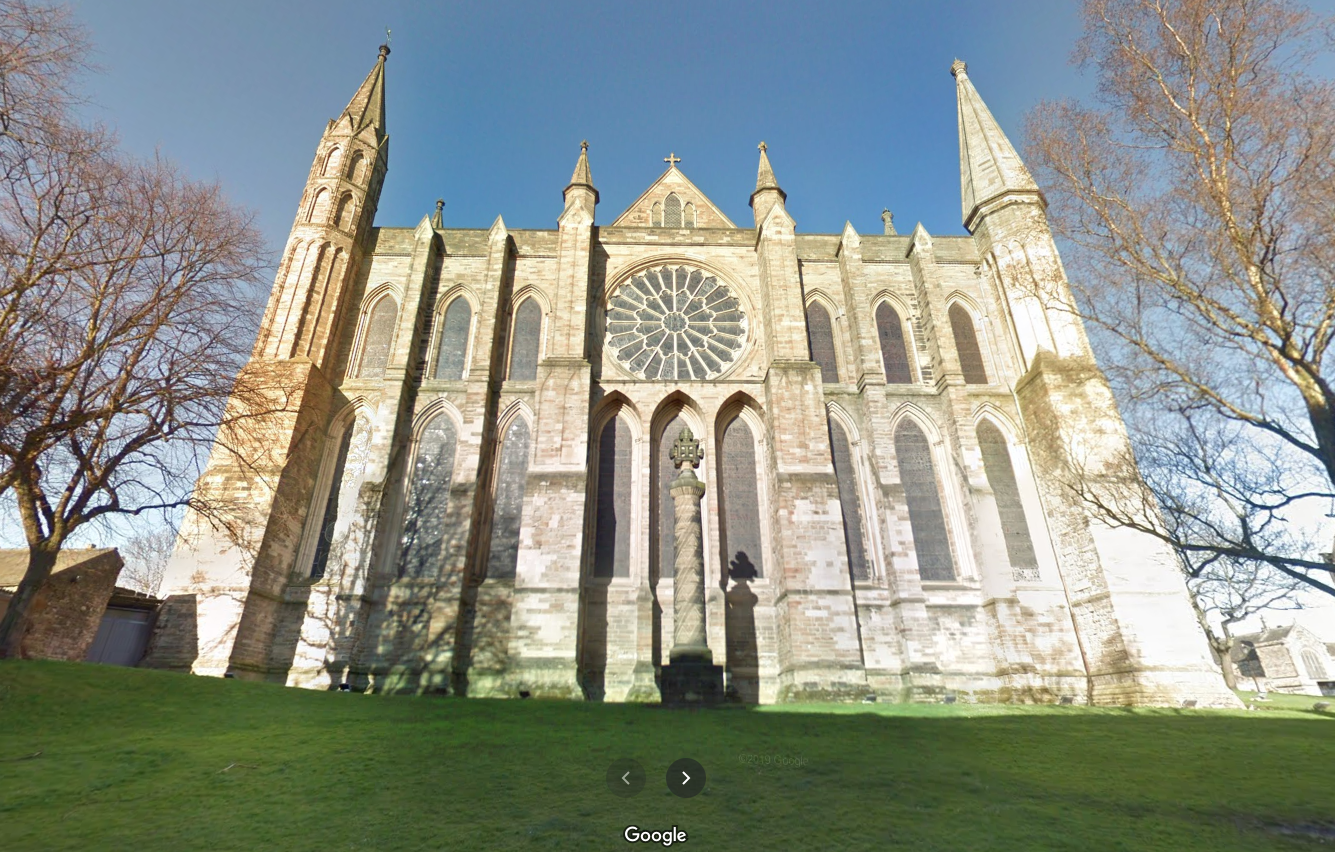
The wall that connects these two towers is interesting. It forms the southernmost face of the so-called long gallery, sometimes even just referred to as the Durham building because as I said, so much of its design is based off of Durham Cathedral. That cathedral was a real-world filming location for the first two films, and there are some areas of the miniature that follow its design pretty slavishly so as to meld well with the location shoots.
This south wall, though, corresponds to an area of Durham never seen in the film. This what it looks like in real life, courtesy Google Street View:
Since they never shot any scenes right here, there was freedom to modify the design for the visual effects miniature, which looks like this:
As you can see, the miniature retains the overall shape and dimensions, but many of the details have been changed. The large rose window is replaced with a much smaller and less “churchy” version, and front doors have been added – front doors that are identical to the doors to the Great Hall, which are in turn identical to real-world doors at Christ Church at Oxford. (The doors are, however, scaled up to about twice the size – nearly 30 feet tall in the imagined real-world scale the miniature represents!) The windows are very Oxfordesque as well.
Anyway, I began adding this south wall:
I didn’t have to create those huge Oxford doors completely from scratch this time…the archways in the grand staircase side project are variations thereof, so I was able to bring one of those archways into this file and modify it appropriately. (I admit it’s kind of a hodgepodge of super-precise areas and others that are merely close to correct…ssshhh, don’t tell anyone.)
I then added the four house crests – plus the main Hogwarts crest – above the door, using bump maps to simulate the relief. Here’s a student’s-eye view from the viaduct:
It’s especially nice now that I remembered to make the windows visible! Ignore the light under the doors though.
I don’t know why I was psyching myself out prior to starting the viaduct entrance…I had this weird gut feeling that it wasn’t going to look right, or I wouldn’t be able to get the dimensions to all agree with each other, or something…but I really like the way this is turning out! Stay tuned for more updates as I add windows, the triangular area with the small rose window, and the two small spires on either side!
Possibly the most noticeably new castle feature in Prisoner of Azkaban was the long, rickety wooden bridge leading from the new clock tower and courtyard to the new location of Hagrid’s hut and the Whomping Willow. (The bridge stuck around all the way through to Deathly Hallows, when it was enlarged to make its destruction more dramatic.)
As with so many things, it’s easier to build something like this in its original pristine state and then deform it appropriately. So I set out to create a perfectly straight version of the bridge with none of its characteristic undulations:
Not very recognizable yet. Adding the roof and a few more elements helps a lot:
That’s more like it!
As I began to add the trestle structures below, I threw in some textures as well:
This all came together pretty quickly, in part because everything you see above consists of a single 8-foot-long segment with an Array modifier that dynamically duplicates it 24 additional times. Then it was time to move the bridge into place as I continued to add details:
Thus far, I’d avoided all the wooden tracery that gives the bridge its ornate look. There are actually two designs used on different parts of the bridge, something I’d never noticed before. I recreated both:
Next steps will be to adjust the bottoms of the supports to match the ravine below, adjust the texturing on the roof, and ultimately bend and twist the segments of the bridge to give it its final wobbly look.
Okay, after some massaging, I’ve gotten the photogrammetry meshes to line up a little better. This is always tricky because:
The photogrammetry isn’t precise down to the millimeter – depending on the source images, the model can end up a little skewed.
The technical drawings aren’t super precise either – for most areas, I don’t have detail drawings, only the overall floor plan.
When lining up one photogrammetry mesh with another, you might need to adjust any or all of the following:
overall scale
x translation
y translation
z translation
x rotation
y rotation
z rotation
So, bottom line…these things aren’t as precise as one could wish, and you have to decide which which sources to trust, and that can vary from area to area.
Anyway, the adjusted photogrammetry confirms that different flights of the Half-Blood Prince boathouse steps (which are the same as in the previous two films) do indeed have different slopes, which is why my vertical dimensions weren’t working very well. In fact, to get everything to fit, I had to give almost every flight a slightly different slope. This seems awfully messy, but it also provides the best fit to the actual miniature.
That’s all being put on hold for now, though – I just discovered more reference photos that are helping me fill in areas that were otherwise difficult to reconstruct. In particular, I finally know what the original “link building” looks like! (That’s the small connection between the Great Hall/Chamber of Reception structure and the marble staircase tower; it changed to a different design after Azkaban.) So while I don’t have any renders to share for this post, I think the next one will cover the link building and the front of the quad building!
P.S. For the record, the boathouse steps themselves are actually a great design, beautifully executed in all three incarnations. I just get frustrated when I can’t get my sources of info to agree with each other, haha.
Work continues on the Prisoner of Azkaban iteration of Hogwarts! I guess my return to the project might have legs.
(Forgive the exposed interior glow panels on the right again.)
With the Chamber of Reception complete, I moved on to the terraces or balconies surrounding the Great Hall, plus the foundations below. Good lord, the geometry of these corbels gave me a headache as I tried to reconcile a variety of imprecise measurements and calculations. I’m pretty happy with how they turned out, though. And I sure was thrilled when the spacings of the corbels and the torches lined up! I added the finishing touches to the pepperpot as well.
This also afforded the opportunity to check out some angles not seen in the films, such as this nighttime view looking toward the head of the Great Hall from the balcony outside:
Soon I was faced once again with that perennial question: what next? At first I considered doing the crenelations outside the Chamber of Reception and the steps down to the boathouse, but as I assembled reference images, I found myself drawn to the boathouse itself.
It’s a simple structure with a lot of good reference out there, since it never changed till the digital rebuild of the castle for Deathly Hallows (when it was completely redesigned), and visitors to the Warner Bros. Studio Tour can get quite close to that part of the model. As a result, it came together pretty quickly. Here it is in complete form:
I really like that last one. I wanted the boathouse to “pop” in front of the similarly-colored castle behind it, so I went with a shallow depth of field and ended up with this render that kinda looks like a miniature itself. You can even see the witch-and-black-cat weather vane at the top. And, as I mentioned last time, I finally got a decent stone floor texture going, though I’ll probably still tweak that some more.
Next up…the boathouse steps, I suppose? Speaking of which, it just occurred to me that the first-years have to climb the height of a 14-story building to get from the boathouse to the Great Hall for their Sorting. Between that and the nerves, it’s amazing they all manage to stay on their feet.
For the first three Potter films, a large antechamber or entrance hall sat in front of the Great Hall. Its interior – the very first interior of Hogwarts seen on film – was shot on location at Christ Church Cathedral’s Great Staircase at Oxford. Stuart Craig and his team didn’t attempt to recreate the exterior of this structure in the visual effects miniature of Hogwarts, but the design they came up with does draw some details from that real-world location. Although this room is never explicitly named in the film, Harry’s prop acceptance letter instructs him to report to the “Chamber of Reception”, and the name (seen only briefly onscreen) seems to have stuck with the fan communities. The closest equivalent in the books is the entrance hall.
For Goblet of Fire, Hogwarts received a new courtyard and tower in front of the Great Hall, and the Chamber of Reception went the way of the dodo, never to return. In its place was an entrance hall with a smaller footprint and very different appearance. It’s a great look, but I’m very fond of the Chamber of Reception, due to my particular nostalgia for the first film. Fortunately, since I’m working on the Azkaban version of the castle, I get to include it in my model!
Getting the vertical dimensions of the Chamber of Reception required some use of photogrammetry and inference from known elevations of adjacent areas. Soon, I had a basic shape roughed in:
That chimney that protrudes from the corner on the right is a detail taken from the real thing at Oxford, by the way. Thanks, Google Maps:
The miniature also incorporates the exterior steps and the light fixture above the arch, even though there are no location shots of those in the film, leading me to believe that they at least considered shooting some stuff just outside this building at Oxford.
Anyway, I kept the same camera angle for the renders that followed. I began to block in the so-called pepperpot building on the left and added more details to Chamber of Reception:
The last round of details really brought it all together, completing the Chamber of Reception (other than some windows I may add to the far side). The tracery on the windows was tough, since reference for those is quite limited. I think what I came up with is pretty decent, even if it’s not 100% accurate. I also had to refer to the hammerbeam roof interior miniature from the first film for the rose window on the front of the Great Hall – I can’t find any closeup shots of the exterior, but there’s a corresponding rose window in the interior miniature.
I even included that real-world lamp above the arch, plus another Hogwarts-style sconce next it that’s visible on the effects miniature. They’re hard to see in the daylight, so…Nox!
There’s still more to be done here with the interior lighting, but I do like the way this is turning out. You’re actually seeing into the lit interior of the Chamber of Reception and Great Hall; most of the other windows in my model just have flat panels behind them that give off a splotchy orange glow for night shots, a cheat that’s very obvious in the exposed interiors seen to the right side of this render. But the Great Hall and Chamber of Reception have large windows into large spaces with known interior architecture, so I didn’t want to fake it with these.
I think I next need to add details to the pepperpot, and then either the link building or the terraces around the Great Hall. We’ll see what order I end up springing for. I’m also going to need to create a new texture for the paved horizontal surfaces like those terraces – so far I haven’t done anything like that.
Well, it only took a pandemic to get me back into this project! After the better part of a year working on other stuff, I’ve reopened my Hogwarts 3D model and begun adding onto it again. I still have some other big projects I’m working on, so I don’t know how much further I’ll get or at what speed, but it’s nice to at least have an update!
The first order of business was to finish up the main window of the Great Hall. The exterior version of it, that is – in interior scenes, the top of the window has a pointed arch shape, whereas the miniatures (and, for Deathly Hallows, computer models) used for exterior shots had a rectangular shape. Here’s a render of the end product, using a familiar camera angle from last year:
Felt good to have that finally finished! Next I began the central spire above the Great Hall, as well as the dormer windows along the roof. That spire is notable because of how steep it is. The castle originally had a lot of short spires, most of which became much steeper in POA, but this one was steep like this from the beginning:
Just like olden times, I got to wrestle with different references (film frames, production photos, photos of the model from the Warner Bros. exhibit, technical drawings, photogrammetry from the films, etc.) and try to reconcile them all into consistent dimensions. This can be surprisingly difficult at times, although it got easier when I remembered that the Great Hall got widened after POA – that explained some of the biggest discrepancies.
With the addition of more detail, the Great Hall itself is now finished, more or less:
I say “more or less” because the other side of the Great Hall is where it interfaces with the chamber of reception/entrance hall, depending on your preferred verbiage. That side is currently a featureless wall:
The next steps will be to start adding the entrance hall, which will cover most of that blank wall. Then we can add some of the terraces around these structures and the small building that connects the Great Hall to the marble staircase tower next to it. More to come, I hope!
On a more serious note, if you’re reading this during the COVID-19 pandemic, I hope you and your loved ones are safe and well-isolated, as dictated by the severity of the situation in your area. These are crazy times and (he reminded himself) it is more important than ever to be forgiving and patient with each other – and ourselves. Sending lots of love!
All right…as promised, it’s time for one of Hogwarts’ most recognizable exterior design features to go from simple block-in to fully detailed model. I’m talking, of course, about the marble staircase tower, also referred to as the turris magnus (on the Marauder’s Map) or Dumbledore’s tower. You can go all the way back to Stuart Craig’s original concept sketch for the Hogwarts exterior, and this tower is already there. It’s the biggest tower, the one on the left. A few of the details are slightly different than the final design, but it’s pretty close:
This thing is massive. To give you a sense of scale, in the real-world environment envisioned by the design team, the top is over 600 feet above lake level. The main body of the tower is 92 feet wide. The spire alone is over 200 feet tall, with somewhere around 50 feet of that being the enormous copper finial at the top. For my fellow Disneyland fans…the entire freakin’ Matterhorn would fit inside the spire. Near the top, that smaller triple turret on the left is Dumbledore’s office; the castle’s moving staircases sit below, inside the cylindrical body of the tower. Mr. Craig has readily acknowledged in interviews that there are design choices here that simply couldn’t be built in real life. Fortunately, magic covers many architectural sins, and personally, I think the films are all the better for it. The turris magnus is featured prominently in the very first shots of Hogwarts and it’s part of what made such an impression on me in the early 2000s.
The first detail I wanted to capture was the dormers sitting along the sides of the spire. This is where the ridiculous, over-the-top dragon chase in Goblet of Fire really came in handy, because Harry and the Hungarian Horntail end up on these rooftops, providing closeup miniature shots and even closer shots of a partial set for Daniel Radcliffe to interact with. I decided to incorporate all these details into the dormers, even though the main 1:24 scale miniature probably wasn’t quite this detailed. (The closeup shots were accomplished with other bespoke miniatures on larger scales.)
Let’s also pull back for a wider shot, including some detail work on the finial and the beginnings of work on Dumbledore’s office:
(By the way, sorry for that other spire near the bottom middle, the one that has the copper patina discoloration near the top but no finial. Keeps showing up in renders. Eventually I’ll add the finial, I promise!)
Next came the stepped corbelling at the base of the turrets of Dumbledore’s office, and their own much smaller spires began to take shape as well. This was all slightly complicated by the fact that what few technical drawings I could find were not quite accurate, but I think I got pretty close in the end.
Here’s where I ran into a conundrum, though. As I mentioned, the closeup shots in GOF were accomplished with larger miniatures built just for those shots. As I looked more closely, I realized that the design of these turrets is a little different in these miniatures than in the main miniature – mainly in the design and placement of the windows. I couldn’t decide at first whether to go with the more detailed alternate design seen in GOF (and the theme park versions) or just go off of the main 1:24 model. The former was tempting at first, since the changes were clearly done to help the exterior match the interior sets designed for Chamber of Secrets. Speaking of which, as massive as this whole tower is, Dumbledore’s office is actually still smaller than the actual set. I thought that was pretty interesting. Below is a very simplified version of the interior set (in white) next to the exterior, using the real-world scale of the set and the intended imaginary scale of the exterior. (The vertical protrusions on the right are where the windows are; they didn’t build the sets with full-thickness walls, so they look like they’re sticking out.)
Anyway, the main model’s design won out in the end, and you can see the corresponding simple window designs have been added here. I’m technically still working on the POA version, and the redesigned exterior wasn’t created till GOF; when I get to GOF, I’m sure I’ll build the redesigned version too.
That makes the spire more or less complete, although I may go back in and add in details like roof flashing where Dumbledore’s turrets meet the main spire. For now, I moved on to the main body of the tower, adding corbels and windows:
From there, it was just a matter of building the larger windows that cover the rest of the tower below! In studying my 16,000-pixel-tall collage of reference images for this tower, I noticed that the spire has actually been mounted on the tower at a variety of angles over time, and there were again some discrepancies between the actual model and the technical drawings. This made it harder to figure out the radial spacing of the windows, but in the end, I did some measurements on my old photogrammetry of the castle and settled on there being 18 windows on each floor. Hopefully that’s correct, haha. In any case, here’s the complete tower!
As I continue around this corner of the castle, we’ll next be proceeding to the only other feature that’s as visually important as the marble staircase tower: the Great Hall!
Still focusing exclusively on the Prisoner of Azkaban version of the castle. I’ve continued working my way counterclockwise (anticlockwise, to Harry and his Brit friends) around the quad building. The south wall is now complete.
If some of this architecture looks pretty unfamiliar, there’s a good reason for that: you never get a good look at this wall in the films, at least in this design iteration. Finding adequate references for the buttresses and the arch-shaped depression was quite a challenge, and there’s still a bit of guesswork on some of the details, but it should be pretty accurate. The tracery on the windows between the buttresses was particularly tough…there are no closeup shots of these that I can find anywhere, and they vanished in OOTP, so it’s not like you can go photograph them on the miniature in the Warner Bros. Studio Tour. But I lucked out and discovered that the same window design was used inside the quad (AKA paved courtyard) in the OOTP video game, and that provided some good reference. (Speaking of windows, the windows in this render really show how hollow the quad building is right now. Eventually, I’ll have everything filled in so you’re not looking straight through from one side of the building to the other.)
It’s a short post for today, but that’s just because I want to be able to devote the next post to the major element I’m working on this evening: the castle’s main tower, variously known as the marble staircase tower, the turris magnus, or Dumbledore’s tower. I’ve had a very simple version of the tower in there since the start of the model, but now it’s time to get all the details in there. More soon!
I liked that fire material from the last post so much that I kept finding myself virtually lighting the torches and switching to that day-for-night setup. Eventually, I got wise and decided to create a dedicated “night mode” for the model. It has a different HDRI for the background (a cloudy daytime scene from HDRIhaven.com that I made much darker and bluer), stylized blue lighting to match the moonlit shots in the first couple films, and interior lights behind some of the windows. Compare:
Best of all, I realized I could use Blender’s node group functionality to create a single slider that would allow me to change all the different settings between day and night simultaneously. I also did the same for the two color modes (the warmer look of the first two films, and the desaturated look of the later films, seen above).
Both tasks were made easier by some behind-the-scenes organizing I’d been doing. The procedural (algorithmic) brick texture on all the walls had gotten really complicated, because I was layering so many different elements together in the pursuit of a realistic and visually pleasing result. For kicks, I thought I’d share what the brick material’s node tree looked like before:
Each of those little gray boxes (nodes) is a set of calculations, receiving inputs and sending outputs via those light gray lines that connect them to other nodes. I’d organized them into those colorful groups, each of which has a descriptive label, but it was still a pretty ugly setup and not that easy to use or “read.” Here’s the same material after visually organizing the node tree a little better:
Not only does this look cooler, but it’s a lot easier for me to just jump in and make changes or additions where needed. (Which I’ve already done repeatedly since taking that screenshot…the setup is even more complicated now, but still nicely organized.)
You might have noticed that long wall at the bottom right of day/night renders, connected to a small tower. These new additions will barely be seen in the final version of the POA model – they were part of the original model from the first film, but starting in Azkaban, the landscape became much hillier and it literally swallowed up most of the wall and the entirety of that tower. But I decided to build the whole thing now so that it would be easier to create the versions for the first two films when the time comes. Here’s another shot:
There’s also some work happening here on that wall beneath the hospital wing bridge, just to the right of Gryffindor Tower in this image. Here, let’s take a closer look with the clock tower and hospital wing temporarily hidden, and some improved texturing on the roofs and spires:
Windows, dormers, drainpipes, corbels, the whole nine yards. That wall is done now, and you can even see some work happening on the tower on the right. Fast-forward a bit, and here’s a closeup of that tower, now complete as well:
Some of this geometry was definitely tricky to get right, but it was worth it in the end. I also had a lot of fun with the decorative elements near the top – there’s a triquetra near the top of each dormer, plus some sort of decorative plaque just below. I couldn’t quite figure out what is embossed in the plaque, so I just sculpted something that looked similar and baked it as a normal map. [EDIT 4/24/19: I finally found a clear enough photo of the plaque – it’s the Hufflepuff crest! Guess I’ll have to go in and redo it at some point…] You can also see the new diamond-shaped muntins in the windows, which are now in all the windows of the castle so far. (I admit that I didn’t go procedural with these…I briefly tried, but it just seemed more efficient to use a single diamond image that I could tile all over the glass.)
Taking a closer look, though, the roof shingles aren’t supposed to get flattened out in some places like that. Always more to be done!