Still not sure how I want to handle the statues on top of the Alnwick Castle structures, so I’m hopping back over to the training grounds tower.
Part of this little corner still needed to be filled in. It’s hard to find good reference for that spot on the miniature, and it does seem to be somewhat different from the real thing at Alnwick. I decided to just do my best (and add the footpath where Hagrid drags the Christmas tree through the snow):
There are a few torches that show up over here in some shots in Chamber of Secrets, but I’ve elected not to include those – their positions aren’t always clear or even consistent from shot to shot, and I’m not sure whether they were ever in the main miniature.
Around the other side of the structure, I’ve accepted the difficult truth that I may never find adequate reference for certain details. I’m using the real structures at Alnwick to fill in the gaps as best I can. Fortunately, some of those real-world details are visible in the background in Sorcerer’s Stone, so I feel justified in including them.
This shorter structure on the right corresponds to Alnwick Castle’s 19th-century chapel, and from what I can see, it seems to have been a pretty exact recreation in the miniature:
Incidentally, see that rectangular depression a ways to the left of the chapel, above the arched recessed windows? In real life, the heraldic symbols of the Percy family are there. In the Hogwarts miniature…I can’t tell. It’s too tall to just be a Hogwarts crest. So I’m just leaving that blank for now. If you’ve got closer images of the miniature here…please send them! I’m always on the hunt for new rare photos or blueprints of the miniature.
In the meantime…here’s the complete training grounds tower, as it existed from Chamber of Secrets through Order of the Phoenix!
Fun fact: In the last render above, we’re sitting on the clock tower courtyard roof. The foreground cylindrical tower on the far right is of course Gryffindor Tower.
You might notice that I’ve removed the Alnwick Castle barbican/gatehouse and adjacent walls. Or rather, I’ve moved them so they don’t exist in my Prisoner of Azkaban model anymore, since that area will be covered up by hills. Don’t worry – those structures still exist in my nascent Sorcerer’s Stone model, and they’ll become part of my Chamber of Secrets model too.
Yikes…it’s been a long time since my last update! Sorry about that, folks. One of the many factors: the training grounds tower is tough! It’s hard to find enough reference images. So to give myself a break, I switched gears to focus on the castle walls.
The curtain walls and small towers surrounding the training grounds were originally derived from those at Alnwick Castle. A large swath was then redesigned in the second film, probably to add visual interest in the Whomping Willow scenes. The westernmost areas (near the first flying lesson) still stayed the same until the third film, when they were swallowed up by hilly terrain. In effect, only the COS redesign remained. That’s the state the miniature is still in now, although the CG version in Deathly Hallows and Fantastic Beasts omits the walls altogether.
I started at the western end of the COS revisions:
This illustrates some of the challenges in mapping the stone brick textures correctly to the model when the angles get funky. I’ve tried to create a material that just behaves correctly no matter what I build, but sometimes I need to get in there and manually fiddle with the mapping to get it right.
These structures all look strangely tall right now, but eventually the terrain will cover up most of the lower areas:
They’re also in pristine condition compared to their appearance in the films, since significant chunks of the above-ground areas have crumbled away. But it’s always easier to create the full “original” structure and then weather away the parts you don’t need.
Here’s the same view with some more adjustments, details, and additions, but still no weathering:
And now, swinging around the easternmost area, we link it all up with the areas that are directly taken from Alnwick Castle:
I’ve also fixed the mapping of the brick textures here:
Some of these areas don’t quite match between the blueprints, the photogrammetry of the miniature from the Studio Tour, and the real-life correlates at Alnwick. I’ve aimed for a happy medium that tends to favor the actual miniature.
Then and only then do we get to the weathering, by way of a Boolean modifier. If you don’t know what that is…well, imagine carefully shaping a floating glob of poisonous molten radioactive alien laser acid that will eat away any part of the wall it touches. Actually, you know what? I won’t make you imagine it – here are my Boolean acid globs:
And yes, the glowing lava look is a critical part of getting the Boolean modifier to work right. TOTALLY necessary. 100%. Anyway, move the above slider back and forth to wipe away the glowing poisonous molten radioactive alien laser acid lava and reveal the weathered stone beneath.
I’ve still got to built the western half of the curtain walls, the parts that weren’t changed from their Alnwick-like state. But I’ll save those for a future post so I can at least have something to share with you now!
Whew, sorry for the long delay…the months of sitting at my home desk have taken their toll on my arms, and I’ve had to significantly limit my computer use. This will be a shorter post as a result. I’m starting physical therapy soon…if you’re feeling particularly generous and you want to help support my recovery, my Venmo handle is @Joe-Cardello, for what it’s worth. 🙂
Anyway, let’s continue with the version of the training grounds tower that was seen throughout the middle of the Potter series, including Prisoner of Azkaban. As we work our way around to the west facade, my reference material becomes even scarcer, but I’ve got just enough to piece it together in a reasonably accurate way. I started with plain walls, deciding to add the windows and so forth later:
Here’s a view from overhead once I’d roughed in the main shape of the building. At this point, I wasn’t worried too much about cleaning up the intersections between walls and objects…I just wanted to make sure the layout made sense three-dimensionally:
You can see just a bit of the tiny courtyard in the middle. That’s one area for which I truly have zero reference (other than the basic floor plan). It roughly corresponds to the cobbled inner courtyard at Alnwick Castle, which was actually used in the location shoots for the first film, but the version in the miniature is much smaller and it has a different shape because of the way the Alnwick floor plan was reconfigured around it. So the layout of any doors, windows, or other decorative elements on that part of the miniature sadly remains a mystery.
As I said, I have less progress to share because of my ergonomic issues, not to mention the simple fact that this is a tricky structure to figure out. But I’ll at least fill out the rest of this post with an aerial overview of my POA castle so far:
Take care of your body, take care of your mind, and don’t be an ass to people who identify as transgender. See you soon!
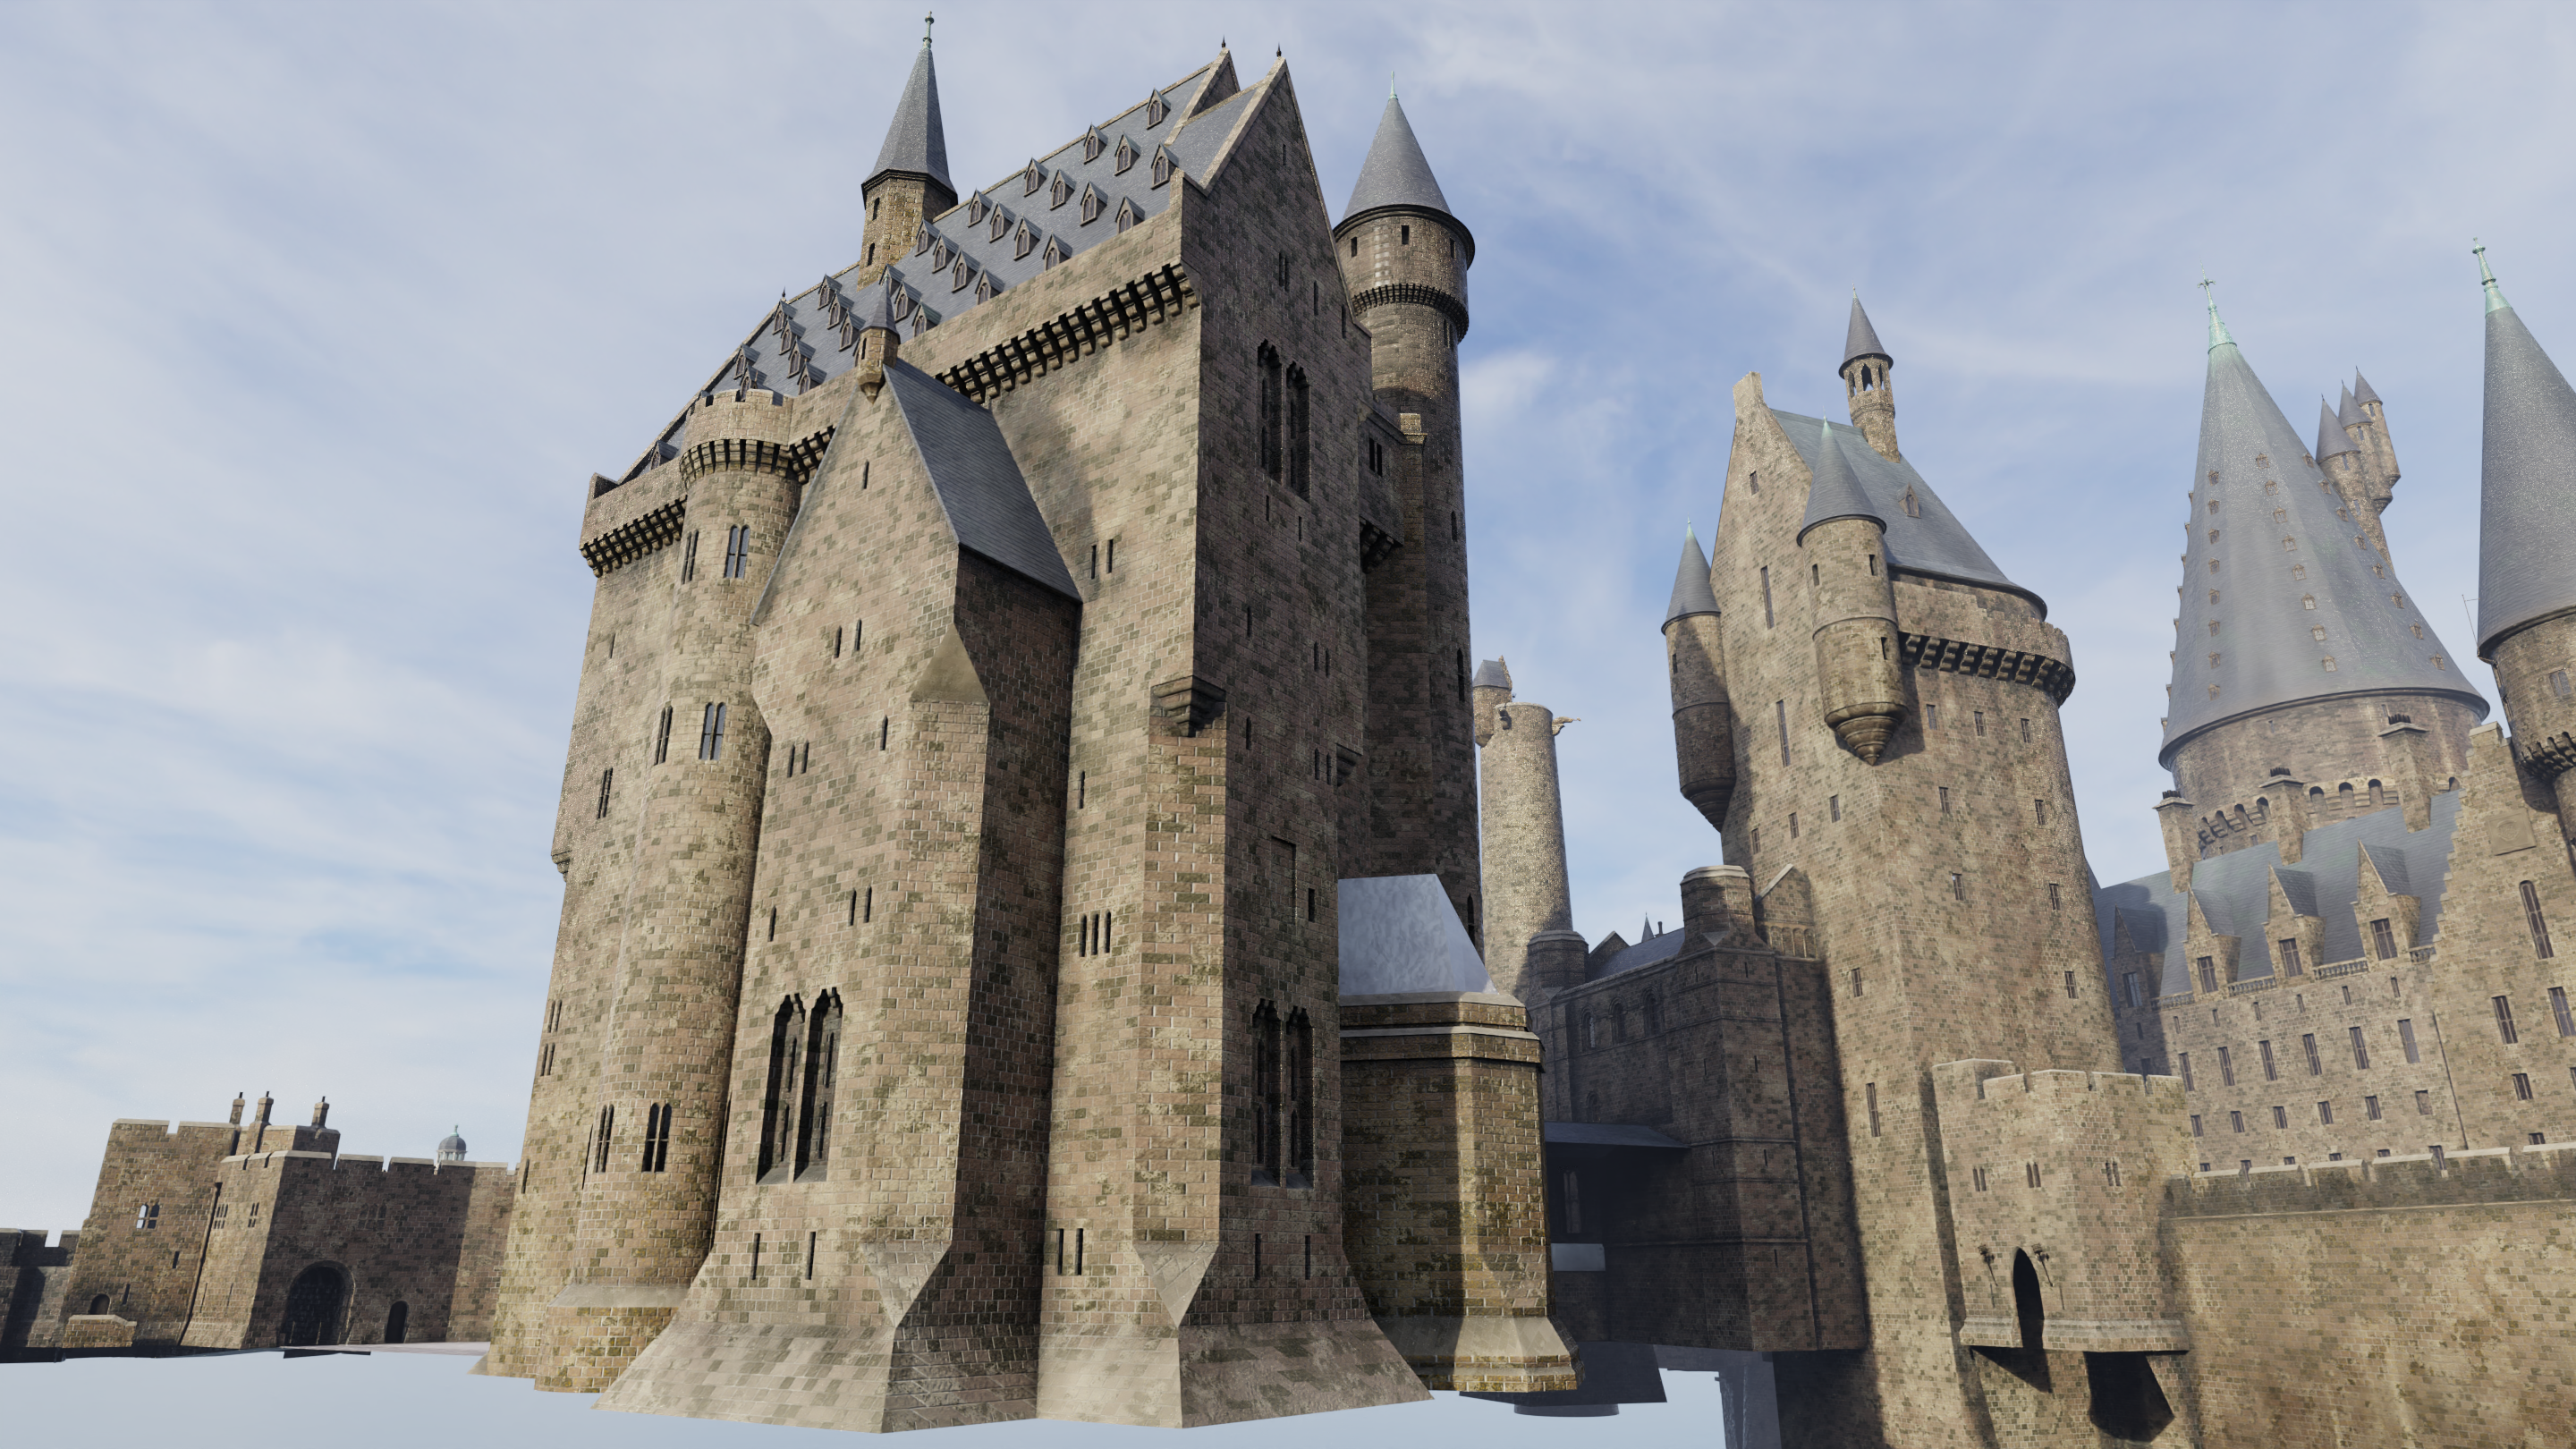
Holy crap! I can’t believe we’ve arrived at the final major tower of Hogwarts! I’ve been eager and afraid to tackle it because of its complex geometry and the limited reference available. Let’s jump in!
The training grounds tower was added to the original castle out of sheer necessity. Alnwick Castle was used as a major filming location so they needed it to be present in the miniature. Stuart Craig’s team tweaked its footprint a bit and built it up into a much taller complex of towers; the bottom floors just looked like Alnwick while the upper floors took their stylistic cues from the original castle’s other conical turrets. Evidently Mr. Craig didn’t like the vertical extensions, because they were totally redone for the second film in a style that slightly foreshadowed the more Gothic look that would take over in the third film. (Interestingly, some COS shots still feature the SS version.) That revision stuck around till Half-Blood Prince, when it was replaced with a single tower echoing the bell towers’ design.
Since I’m working on the Azkaban castle right now, it’s that second iteration of the tower that I’m focusing on. And “focus” is indeed the right word, because I’ve spent a lot of time just staring at reference images and…thinking. Trying to piece it all together. Eventually, I started working on the facade toward the right:
This is the project’s first render with the OptiX denoiser, which wasn’t compatible with my GPU till Blender 2.90. Denoising is critical with path tracers like the Cycles render engine, where speeding up the render introduces more noise. I was using Open Image Denoise before, but OptiX is faster and it’s retaining more detail, so I’m pretty stoked!
Anyway, training grounds tower. It’s proving as challenging as I feared/hoped it would be. The modeling itself is not particularly difficult, but the paucity of high-quality reference images makes it difficult to piece together all the details, especially since I want to get the scale right.
I’m keeping an eye on the original version too, since the lower section is identical and I want to make sure I can reuse it without any issues.
In a twist that will shock precisely zero longtime readers, I’m finding lots of small discrepancies between shots of miniatures, location shoots at Alnwick Castle, CG long shots, etc. As usual, I’m striving for something of a happy medium, but weighted toward the main 1/24th-scale miniature.
There’s still a lot more to do on this structure, but it’s been 10 days since I last shared my progress and I think I’ll save further progress for my next post.
Time for a Hogwarts feature that’s right out of Durham Cathedral, at least in its original form. The cloisters were used as the filming location for the “middle courtyard” or “Transfiguration courtyard” in the early films, though it was later represented by a similar courtyard at Oxford and then by a set at Leavesden.
I first spent a morning working on under-the-hood tweaks to hopefully improve the file’s performance – downrezzing overlarge normal maps, replacing duplicated objects with linked proxies, decimating some meshes that had gotten too dense, etc. The hope is that my computer will be able to handle the file a little more easily moving forward. No sexy renders to share for that, though, so here’s a cute puppy photo instead.
Anyway, back to Hogwarts! A big question cropped up as I was compiling my references: How much detail do I put into the cloisters – specifically, the doorways that lead to other parts of the castle? These are seen in the location shoots in the first two films, but at least some of these were evidently left out the miniature. (They never would have been visible in the film, so I can appreciate the decision to focus elsewhere.) Furthermore, the south walk (which corresponds to the east walk at Durham) changed repeatedly over the course of the films, and I have no idea what the cloister interior looked like at that point.
I figured the most reasonable approach would be to create the complete courtyard without those doorways and then see if I could get away with it in my renders. I started with the tracery of the cloisters and a basic ground plane:
This part was easy because I’d already built the clock tower courtyard – its cloisters contain a lot of design elements adapted from Durham Cathedral.
The fountain in the center of the courtyard was next, and this one’s going to give me some trouble later on…not because it’s hard to create, but because it’s unclear exactly when it vanished. Let’s break it down:
It was created for the first film, apparently as a set dressing that sat on top of the lavatorium (monks’ handwashing station) that sits in the middle of the courtyard at Durham.
It’s still there in the second film, both on location and in a bespoke 1/8th-scale model of the courtyard used in an overhead establishing shot.
The center of the courtyard is never visible in the third film, so that one’s a question mark.
As I mentioned, goings-on in the courtyard were shot at Oxford instead of Durham Cathedral for the fourth film, so the location looks totally different and won’t be reflected in my model. There is an aerial shot during the First Task when we briefly see the Durham courtyard, but if the fountain is there, only the very top of it is peeking over the roofline.
No idea in the fifth film…
In the sixth film, the courtyard was realized as a set that included the base of the Astronomy Tower. (I suspect this was a revamp of the viaduct courtyard set, which I suspect was a revamp of the clock tower courtyard set.) There’s no fountain in that set, but that set is far from a perfect match to the miniature. I can’t find any shots of the center of the courtyard in the miniature, but the fountain is gone from the technical drawings and I’d imagine the same is true of the miniature.
In the final film, the fountain is again missing from the technical drawings, and this is confirmed with a CG overhead shot of the area.
With all that in mind…until I can find more reference that confirms which changes were made when, I’m just going to assume the fountain lasted till the sixth film, at which point it was removed and never came back.
Anyway, I added the fountain and started the sewer grate. I also added the benches, which seem to have been more set dressings. You can see in this render that I’ve finally mirrored the east walls of the Long Gallery onto the west side, too:
That’s the first render I did with the new Blender 2.90. It’s got some great new features, but it kept crashing when I attempted to render. After some troubleshooting, I figured it out: this version of the software doesn’t like my old smoke simulations. That’ll need to be addressed, but for now, I’m afraid the hearths of Hogwarts have gone cold.
That structure in the top left corner of that render is a newly-added Durham Cathedral transept, the last missing piece of the Long Gallery. In the first film, this one was a simple mirror image of the one on the other side, but when the Dark Tower (center) was added in Prisoner of Azkaban, this transept had to be shortened a bit, resulting in a slightly asymmetrical footprint that lasted right through the end of the series. Easier to see from the air:
As you can see, the one to the left of the central tower isn’t as long as its counterpart on the right.
One interesting thing about this courtyard is that each of its four sides has a different look. I next took care of the north wall, which corresponds to the west wall at Durham:
You’ve no doubt noticed that the cloister is still roofless – I decided to save that for after the surrounding walls were built. Speaking of which, here are the last of them:
It’s hard to find detailed reference for the wall on the right (above the two benches) in the miniature. Its design is similar to that of the corresponding wall at Durham Cathedral, but there are some differences. To make matters worse, there are some apparent discrepancies in the number of windows in the various Hogwarts images available, but there’s a good chance that what I’ve done is accurate to the state of the main miniature at the time of POA. And if not, it’s at least quite close – it could be that there are supposed to be six windows on the shorter part of the wall instead of five.
Anyway, the only remaining step was to add the cloister roofs! With these in place, the answer to my “big question” became clear: No, I didn’t need to add doors and other details inside the cloisters. They simply aren’t visible unless you’re actually inside the cloisters, and I’m okay with not having detailed views inside there. So with that in mind…voilà, the complete transfiguration courtyard!
Incidentally, I love that structure just above the center of that render, below the DADA tower. It was added in the third film when the DADA tower got shifted over a bit, and it’s basically just a Durham Cathedral transept, except, like…a standalone version. Something about it tickles me. Naturally, everything will look better once that wall next to it has an actual building behind it, but that’ll come with adding the final major piece of the main castle: the training grounds tower!
Work on my 3D model of the Prisoner of Azkaban castle continues! The area that corresponds to Durham Cathedral’s north transept is now complete:
I shifted my way attention to the adjacent walls that correspond to the cathedral’s nave and north aisle, otherwise known at Hogwarts as the Long Gallery. I was surprised to notice that the windows and buttresses are not evenly spaced. In fact, the upper windows don’t even align with the lower windows. I fought this briefly, thinking I must be mistaken, but nope, I’m pretty positive none of this stuff lines up in the miniature – and not in ways that match the imperfections of Durham!
I wanted to match the miniature as closely as I could, so I started by adding placeholders for the bell towers at the other end of the Long Gallery to help me lock in my spacing:
The stand-ins are shorter than the talent, and their faces are kinda blank, but hey, what are you gonna do.
At this point I discovered that my entire Long Gallery area was about a foot too far east, so I took a few minutes to shift it over and swivel the viaduct accordingly (a whopping 0.25°). A foot’s not a lot – at 1:24 scale, that comes out to half an inch in the miniature – but it helps to line things up as closely as I can.
With that done, I blocked in the walls and roofs of the long gallery:
Then came the details, with all their subtly variable spacing. Here’s an orthographic view from the side – a perspective-less elevation view, in other words. All the misalignment is totally intentional, and it should be pretty accurate (although I made further tweaks after this render).
Of course, it’ll look better once the far side is enclosed as well; I’m not working on that courtyard side yet.
In the meantime, my next task was to create the 15-foot-wide octagonal tower on the roof of the Long Gallery. This was added in Chamber of Secrets; my guess is that it was a purely aesthetic decision, perhaps motivated by the fact that the establishing shot of the greenhouses shows that area more clearly than we had seen in the first film.
Pretty quick add, and it never changed in any of the later films. Just gotta make sure I exclude it from the eventual Sorcerer’s Stone version of the model!
Next up? The bell towers! While the central tower isn’t very similar to the one at Durham Cathedral, the bell towers have a lot more in common with their Durham counterparts, the North and South Galilee Towers. In fact, the basic impression of the original design in the first two films is that they’ve simply knocked a few of the pinnacles off and added a conical roof to each tower. (Closer inspection does reveal some subtle differences in the details, as with all the Durham areas.) In Prisoner of Azkaban, the conical roofs were replaced with taller belfries and octagonal spires that echo the redesigned central tower, but the lower sections still bear a striking resemblance to Durham Cathedral. They also get a lot more intricate than the central tower, which makes them a little intimidating. I decided to start with the bottom portion, which is all based off stuff I’ve already made:
Now for the hard stuff! Okay, it’s not exactly hard…it’s just…a lot.
Halfway there:
The openings are tricky. In some shots in the early films, you can very unambiguously see straight through from one side to another, but in some photos of the miniature from the Warner Bros. Studio Tour, it looks like there are interior walls. After finding other photos that seem to show straight through in the Studio Tour as well, I decided to keep mine hollow, as you see above. Hopefully that’s still accurate to the later films.
Next time we’ll finish the bell towers, add the wall between them, and continue around this northern part of the castle!
Thus far, this project has focused entirely on the versions of Hogwarts seen in the films (and theme parks). But I’ve been re-reading the entire book series as well, taking notes anytime some aspect of the castle or its environs is described – after all, if you pay attention, you’ll notice that it’s a completely different castle. For a long while I had this idea that it would be cool to create a model, illustrations, and/or floor plans for the book version of Hogwarts, but I wanted to make sure I had all the information first. In the meantime, I messed around with possible overall looks in 2D, though I didn’t arrive at anything I particularly liked:
Then I finished my notes on Deathly Hallows and compiled them according to different areas of the castle and grounds. I wrote out the following guiding principles for myself:
The goal is to depict in 2D and/or 3D what Hogwarts and its surroundings look like in my head, factoring in all the details given in the books.
Where details conflict between books, priority is generally given to descriptions that occur later in the series and/or more often.
The word “castle” is used to describe Hogwarts, but it’s evident from the descriptions that its features don’t always line up with what one would find in a real Scottish castle from the time period. At the same time, there’s nothing to hint at the Gothic cathedral architecture we see in the films. Here, we assume that this is a thousand-year-old boarding school built by magical people, sharing a lot of architectural similarities with contemporary Muggle castles.
We know the layout of Hogwarts is not 100% fixed; its magical properties do cause it to behave in some unusual ways. That being said, its overall layout doesn’t seem to change, based on the details given and on the fact that students can find their way around without a map. The approach here generally assumes a fixed layout with no fudging of the available space.
J. K. Rowling’s two hand-drawn maps of the book layout are taken as a general guide. Where details in the maps conflict with those in the books, the latter take priority.
The language in the books is not always particularly precise, so there is a little room for flexibility in the interpretation.
The process I had in mind was to start with the interiors, exploring spatial relationships between the castle’s various rooms, corridors, staircases, and so on. I figured if I could figure out how Dumbledore’s office relates to Gryffindor Tower, and how Gryffindor Tower relates to the Room of Requirement, and how the Room of Requirement relates the marble staircase, etc., etc., eventually I’d have a good idea of how to bring it all together.
With this in mind, I started my first layout experiments with the ground floor, since the entrance hall, Great Hall, and marble staircase are among the most frequently (and consistently) described areas of the castle. I took a bubble diagram approach and allowed myself to get really, really messy:
The areas closest to the entrance hall and Great Hall (GH on the right) were already feeling fairly locked in, but as you move further and further away, things get less and less certain.
Moving from the castle’s ground floor to its highest peaks, I started playing around with tower size and placement, since these will greatly impact the overall look and layout of the castle. I experimented in both 2D and 3D, again allowing for extreme roughness:
The existence of a bell tower is speculative; it’s never referred to as a tower in the book, but the bell seems to boom from somewhere above, perhaps especially close to the courtyard and classroom eleven. Considering how Hogwarts is a “vast” “towering mass” of “many turrets and towers”, I don’t think I necessarily have to limit myself just to the six towers that are explicitly described.
I next looked at the seventh floor. Here’s our first (and biggest) instance of the books not agreeing with each other. In the first three books, the corridor with the portrait hole to Gryffindor Tower seems to be on the third floor, but starting in Goblet of Fire, it’s very clearly on the seventh. Here I cleaved to my guiding principles above and accepted the seventh floor as canon. My other main landmarks on this floor were the Room of Requirement (RoR) and Dumbledore’s office, so I tried to work out how they relate to each other.
This is where I started getting a little overwhelmed with this side project and stopped working on it. I was also turned off by Rowling’s misguided comments about transgender people, which didn’t help. So for now, this side project has gone dormant, possibly to be revived someday…possibly not. In the meantime, I hope you enjoy this glimpse of my process. If you’re really interested in this idea, there are some other great attempts online. I’m thinking in particular of this one and this one.
Let’s take a detour back to the moving staircases of Hogwarts! Thus far, as seen in this post, the environment has been very generic – just a tall rectangular space of the correct dimensions. Let’s fix that.
The biggest problem – we’re talking physically biggest – is that there’s supposed to be an extra chamber in the bottom section where the big window goes. Even if I’m not going to add the window yet, I can at least add that chamber:
Notice also the addition of a blue screen floor. This sits at the floor level of the actual set and also corresponds roughly to its footprint. Below that, I’ve lowered the main floor to reflect the slightly greater depth of the miniature. This is important because I won’t have room for the whole window if I leave the floor at set level. (The window only existed in the miniature, as far as I’m aware – though that changed in the redesigned Prisoner of Azkaban set.)
Next step is to hide the blue screen floor and add the lamps that help light the space:
(None of this is intended to look as realistic as the main castle model…the materials are very basic and these are just quick renders with Blender’s Eevee engine, which specializes in speed at the cost of physical accuracy.)
With lamps in place, let’s start adding the passageway that leads to this room from the Great Hall/Chamber of Reception area. (This was not part of the miniature as far as I’m aware, but it most definitely was part of the set.) This area is interesting because the production design draws very heavily on the real world – specifically, the steps at Christ Church Cathedral at Oxford, where the Chamber of Reception interior scenes were shot. You can see this most clearly with the large stone arches, which were built to match the ones at Christ Church, tying the sets and location shoots together into one shared imaginary space. The doors to the Great Hall set use the same arch design as well…a fact I’m grateful for, since the Warner Bros. Studio Tour was kind enough to post detailed drawings of those doors. You can see the same design on the castle exterior model as well, though I haven’t built those parts yet.
As always, things start with a confusing mess of intersecting curves that gradually coalesce into something more recognizable:
One of these arches is used as the entryway to the main room with the moving stairs:
Nice to be able to duplicate the design as needed:
Those rather ghostly outlines are caused by the same “backface culling” feature that allows us to see into the rooms from outside.
With more walls, details, and openings coming together, this area is starting to look quite a bit like the set…
…minus all the paintings, of course. As I see it, I have three basic options with those. In order of increasing difficulty:
Pull a Filch and omit them entirely.
Scatter the walls with a variety of paintings that look right overall.
Try to match the paintings seen in the films, frame by frame, painting by painting (and fill in the gaps with option 2).
I’m currently sticking with option 1, but who knows?
In any case, there’s still more work to be done here. I need to add the rest of those smaller arched openings throughout the room, and I need to add the large, ornate window on the opposite side. Look for those in a future post! I also still hope to do some videos and scale comparisons and whatnot once this side project is complete. I might need to invest in a new GPU before then, since my current equipment is crashing if I try to render any more lamps with Eevee…
As we’ve seen, POA featured some significant additions to the castle’s architecture, many of which were anchored by the new clock tower in the southwest corner. The last remaining piece of this section was the small gatehouse at the end of the wooden bridge. This came together easily; the only real question was how big to make the torch, since its size (relative to the building) differs significantly between the miniature and the full-sized set built at Glencoe. I ended up using the same scale as some of the castle’s other torches, which resulted in me kinda splitting the difference between the two sizes.
Believe it or not, that brings the POA additions to something of a complete state!
The south wing as a whole is still not complete, since I haven’t touched the quad interior due to scarcity of reference material. I also still need to add the walkway that connects the Chamber of Reception to the quad, but I’m holding off for the same reason.
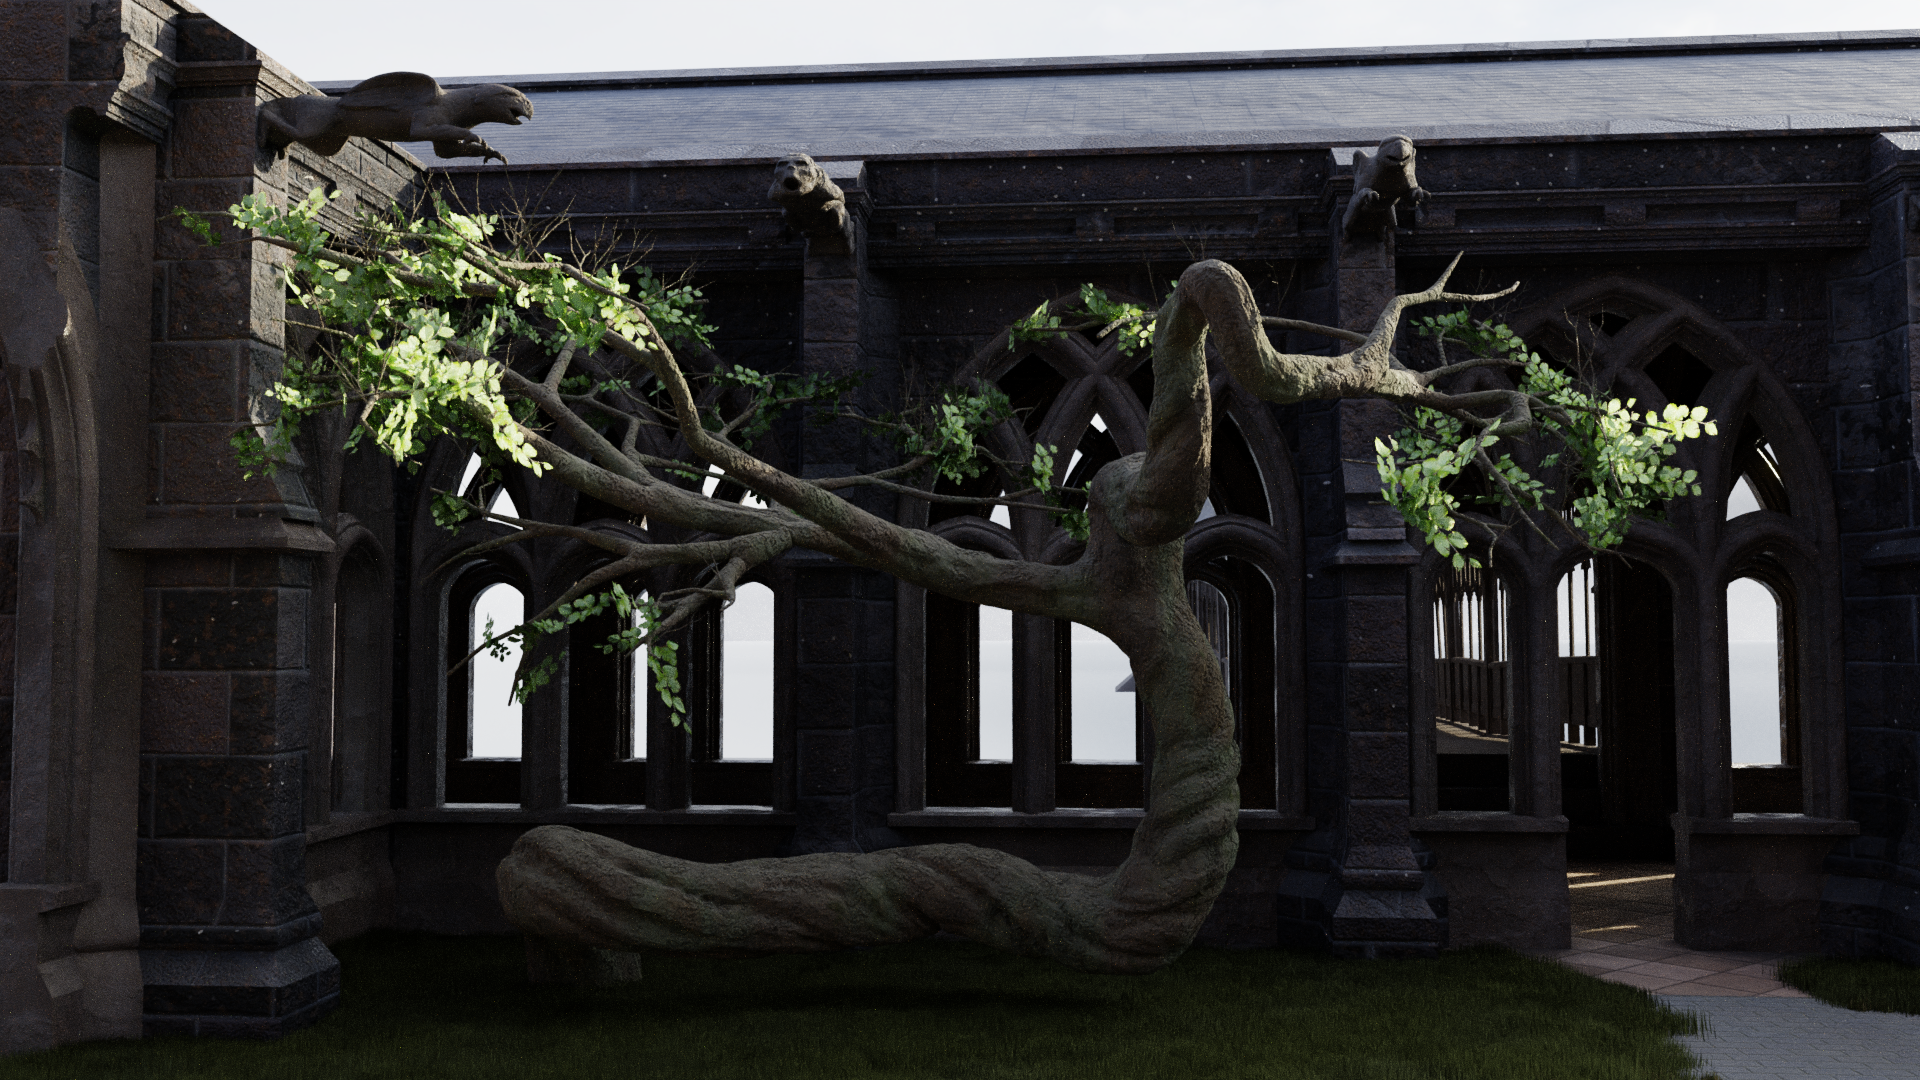
Knowing this, I decided it was just about time to turn my attention to the castle’s north wing, much of which is derived from Durham Cathedral and Alnwick Castle. There were just a few odds ‘n’ ends to finish up first, like the fleur-de-lis pattern at the back of the Great Hall (bottom right):
Another miscellaneous item was the tree in the clock tower courtyard where Buckbeak’s executioner sits to sharpen his blade. It was fun creating its forking, branching paths by hand, following what we see in the film for the trunk and larger branches, then just going crazy with the smaller branches. I allowed Blender’s Skin modifier to bulk it all out into a basic three-dimensional form:
Whoops…I realized I’d forgotten to add the steps leading up from the courtyard to the wooden bridge. I added those, sculpted a bit more detail into the tree trunk, and used a particle system to add some leaves.
Next came ivy to help the courtyard feel a little more overgrown and wild:
I also spent some time grappling with Blender’s Mantaflow fluid simulation engine, trying to get convincing smoke to furl from the castle’s chimneys. It took the better part of a day for me to figure out that my baking errors stemmed from an apostrophe in the cache folder path (a folder descriptively named “Joe’s Stuff”). With that finally resolved, I was able to get some smoke in there:
After all the frustration, I really like how it turned out! I think that’s a nice note upon which to end the work on the south wing, at least till I can find more reference for the POA-era quad. Next we turn to the north wing, starting with the Durham section!
After creating the major building blocks of the clock tower courtyard, it was just a matter of carefully putting them all together. Here’s a first render with the modeling all finished:
This, of course, is the courtyard in relatively pristine condition, but it’s supposed to be rather run-down and overgrown. As with the fountain, I used Boolean modifiers to knock out chunks of the appropriate walls and arches. The great thing about this method of destruction is it’s…well, non-destructive. Everything is still there – it’s just hidden.
As I added some different ground textures, I also started layering in vegetation – a first for this project. Blender’s hair simulation allowed me to grow pretty satisfactory grass along the courtyard. I weight-painted the distribution so so it would clump around the fountain, walls, and columns. This clumping does vary between films and between sets/miniatures; I aimed to split the difference in a way that felt natural. (I haven’t worked much with particle systems…imagine my surprise and delight when I discovered that my render times barely took a hit!)
It’ll need more work, but it’s more grass than I had before!