Let’s return to the clock tower courtyard. With the fountain in the center finished, I decided to now enclose it with the courtyard itself. Existing as a full-scale set and as miniatures at 1:24 and 1:10 scales, the courtyard was designed for the third Potter film and is surrounded by aged cloisters and overgrown vegetation. There’s a lot of complex geometry to capture. I compared photogrammetry, production stills, technical drawings, film frames, shots from the Warner Bros. Studio Tour, the similar courtyard in front of the castle in films 4-6, the larger version thereof in the final film, etc., etc. Eventually, I felt like I had a decent understanding of the space.
One thing I’d never noticed before was that there are actually two different designs to the arched tracery of the cloisters:

The one on the right is taken directly from Durham Cathedral, lending stylistic unity with the location shoots from the first two films. I’m not sure if the one on the left is taken from a real-world location, but it’s certainly very similar to a lot of real Gothic tracery out there. That one is used primarily in the sections of these cloisters without a roof.
As with the fountain, my first task was to create the courtyard in a more-or-less pristine state, without any of the damage or erosion to be added later. (Adding the ground is a logical last step so I don’t have to worry about it blocking my view of the blueprints beneath the model.) Notice how the last arch on the right has the Durham tracery design:

The courtyard has elongated gargoyles placed at intervals around its interior, and while they look similar, there are actually two designs that alternate: a hippogriff and a centaur, although they’re so stylized that I had to study them for a while to figure out what they were depicting.
When they repurposed the clock tower courtyard set for the viaduct courtyard after Prisoner of Azkaban, they kept these gargoyles in place, providing a lot more visual reference. (Interestingly, while the gargoyles also made it into the larger version of the viaduct courtyard for Deathly Hallows, their features are much more sharply defined and less eroded in this version. I decided to split the difference for the purposes of my model.)
For the centaur design, I even had the benefit of a pretty accurate orthographic drawing published in The Art of Harry Potter. I based my Blender sculpt on that drawing and then baked a normal map onto a simplified version, much like I did for the fountain statues, although I didn’t bother with manual retopology – I knew this guy would never need to be rigged, posed, or animated, so I just let the Remesh modifier take care of the simplified topology for me. Anyway, you’ve already seen me go through this with the fountain statues, so instead of boring you with similar images, I’ll share this unique WIP view of the centaur sculpt from the inside:
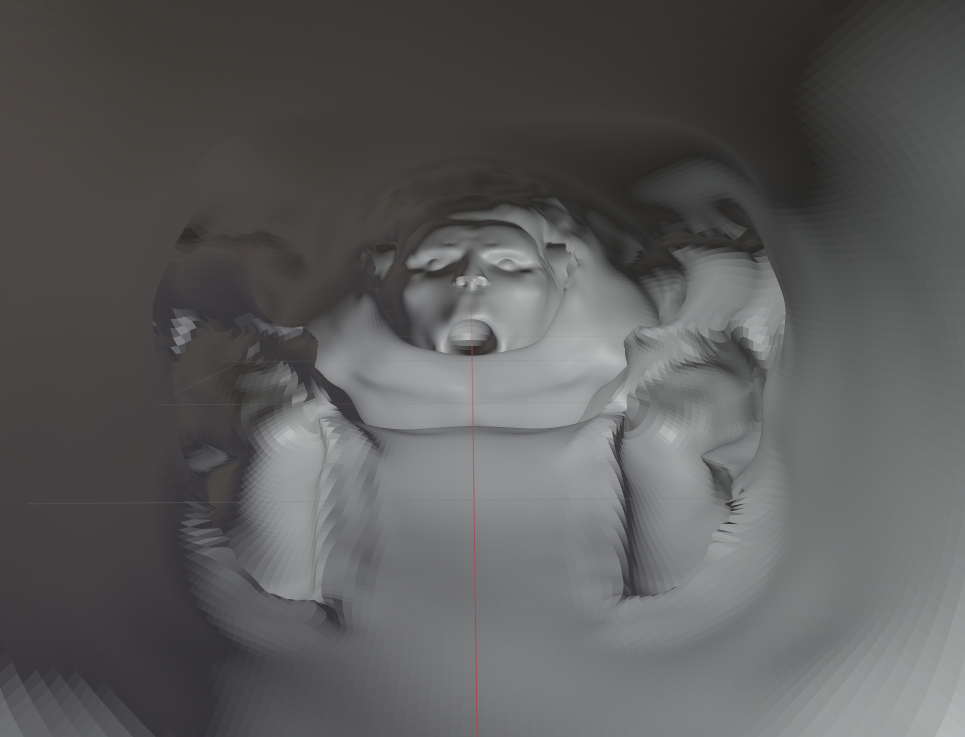
Enjoy your nightmares.
Anyway, here’s the completed centaur design in situ, with some procedural noise layered onto the normal map baked from the sculpt:

I made the mistake of not putting much work into the base mesh before sculpting this guy, so there were some areas of the sculpt that got dicey. The hippogriff fared better because I took the time to create a proper base mesh, like I had with the eagle sculpt. See, what a cutie! (I didn’t have original ortho drawings for this one, so I was wingin’ it. Heh.)

I tried to again use the Remesh modifier for my lower-poly version, but it didn’t work as well on this fella. Sharp parts like the beak and claws did not work well at all. Back to manual retopology! Oh well, it’s good practice, and a good opportunity to improve upon some of the poor topology on the eagle statue. My brain is not wired to easily just throw down perfect edge loops.
By the way, if the term “normal map” doesn’t mean anything to you, here’s what the one for the hippogriff gargoyle looks like:

The different colors essentially tell the software to pretend the surfaces point in slightly different directions than they actually do, thereby simulating details that aren’t actually there. Blender “bakes” these maps by comparing the surface of the simplified mesh to the original sculpt.
Here’s the end result:

The tricky thing with this one is that the front legs seem to have fallen off many of the gargoyles in the clock tower courtyard and the original viaduct courtyard, but the ones in the larger Deathly Hallows viaduct courtyard are intact. I think I’m just gonna keep the legs for the time being.
Here’s where we’ll leave off for today. In a future post, we’ll build the remaining walls of the courtyard and damage the appropriate areas.


