South Wing Odds ‘n’ Ends

As we’ve seen, POA featured some significant additions to the castle’s architecture, many of which were anchored by the new clock tower in the southwest corner. The last remaining piece of this section was the small gatehouse at the end of the wooden bridge. This came together easily; the only real question was how big to make the torch, since its size (relative to the building) differs significantly between the miniature and the full-sized set built at Glencoe. I ended up using the same scale as some of the castle’s other torches, which resulted in me kinda splitting the difference between the two sizes.

Believe it or not, that brings the POA additions to something of a complete state!

The south wing as a whole is still not complete, since I haven’t touched the quad interior due to scarcity of reference material. I also still need to add the walkway that connects the Chamber of Reception to the quad, but I’m holding off for the same reason.

Knowing this, I decided it was just about time to turn my attention to the castle’s north wing, much of which is derived from Durham Cathedral and Alnwick Castle. There were just a few odds ‘n’ ends to finish up first, like the fleur-de-lis pattern at the back of the Great Hall (bottom right):

Another miscellaneous item was the tree in the clock tower courtyard where Buckbeak’s executioner sits to sharpen his blade. It was fun creating its forking, branching paths by hand, following what we see in the film for the trunk and larger branches, then just going crazy with the smaller branches. I allowed Blender’s Skin modifier to bulk it all out into a basic three-dimensional form:

Whoops…I realized I’d forgotten to add the steps leading up from the courtyard to the wooden bridge. I added those, sculpted a bit more detail into the tree trunk, and used a particle system to add some leaves.

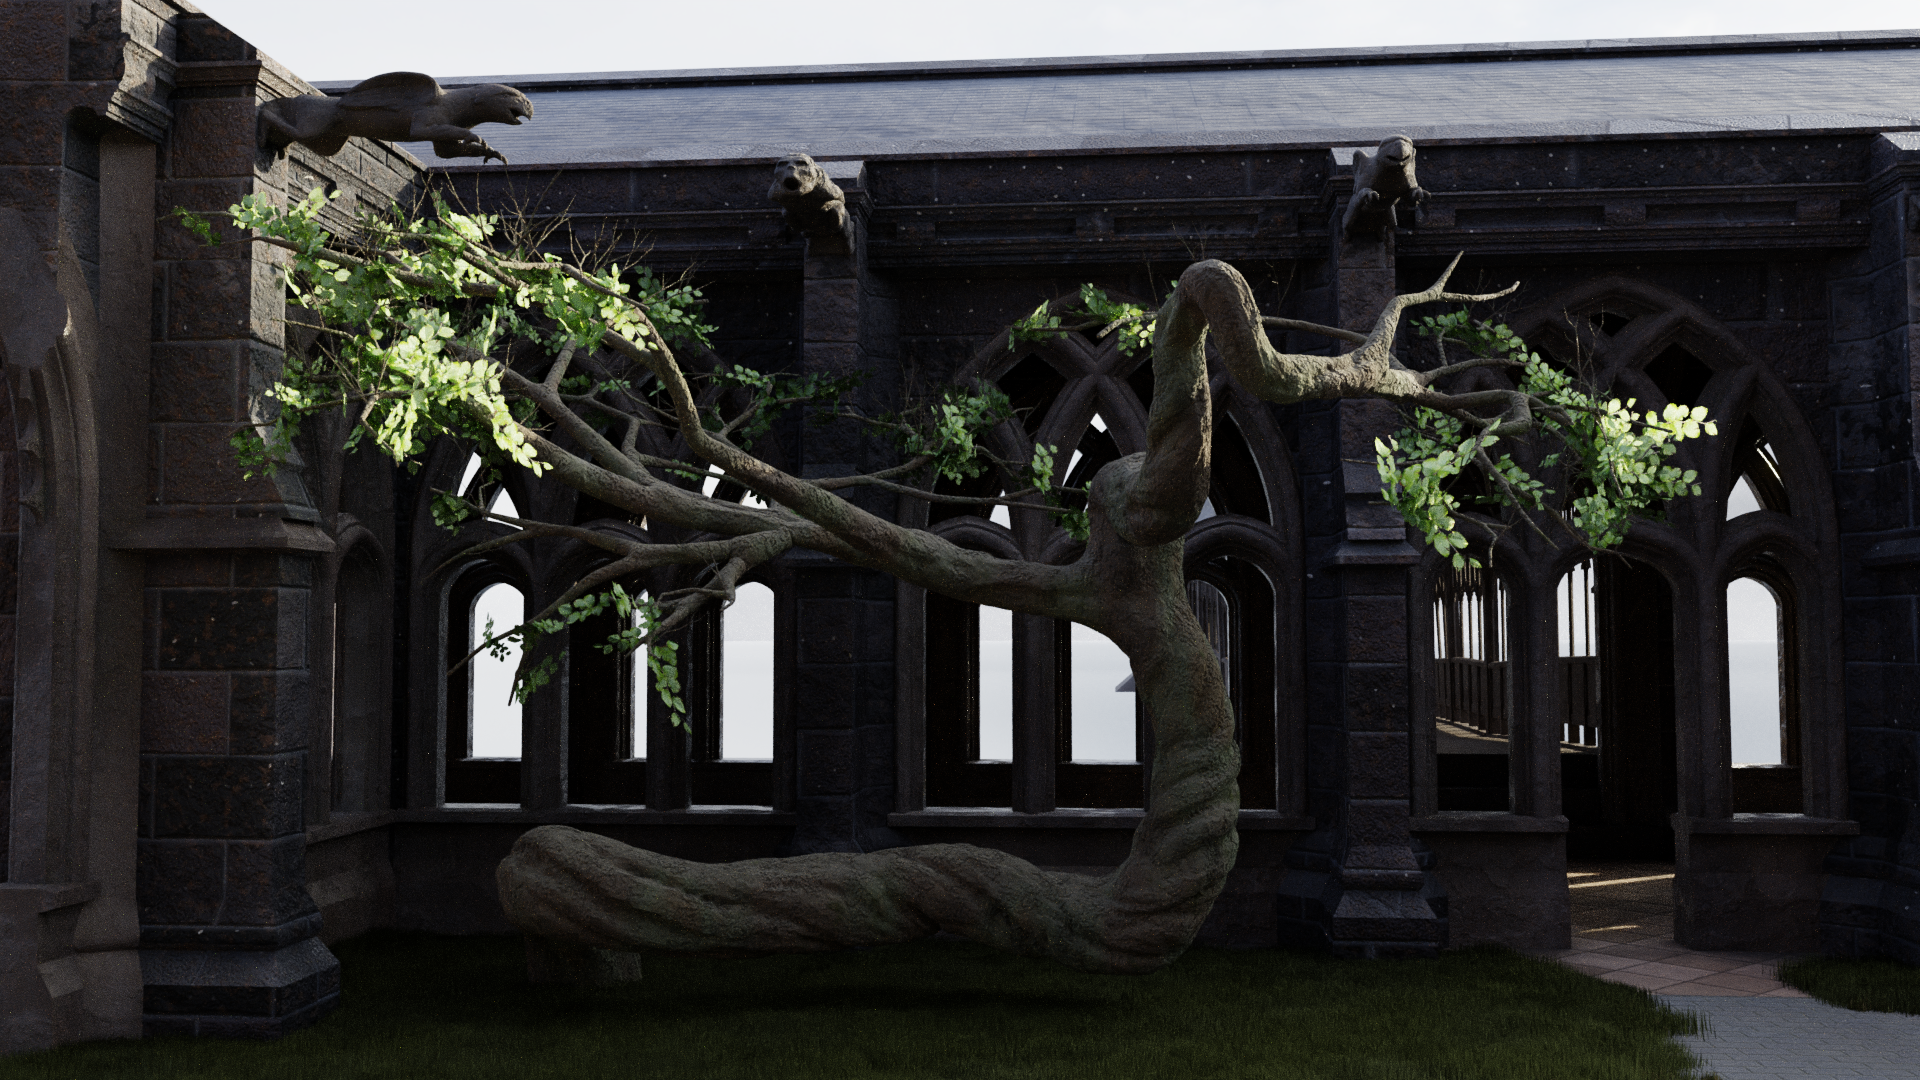
Next came ivy to help the courtyard feel a little more overgrown and wild:

I also spent some time grappling with Blender’s Mantaflow fluid simulation engine, trying to get convincing smoke to furl from the castle’s chimneys. It took the better part of a day for me to figure out that my baking errors stemmed from an apostrophe in the cache folder path (a folder descriptively named “Joe’s Stuff”). With that finally resolved, I was able to get some smoke in there:

After all the frustration, I really like how it turned out! I think that’s a nice note upon which to end the work on the south wing, at least till I can find more reference for the POA-era quad. Next we turn to the north wing, starting with the Durham section!

Completing the Wooden Bridge (POA Edition)

With the basic structure of the wooden bridge in place, I next set out to adjust the support beams below. The bridge spans a ravine and its cross beam patterns do vary. Paying close attention to their arrangement in the original miniature, I first modified the half closest to the castle:

Then it was just a matter of duplicating the structure to the far side and tweaking a spot where it’s not quite symmetrical:

This brings the bridge to a complete state…at least, without all the shaky imperfections that give the original its charm. Time to get those in there.

My weapon of choice was Blender’s Mesh Deform modifier, a nondestructive tool that allows you to manipulate one object’s shape and have it affect the shape of another. I created a much, much simpler version of the bridge – really just a 3D envelope to roughly surround it – and manually pushed different sections around to approximate the swaying structure seen in the films. Blender obligingly shifted the detailed model of the bridge to match.

Just for fun, here’s the simplified envelope visualized with a translucent material around the actual bridge model, prior to any distortion:

And when I warped that envelope (twice due to some annoying lost work), it made the detailed bridge underneath look this!

(This is after breaking apart the roof into some separate chunks with their own local coordinates so that the shingle texture would map correctly onto them.)

I’m feeling quite happy with this! It’ll look a lot better once I’ve added terrain, of course. And even just adding the gatehouse at the other end will help. I think that’ll be my next task.

Revealing the Bridge

Possibly the most noticeably new castle feature in Prisoner of Azkaban was the long, rickety wooden bridge leading from the new clock tower and courtyard to the new location of Hagrid’s hut and the Whomping Willow. (The bridge stuck around all the way through to Deathly Hallows, when it was enlarged to make its destruction more dramatic.)

As with so many things, it’s easier to build something like this in its original pristine state and then deform it appropriately. So I set out to create a perfectly straight version of the bridge with none of its characteristic undulations:

Not very recognizable yet. Adding the roof and a few more elements helps a lot:

That’s more like it!

As I began to add the trestle structures below, I threw in some textures as well:

This all came together pretty quickly, in part because everything you see above consists of a single 8-foot-long segment with an Array modifier that dynamically duplicates it 24 additional times. Then it was time to move the bridge into place as I continued to add details:

Thus far, I’d avoided all the wooden tracery that gives the bridge its ornate look. There are actually two designs used on different parts of the bridge, something I’d never noticed before. I recreated both:

Next steps will be to adjust the bottoms of the supports to match the ravine below, adjust the texturing on the roof, and ultimately bend and twist the segments of the bridge to give it its final wobbly look.

Completed: Clock Tower & Hospital Wing

Short post today. I finished the clock tower! The only two pieces I still needed to add were the big window in back and the enormous pendulum that hangs down through the entry. Both are now in place! (I’d avoided the window for ages because I couldn’t find a clear shot of the tracery. Then I randomly came across a shot of a window at King’s College Chapel and realized that it was the exact same design. Problem solved!)

Around the other side of the building, I’ve been really hesitant to finish the hospital wing because the placement of the detailing toward the bottom will depend on the detailing of the surrounding quad walls, and I haven’t been able to add those due to insufficient reference. But I bit the bullet and at least took care of the top section:

I’ll still need to add the windows and so forth down below once I’m able to complete the quad. In the meantime, I’m gearing up to probably tackle the (gulp!) wooden bridge next.

The Clock Tower Courtyard

Let’s return to the clock tower courtyard. With the fountain in the center finished, I decided to now enclose it with the courtyard itself. Existing as a full-scale set and as miniatures at 1:24 and 1:10 scales, the courtyard was designed for the third Potter film and is surrounded by aged cloisters and overgrown vegetation. There’s a lot of complex geometry to capture. I compared photogrammetry, production stills, technical drawings, film frames, shots from the Warner Bros. Studio Tour, the similar courtyard in front of the castle in films 4-6, the larger version thereof in the final film, etc., etc. Eventually, I felt like I had a decent understanding of the space.

One thing I’d never noticed before was that there are actually two different designs to the arched tracery of the cloisters:

The one on the right is taken directly from Durham Cathedral, lending stylistic unity with the location shoots from the first two films. I’m not sure if the one on the left is taken from a real-world location, but it’s certainly very similar to a lot of real Gothic tracery out there. That one is used primarily in the sections of these cloisters without a roof.

As with the fountain, my first task was to create the courtyard in a more-or-less pristine state, without any of the damage or erosion to be added later. (Adding the ground is a logical last step so I don’t have to worry about it blocking my view of the blueprints beneath the model.) Notice how the last arch on the right has the Durham tracery design:

The courtyard has elongated gargoyles placed at intervals around its interior, and while they look similar, there are actually two designs that alternate: a hippogriff and a centaur, although they’re so stylized that I had to study them for a while to figure out what they were depicting.

When they repurposed the clock tower courtyard set for the viaduct courtyard after Prisoner of Azkaban, they kept these gargoyles in place, providing a lot more visual reference. (Interestingly, while the gargoyles also made it into the larger version of the viaduct courtyard for Deathly Hallows, their features are much more sharply defined and less eroded in this version. I decided to split the difference for the purposes of my model.)

For the centaur design, I even had the benefit of a pretty accurate orthographic drawing published in The Art of Harry Potter. I based my Blender sculpt on that drawing and then baked a normal map onto a simplified version, much like I did for the fountain statues, although I didn’t bother with manual retopology – I knew this guy would never need to be rigged, posed, or animated, so I just let the Remesh modifier take care of the simplified topology for me. Anyway, you’ve already seen me go through this with the fountain statues, so instead of boring you with similar images, I’ll share this unique WIP view of the centaur sculpt from the inside:

Enjoy your nightmares.

Anyway, here’s the completed centaur design in situ, with some procedural noise layered onto the normal map baked from the sculpt:

I made the mistake of not putting much work into the base mesh before sculpting this guy, so there were some areas of the sculpt that got dicey. The hippogriff fared better because I took the time to create a proper base mesh, like I had with the eagle sculpt. See, what a cutie! (I didn’t have original ortho drawings for this one, so I was wingin’ it. Heh.)

I tried to again use the Remesh modifier for my lower-poly version, but it didn’t work as well on this fella. Sharp parts like the beak and claws did not work well at all. Back to manual retopology! Oh well, it’s good practice, and a good opportunity to improve upon some of the poor topology on the eagle statue. My brain is not wired to easily just throw down perfect edge loops.

By the way, if the term “normal map” doesn’t mean anything to you, here’s what the one for the hippogriff gargoyle looks like:

The different colors essentially tell the software to pretend the surfaces point in slightly different directions than they actually do, thereby simulating details that aren’t actually there. Blender “bakes” these maps by comparing the surface of the simplified mesh to the original sculpt.

Here’s the end result:

The tricky thing with this one is that the front legs seem to have fallen off many of the gargoyles in the clock tower courtyard and the original viaduct courtyard, but the ones in the larger Deathly Hallows viaduct courtyard are intact. I think I’m just gonna keep the legs for the time being.

Here’s where we’ll leave off for today. In a future post, we’ll build the remaining walls of the courtyard and damage the appropriate areas.

Building the Grand Staircase “For Real”

Let’s return to my efforts with the separate model of the grand staircase from the first two films, as described in this post. With mockups and tests out of the way, it’s time for a real attempt at modeling the grand staircase! All of the flights of stairs in that room (other than a few at the bottom) have identical designs and dimensions, so I’ll be able to do a lot of duplication here. We’ll start off simple:

Cool. Next comes the room itself, or at least a very basic start at representing its shape. Starting to duplicate some elements, throwing in some basic lighting and coloration…

Yeah, this is gonna work. I decided from the get-go that I wanted this side project to be geared toward Blender’s Eevee render engine, rather than the slower but more realistic Cycles engine I normally use. Makes it a lot quicker to churn out renders as I go.

I started messing with the animation early on. This adds a whole different level of complexity to the project, since the motion of the stairs also affects the configurations of the handrails…and typically when one flight moves, another has to move to get out of its way…but the flights can’t all move simultaneously without colliding into each other…yeah, it’s tricky. Still, I was able to get the first few flights working with fairly minimal “cheating” – here are two views with all the swiveling stairs (so far) in their two main positions.

To help you get oriented, the long landing at the bottom right (with the baluster shadows on it) is where Harry and friends first emerge into this room. I just haven’t built the archway through which they enter, or the rest of the set beyond. The first render reflects the way the model was built; the second reflects the alternate positions after the stairs have rotated.

One thing that helps with this is that I’ve activated backface culling for the room itself. In computer graphics, each surface “faces” a particular direction; we call this the normal. Ordinarily you can see the surface from either side, but with backface culling, you can only see it from its “front” side. I built the room so its normals all point inward, which means you can always see into the room, no matter what angle you’re at.

I paused work on the staircase to switch back to some of the other stuff I’ve more recently posted about, and that’s when I hit a snag…another fan turned me on to some old issues of Cinefex magazine that describe “an eighth-scale, forty-foot miniature, laid on its side to aid construction and photography” (#88, regarding the first film) and “a 40-foot-long staircase miniature built previously” and reassembled as it was before (#93, regarding the second film).

This stumped me. Hard. The model was indeed laid on its side, but at 1:8 scale, the various real-world items strewn about in construction photos would look much, much larger than they do. And if the miniature still measured 40 feet along its longest side at 1:8 scale, that would make the “real thing” 320 feet tall…and by my calculations, it should only be in the low 200s.

Ultimately, I’ve decided to press forward with my original dimensions, essentially disregarding the Cinefex figures. My best hypothesis is that the reference to 1:8 scale is incorrect – probably a misreading or misremembering of 1:3 scale – and the 40-foot figure isn’t the distance from the room’s bottom to top, but from the open wall nearest the Great Hall to the opposite wall with the large window. That math actually works perfectly if the scale was indeed 1:3.

So I continued building the rest of the flights of stairs. It turns out a little more “cheating” is necessary than I originally hoped…some of the balustrades are going to have to magically pop out of nowhere. But then again, the castle is magical. And the only alternatives are to leave unprotected ledges 200 feet up (yikes) or to have some of the balustrades sweep right through the landings, knocking off any students in their way (yikes again).

In any case, I’m mainly focused on the configuration in which the model was built; all the stair movement was digital (other than the one full-sized flight on the set that actually moved). The movement is just a bonus. With all the flights in place, it looks something like this:

The walls, floor, and ceiling are still just placeholders, really, and I haven’t added the lamps below the landings yet. But the stairs themselves are all accurate! Notice how they form two unconnected spirals that switch sides at the top and bottom. In a future post, we’ll add more detail to the rest of the room, and maybe some less generic materials. Then come animations and flythrough/around videos!

A Little “Proof of Concept”

Golden eagles and moving staircases can get frustrating. Sometimes you just need to return to your comfort zone and make some turrets. That’s what led me to spend some time (for once) on a version of Hogwarts that’s NOT the one from the third film! We’re going all the way back to the beginning, to a simpler time before the back of Hogwarts got its elaborate clock tower and courtyard. We’re going back to Harry Potter and the Philosopher’s/Sorcerer’s Stone!

In addition to giving me some relief from the project’s more challenging tasks, this gave me a chance to play a bit with this project’s whole primary purpose: providing 3D comparisons between different versions of the model. So I built a new version of the quad’s outer wall, but in its original state, before the hospital wing and clock tower and so forth were added for Azkaban. It’s very difficult to find information about this area of the original model, but I think I’ve been able to get a pretty close facsimile:

Still woefully incomplete, of course, but the cool thing is that I could keep the camera in the exact same spot and render a direct comparison with the (also incomplete) POA version:

This is the kind of stuff I want to get into when the project is reaching its final stages. I’d even like to let the camera glide slowly around the model as things change from film to film…I think that would be visually appealing and very informative.

(Now’s also as good a time as any to point out that I’m now on Instagram; I don’t necessarily post a lot, but feel free to follow there as well if you’d like!)

Anyway, no idea how long I’ll be working on this SS version of the castle right now; I’ll have to get back to those statues sooner or later. We’ll see what my next post ends up being about!

My Hogwarts Model Featured in “Les Fondateurs 2” Teaser!

The teaser trailer for Les Fondateurs: La Quête de Gryffondor is out! Spoiler alert: there’s a brief shot of Hogwarts at the end, courtesy of yours truly. I’m really looking forward to producing more shots of the castle for this fan film!

Fun facts about the animation, which was created specifically for the teaser:

  • This was created using a copy of the main model. I removed everything that wouldn’t be visible, since I wasn’t using a render farm and I wanted to keep the render times decently fast. (We intend to use a render farm for the film itself, and I also plan to bake a lot of the procedural textures to images, which should speed things up. By then Blender will have adaptive sampling as well.)
  • This shot includes some parts of the castle that weren’t/aren’t complete in the main model – I built some geometry that would work for this brief shot, but there are some inaccuracies. Fortunately, the castle does change over time! In any case, the model used for the film itself will be more detailed and accurate.
  • There are no volumetrics in this shot – all the fog was a composited mist pass, plus an overcast HDRI for the sky and lighting. (Thanks, HDRIHaven!)
  • I removed the pipe that sticks out of Gryffindor Tower…it looked funky from this angle and distance.

I’m looking forward to seeing this project come together!

The POA Clock Tower Approaches Completion

More staircase stuff to come, but for now, back to the main project! With my clock tower photogrammetry in place, I was able to finish up the clock tower’s entryway, again relying more on shots of the set than shots of the miniature, since that area is really only visible from above or from within the courtyard. Fortunately, the sets seem to match the miniature pretty well here. Even though the miniature as currently installed at Leavesden has the doors closed and portcullis down, I decided to keep mine nice and open. My Hogwarts is a welcoming, friendly place. Just look at all the people.

Awkward. Well, anyway, the details look cool, but it’s hard to see beyond the archway; it gets darker in the shadows. Let’s crank up the exposure a little and move beneath the arch to take in all this stuff that we’ll rarely see otherwise!

The actual interior is still dark and boring, but there’ll soon be big windows on the other side of the room.

Let’s talk about those doors, by the way. John Williams wrote a cue for the scene in which they’re locked to secure the school, and he called it “The Big Doors”. He wasn’t kidding. They’re HUGE – around 67 or 68 feet tall, by my estimation. I’m sure they only built the bottom portion for the set, but in the miniature, they just go up and up and up. Imagine the weight…imagine trying to open or close them by hand…

Anyway, the next step was to add windows on the other faces of the clock tower, as well as the details on the dormers along the roof. (Fortunately, these seem to be very similar or identical to the ones on the roof of the Defense Against the Dark Arts building, which I’ve already created, so this didn’t take long.)

With those finished, there are precisely three details left to add to the clock tower: the big window in the back, a small arch at one of the corners, and another door at another corner. Oh, and probably the clock pendulum, too. So four. But I can’t find good reference for the big window, and there’s no point in putting in the pendulum till I have the big window to silhouette it against…and the placement of the arch and door will depend on the placement of the courtyard, and I’m not going to build the courtyard till I’ve built the ruined fountain in the middle. (No sense in enclosing the courtyard and then having to constantly hide pieces to build the stuff inside.) So the fountain is up next!

Clock Tower Progress & Courtyard Photogrammetry

Let’s continue with the Prisoner of Azkaban clock tower! I created the columns and elaborate moulding below the clock. As you can see in this “work in progress” render, everything was still separate from the building at this point:

But as these areas became more complete, I began placing them correctly along the building. I also discovered some issues with how I’d built the facade last year, so I decided to simply redo some of it altogether. Below, you can see some of the old walls removed for replacement as I maneuvered the new elements into position:

I resisted the urge to simplify some of these details, and I’m glad I did. The results were worth it the effort! This has become one of the most detailed areas of the model so far, mostly because the original design has a lot of details, but also because the available reference material is so good. Maybe it’s a good thing I don’t have detail drawings for most of the castle…everything would take so much longer if I could get this precise with everything:

Fun fact, by the way: see that arch at the bottom of the last render? In the miniature, it’s just got open air behind it, but they created a full-sized set for a shot in Order of the Phoenix, and in that version, it’s actually a balcony. (Umbridge and Filch are standing up there.) They don’t appear to have changed the miniature; I’m going to leave the balcony out.

Moving downward, we arrive at this lovely Gothic pediment that frames the entryway. No technical drawings for this one, so I had to just rely on as many reference images as I could find. Shots of this spot on the miniature are virtually impossible to get in the Warner Bros. Studio Tour, so most of my references are actually from the corresponding set, and some of the details can vary between the sets and the miniatures. Anyway, the modeling process looked much like building the arches above, so I won’t bore you with too many in-progress shots:

I also discovered how good Blender’s denoising has gotten, which means I can drastically speed up my renders. My poor machine only chugged for 15 minutes or so on these images, rather than an hour or more.

Anyway, as I got to the very bottom of the tower, where it meets the courtyard, I started feeling the need for more data. So I went on another photogrammetry spree, trying to create meshes from every possible shot of the courtyard/clock tower set in the film. (There are a lot of them!) Accuracy and precision are very important to me with this project – partly just so I know I’m getting something close to the “real thing”, and partly because I know from past experience that small errors have a way accumulating. You estimate the height of object B on object A, and then you estimate the height of object C on object B, etc., and before you know it, lots of small inaccuracies begin to add up…and sooner or later, those will clash noticeably with other estimations elsewhere on the model.

I’d like to avoid that, which is why I ended up with over a dozen photogrammetry meshes (with different lighting and even different seasons) thrown together to get a more complete picture of the courtyard!

Ugly, yes, but very helpful as I prepare to complete the clock tower and start on the courtyard.

P.S. Don’t let me forget to finish the hospital wing.

P.P.S. Happy belated Mother’s Day!