Baking the Bird

When we last visited the statue of a certain golden eagle gobbling up a certain rattlesnake from a certain courtyard in the third Harry Potter film, I’d created a base mesh for the initial sculpt in a separate file…

…but I’d temporarily given up when the flight feathers proved more challenging than I’d expected. Although I didn’t share this last time, I’d actually gotten the head off to a decent start, especially for an artist who doesn’t do much sculpting:

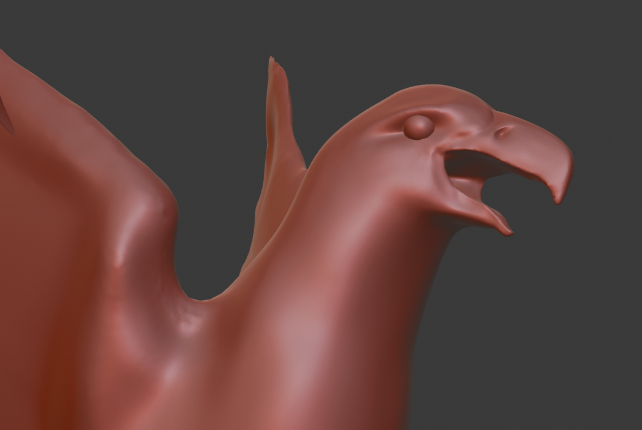
But those dang wings were confounding me. Sculpting them was giving results that were messy and uneven, so I decided to try modeling each feather as its own mesh. This seemed more promising, but I still couldn’t get the feathers to “flow” nicely. They have a lovely sweeping three-dimensional curve to them in the film and I wanted to capture that.

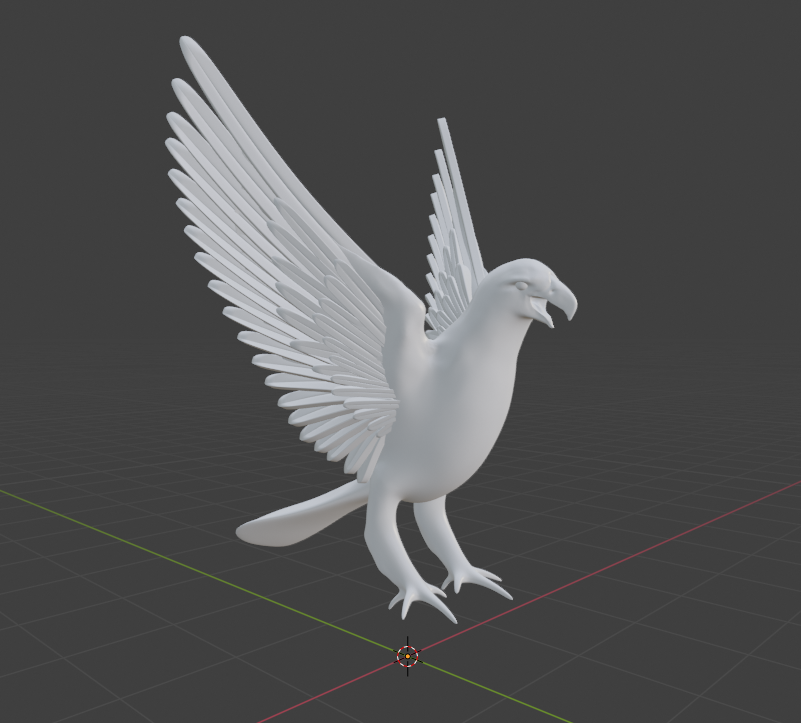
After taking a few days off to stew over this frustrating problem, the right method became apparent. I created four different feather shapes/rotations/positions (absolute shape keys, for my fellow Blenderheads) and allowed Blender to…well, blend between them. After playing with them for a while, I finally arrived at a result I could feel good about:

I’m sure there’s an ornithologist somewhere out there having a heart attack over the anatomical tomfoolery on display here, but whatevs. At a certain point, I have to remind myself that this statue is just a tiny part of a much larger just-for-fun model – and only certain versions thereof, at that. It’s not lost on me that I’m putting more effort into this statue than is really necessary for the purposes of this project, but I view it as an opportunity to learn and practice organic modeling skills that I’ve tended to neglect.

Anyway, I began creating some basic materials and threw in a background HDRI for lighting. The same shape key technique worked for the tail feathers…

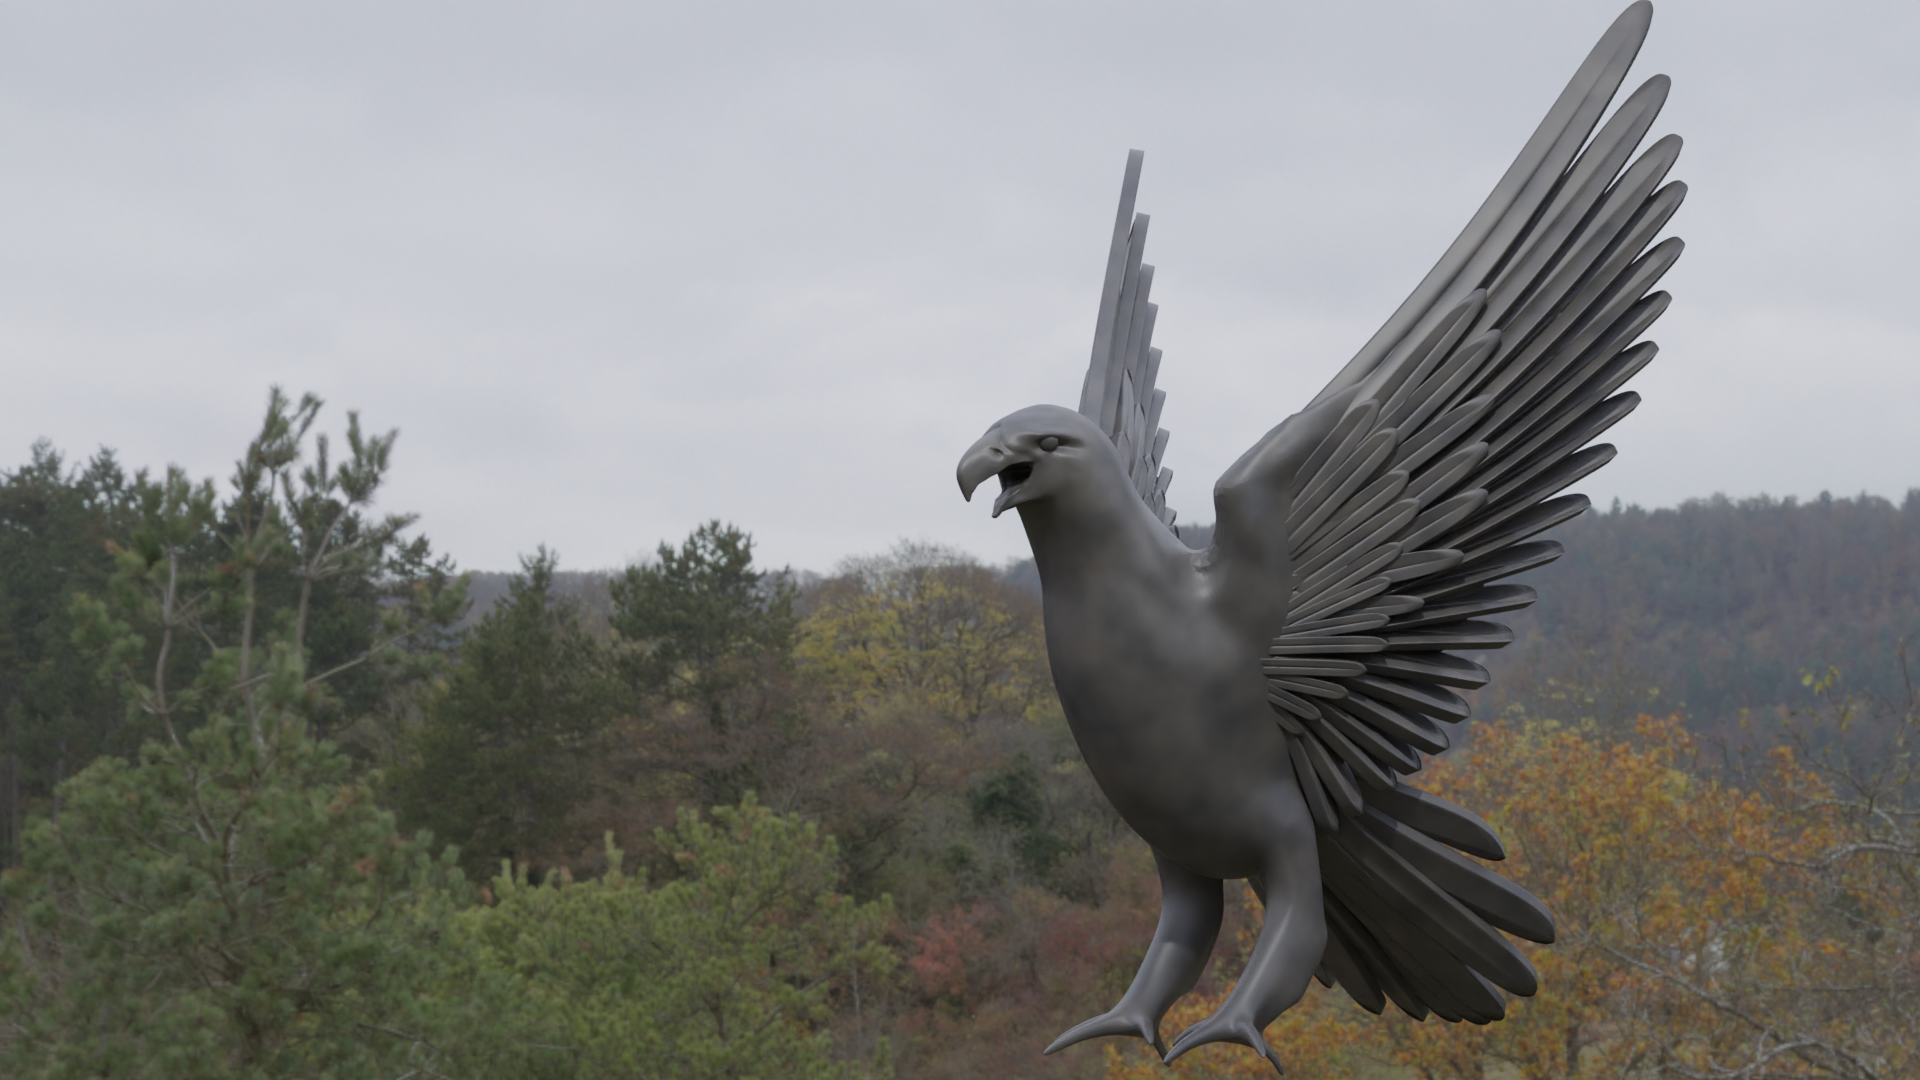
…but not for the finer, more textural plumage on the body. So I used Materialize (another piece of freeware) to help me create a textured sculpting brush from photography of real eagle feathers. Back in Blender, I used this brush to directionally “paint” three-dimensional feathers along the body. This gave me a great base texture; I reshaped parts of it by hand to create more convincing layers of feathers. Should be good enough, considering that this will mostly be seen from further distances.

I thought the legs and feet were going to be hard, but they actually turned out to be a lot of fun:

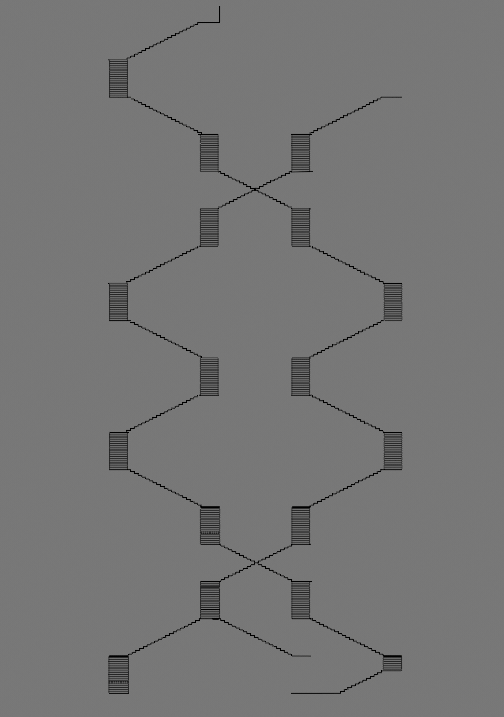
This brought the sculpt of the golden eagle to a state of completion! But at this point, this was all still real geometry – millions of tiny flat triangles connected together to form a complex, bumpy surface that slowed my computer down quite a bit. That’s where normal maps come in. I retopologized the statue into a nice, simple, clean mesh*…

…and then I baked all the details from the original sculpt into a normal map, an image that simulates the shading of the original detailed sculpt on the new simplified mesh. The result looks virtually identical, but the simplified model is waaaaaay less sluggish in terms of software performance, render times, and animatibility. (Shut up, I’ve decided it’s a word now.)

Next steps: creating the rattlesnake, posing the eagle to hold it, integrating the whole statue into the main model, and damaging the fountain to match its dilapidated state in the film. But I’ll save all that for another post. In the meantime, I’m just glad I decided to spend the extra time on this. Confession: I’d never actually done a full-on organic model like this, start to finish, from base mesh to sculpting to retopo and normal baking. It’s really boosted my confidence!

On a more serious note, I’m sure the recent months, weeks, and days have been very difficult for a lot of you. Sending lots of love, with the hopes that we will live to see – and create – a better tomorrow together.

* I’m not an expert in topology and edge flow…if you are, I very much welcome your critique! I’m sure I overcomplicated parts of this mesh, and there were a couple of hidden areas where I decided to just cut my losses and learn from my mistakes next time. The wings feature some staggeringly bad topology – spiral loops, super-squashed quads, and even a lone triangle – but I didn’t care much because these are almost entirely hidden by the feathers. They don’t even have any detail sculpted on them.

Building the Grand Staircase “For Real”

Let’s return to my efforts with the separate model of the grand staircase from the first two films, as described in this post. With mockups and tests out of the way, it’s time for a real attempt at modeling the grand staircase! All of the flights of stairs in that room (other than a few at the bottom) have identical designs and dimensions, so I’ll be able to do a lot of duplication here. We’ll start off simple:

Cool. Next comes the room itself, or at least a very basic start at representing its shape. Starting to duplicate some elements, throwing in some basic lighting and coloration…

Yeah, this is gonna work. I decided from the get-go that I wanted this side project to be geared toward Blender’s Eevee render engine, rather than the slower but more realistic Cycles engine I normally use. Makes it a lot quicker to churn out renders as I go.

I started messing with the animation early on. This adds a whole different level of complexity to the project, since the motion of the stairs also affects the configurations of the handrails…and typically when one flight moves, another has to move to get out of its way…but the flights can’t all move simultaneously without colliding into each other…yeah, it’s tricky. Still, I was able to get the first few flights working with fairly minimal “cheating” – here are two views with all the swiveling stairs (so far) in their two main positions.

To help you get oriented, the long landing at the bottom right (with the baluster shadows on it) is where Harry and friends first emerge into this room. I just haven’t built the archway through which they enter, or the rest of the set beyond. The first render reflects the way the model was built; the second reflects the alternate positions after the stairs have rotated.

One thing that helps with this is that I’ve activated backface culling for the room itself. In computer graphics, each surface “faces” a particular direction; we call this the normal. Ordinarily you can see the surface from either side, but with backface culling, you can only see it from its “front” side. I built the room so its normals all point inward, which means you can always see into the room, no matter what angle you’re at.

I paused work on the staircase to switch back to some of the other stuff I’ve more recently posted about, and that’s when I hit a snag…another fan turned me on to some old issues of Cinefex magazine that describe “an eighth-scale, forty-foot miniature, laid on its side to aid construction and photography” (#88, regarding the first film) and “a 40-foot-long staircase miniature built previously” and reassembled as it was before (#93, regarding the second film).

This stumped me. Hard. The model was indeed laid on its side, but at 1:8 scale, the various real-world items strewn about in construction photos would look much, much larger than they do. And if the miniature still measured 40 feet along its longest side at 1:8 scale, that would make the “real thing” 320 feet tall…and by my calculations, it should only be in the low 200s.

Ultimately, I’ve decided to press forward with my original dimensions, essentially disregarding the Cinefex figures. My best hypothesis is that the reference to 1:8 scale is incorrect – probably a misreading or misremembering of 1:3 scale – and the 40-foot figure isn’t the distance from the room’s bottom to top, but from the open wall nearest the Great Hall to the opposite wall with the large window. That math actually works perfectly if the scale was indeed 1:3.

So I continued building the rest of the flights of stairs. It turns out a little more “cheating” is necessary than I originally hoped…some of the balustrades are going to have to magically pop out of nowhere. But then again, the castle is magical. And the only alternatives are to leave unprotected ledges 200 feet up (yikes) or to have some of the balustrades sweep right through the landings, knocking off any students in their way (yikes again).

In any case, I’m mainly focused on the configuration in which the model was built; all the stair movement was digital (other than the one full-sized flight on the set that actually moved). The movement is just a bonus. With all the flights in place, it looks something like this:

The walls, floor, and ceiling are still just placeholders, really, and I haven’t added the lamps below the landings yet. But the stairs themselves are all accurate! Notice how they form two unconnected spirals that switch sides at the top and bottom. In a future post, we’ll add more detail to the rest of the room, and maybe some less generic materials. Then come animations and flythrough/around videos!

A Little “Proof of Concept”

Golden eagles and moving staircases can get frustrating. Sometimes you just need to return to your comfort zone and make some turrets. That’s what led me to spend some time (for once) on a version of Hogwarts that’s NOT the one from the third film! We’re going all the way back to the beginning, to a simpler time before the back of Hogwarts got its elaborate clock tower and courtyard. We’re going back to Harry Potter and the Philosopher’s/Sorcerer’s Stone!

In addition to giving me some relief from the project’s more challenging tasks, this gave me a chance to play a bit with this project’s whole primary purpose: providing 3D comparisons between different versions of the model. So I built a new version of the quad’s outer wall, but in its original state, before the hospital wing and clock tower and so forth were added for Azkaban. It’s very difficult to find information about this area of the original model, but I think I’ve been able to get a pretty close facsimile:

Still woefully incomplete, of course, but the cool thing is that I could keep the camera in the exact same spot and render a direct comparison with the (also incomplete) POA version:

This is the kind of stuff I want to get into when the project is reaching its final stages. I’d even like to let the camera glide slowly around the model as things change from film to film…I think that would be visually appealing and very informative.

(Now’s also as good a time as any to point out that I’m now on Instagram; I don’t necessarily post a lot, but feel free to follow there as well if you’d like!)

Anyway, no idea how long I’ll be working on this SS version of the castle right now; I’ll have to get back to those statues sooner or later. We’ll see what my next post ends up being about!

The Ruined Fountain Strikes Back

Let’s continue building the ruined fountain from Harry Potter and the Prisoner of Azkaban! I developed a hankering for some texturing, so I created this new material for the fountain. I used the same basic procedural texturing principles in Blender’s Cycles render engine that I used for the castle’s main materials – lots of strategic layering of Noise and Musgrave nodes at varying scales, mainly. The trick is to get this one to work a little better for intricate objects seen at a closer distance while retaining enough low-frequency detail to still look interesting when seen from further away. I think we’ve got a decent start:

I may even end up using this for the surrounding courtyard; it was designed/built at the same time in real life, and probably “in universe” as well. We’ll see how well that works once we get there.

In the meantime, gotta build some columns for this pediment to sit on. This is where I start having to rely more on photogrammetry (and photo reference) for dimensions, so the precision does go down a bit. Should still be quite close, though.

As I described previously, this is the intact fountain, prior to the damage we see in the film. I’ll be matching the damage in my model, but first comes the finishing touch on the fountain structure: the statues! I recently learned that these are an homage to Alfonso Cuarón’s heritage; the image of a golden eagle devouring a rattlesnake is important in Mexican culture. I’ll try to do right by that symbology!

First I studied a bunch of images of the statues as well as photos of real golden eagles and sketched out extremely rough orthographic views in Photoshop. I dropped these into Blender and created a base mesh – just a very rough shape upon which to start sculpting.

The actual eagle statue is frozen in motion, twisting as it grabs the rattlesnake. But sculpting these things is much easier if you start with a symmetrical pose, so that’s what I’m going for here. Then I’ll actually use animation techniques to give it a dynamic, asymmetrical pose.

Or at least, I will once I stop being a whiny baby and get back to work on this bird. For now, I’m fed up with trying to get the feathers right, so I’ve temporarily retreated to my comfort zone to make more buildings.

My Hogwarts Model Featured in “Les Fondateurs 2” Teaser!

The teaser trailer for Les Fondateurs: La Quête de Gryffondor is out! Spoiler alert: there’s a brief shot of Hogwarts at the end, courtesy of yours truly. I’m really looking forward to producing more shots of the castle for this fan film!

Fun facts about the animation, which was created specifically for the teaser:

  • This was created using a copy of the main model. I removed everything that wouldn’t be visible, since I wasn’t using a render farm and I wanted to keep the render times decently fast. (We intend to use a render farm for the film itself, and I also plan to bake a lot of the procedural textures to images, which should speed things up. By then Blender will have adaptive sampling as well.)
  • This shot includes some parts of the castle that weren’t/aren’t complete in the main model – I built some geometry that would work for this brief shot, but there are some inaccuracies. Fortunately, the castle does change over time! In any case, the model used for the film itself will be more detailed and accurate.
  • There are no volumetrics in this shot – all the fog was a composited mist pass, plus an overcast HDRI for the sky and lighting. (Thanks, HDRIHaven!)
  • I removed the pipe that sticks out of Gryffindor Tower…it looked funky from this angle and distance.

I’m looking forward to seeing this project come together!

Starting the Ruined Fountain

Prisoner of Azkaban‘s clock tower courtyard has a large fountain in the center, featuring arched pediments and four statues of birds eating snakes. [EDIT: Many thanks to bentarr1 for pointing out that the golden eagle devouring a rattlesnake is an important symbol in Mexican culture, ostensibly a tribute to Alfonso Cuarón’s nationality.] Like the rest of the courtyard, the fountain has seen better days – whole chunks of it have crumbled away. This makes for a different challenge than the rest of the castle, which has an aged look but hasn’t actually fallen apart.

Thanks to a variety of folks who’ve taken photos of the technical drawings at the Warner Bros. Studio Tour, I’ve got a lot of detailed reference on the top part of the fountain, so I decided to start there. The fountain will be built in complete, pristine form first…then I get to go in and destroy it. (I’ll make a copy, don’t worry!) I started with some of the arches:

The intersecting curves are tricky to stitch together. I’m again very grateful for Blender’s TinyCAD add-on, which makes the job somewhat less painful, especially because there’s a lot of it here:

It looks great in gray, but it’ll look even better when I apply my standard stone texture from the castle, right?

Ew. Never mind. Looks like I’m gonna need to create a new material specifically for this fountain. I’ll put a pin in that for now. Back to plain gray as we give this thing some rotational symmetry:

Dang, kinda makes me sad that they went and destroyed half of the thing…the pre-eroded design is really pretty! Anyway, the top part’s also got a lot of detail, but this pediment’s no impediment:

Then all that’s left for the top part is to add some pinnacles to the corners – interestingly, not quite the same design as the pinnacles on the Great Hall, or even the nearby clock tower entrance. Voilà:

I dig it! Next up will be the base of the fountain, the columns, the bird statues, and the texturing – not necessarily in that order.

The POA Clock Tower Approaches Completion

More staircase stuff to come, but for now, back to the main project! With my clock tower photogrammetry in place, I was able to finish up the clock tower’s entryway, again relying more on shots of the set than shots of the miniature, since that area is really only visible from above or from within the courtyard. Fortunately, the sets seem to match the miniature pretty well here. Even though the miniature as currently installed at Leavesden has the doors closed and portcullis down, I decided to keep mine nice and open. My Hogwarts is a welcoming, friendly place. Just look at all the people.

Awkward. Well, anyway, the details look cool, but it’s hard to see beyond the archway; it gets darker in the shadows. Let’s crank up the exposure a little and move beneath the arch to take in all this stuff that we’ll rarely see otherwise!

The actual interior is still dark and boring, but there’ll soon be big windows on the other side of the room.

Let’s talk about those doors, by the way. John Williams wrote a cue for the scene in which they’re locked to secure the school, and he called it “The Big Doors”. He wasn’t kidding. They’re HUGE – around 67 or 68 feet tall, by my estimation. I’m sure they only built the bottom portion for the set, but in the miniature, they just go up and up and up. Imagine the weight…imagine trying to open or close them by hand…

Anyway, the next step was to add windows on the other faces of the clock tower, as well as the details on the dormers along the roof. (Fortunately, these seem to be very similar or identical to the ones on the roof of the Defense Against the Dark Arts building, which I’ve already created, so this didn’t take long.)

With those finished, there are precisely three details left to add to the clock tower: the big window in the back, a small arch at one of the corners, and another door at another corner. Oh, and probably the clock pendulum, too. So four. But I can’t find good reference for the big window, and there’s no point in putting in the pendulum till I have the big window to silhouette it against…and the placement of the arch and door will depend on the placement of the courtyard, and I’m not going to build the courtyard till I’ve built the ruined fountain in the middle. (No sense in enclosing the courtyard and then having to constantly hide pieces to build the stuff inside.) So the fountain is up next!

A Detour on the Grand Staircase

All right…the main model is still going strong, but I’ve found myself intrigued by a side project: the grand staircase, AKA marble staircase. Much like a parking garage, its interwoven spiraling structures are hard for my brain to visualize, which makes them fascinating to reconstruct.

I’ve specifically focused on the version seen in the first two films…after that, it went through some changes, though those changes remained subtle until Deathly Hallows. But in the first two films, it seems to have been brought to life with the same miniature and full-sized partial set – with digital augmentation. (Incidentally, based off of the few images of the miniature I’ve found, I’m pretty sure it was built on its side at somewhere around 1:3 scale…but don’t quote me on that. If I’m right, that would make the miniature over 50 feet long.) [EDIT: I’ve now found a source that claims it was a 40-foot miniature built at 1:8 scale, which doesn’t seem to work mathematically. I’m not sure what to make of this.]

Initially, my primary goal was to replicate the set. I figured the miniature was kind of its own thing, and I got to work aligning technical drawings and photogrammetry and so forth just for the set. (Each of those small orange shapes is where the camera was for a specific frame from the film…pretty cool to see how the camera moved through the space!)

After more closely studying both films, I came to realize that the available reference material does consistently and explicitly establish the spatial relationships between the set and the miniature. (Thank goodness the different paintings and frames provide excellent reference points!) So I changed tack: the new goal was to create a single model that brought the set, the miniature, and the digital elements together. This was aided by a bit of photogrammetry from Chamber of Secrets that worked WAY better than I thought it would:

So the good news is that I had a lot of information to work with. The bad news is…it was a lot of information! This room is enormous and very repetitive, so it’s easy to get lost in the reference images and forget which staircase is which. I tried to just jump right in with the modeling, but confusion set in pretty fast, so I decided this would just be an exploratory first pass. I kept this mockup simple and not super precise. Still, I kept getting lost, so I spent a long while color coding flights of stairs in both the model and in my reference images. Here’s a glimpse of just part of that process:

It looks like a gaudy mess, but for the first time in my life, I understood the complex geometry of the grand staircase! Things I learned:

  1. In plan view, the stairs form three adjacent squares. The flights that actually move are all part of the middle square.
  2. There were definitely at least 36 flights in the miniature – more likely 38, but I can’t find a clear angle confirming the last 2. Regardless, these cover 19 different levels, each 10 feet high. Almost every levels has 2 landings on opposite walls of the room. (I’m hesitant to call these floors, since Hogwarts isn’t really supposed to have 19 of those…but each landing does have a door…)
  3. In the miniature’s “default configuration”, so to speak, the flights are organized into two separate helical pathways. In the middle floors, these each spiral in a clockwise direction as they ascend on opposite sides of the room. Toward the top and bottom, the two pathways intertwine so they can switch sides. Through most of the model, the two paths are identical; they’re just rotated 180 degrees relative to each other.
  4. The bottom-most level is a bit irregular and doesn’t follow rule #3.
  5. If all the flights that form part of the middle square rotate 90 degrees from their bases, you end up with more of a DNA-like double helix, as opposed to two side-by-side helices.
  6. In the first film, we look all the way up and the stairs seem to continue into infinity. The most distant stairs were added digitally to obscure the top of the miniature. These aren’t part of my model.
  7. In the second film, the camera moves swiftly downward through the miniature; the set is composited in toward the bottom. Below the set are still more stairs; these were created by shooting the miniature again from a different angle and compositing it in as the bottom.

Clear as mud, right? Yeah, it’s hard to visualize. But the rough mockup was a success in that it gave me a clear roadmap for making a serious attempt at modeling the grand staircase. I’ve already begun, and I’m looking forward to sharing the details in a future post! In the meantime, here’s an orthogonal elevation-style view of the mockup, just for fun.

Special Announcement

Something a little different today: I’m thrilled to share that I’m going to be providing Hogwarts visual effects for an upcoming French fan film entitled Les Fondateurs: La Quête de Gryffondor. This is the second film in a series about the founders of Hogwarts and a few shots are going to feature the castle…my castle! It’s still early on, but I’m excited to see this project come together. Here’s the very first promotional image of Hogwarts!

You can learn more about the project (and even help financially) here.

More updates on the main Hogwarts 4D project to come!

Clock Tower Progress & Courtyard Photogrammetry

Let’s continue with the Prisoner of Azkaban clock tower! I created the columns and elaborate moulding below the clock. As you can see in this “work in progress” render, everything was still separate from the building at this point:

But as these areas became more complete, I began placing them correctly along the building. I also discovered some issues with how I’d built the facade last year, so I decided to simply redo some of it altogether. Below, you can see some of the old walls removed for replacement as I maneuvered the new elements into position:

I resisted the urge to simplify some of these details, and I’m glad I did. The results were worth it the effort! This has become one of the most detailed areas of the model so far, mostly because the original design has a lot of details, but also because the available reference material is so good. Maybe it’s a good thing I don’t have detail drawings for most of the castle…everything would take so much longer if I could get this precise with everything:

Fun fact, by the way: see that arch at the bottom of the last render? In the miniature, it’s just got open air behind it, but they created a full-sized set for a shot in Order of the Phoenix, and in that version, it’s actually a balcony. (Umbridge and Filch are standing up there.) They don’t appear to have changed the miniature; I’m going to leave the balcony out.

Moving downward, we arrive at this lovely Gothic pediment that frames the entryway. No technical drawings for this one, so I had to just rely on as many reference images as I could find. Shots of this spot on the miniature are virtually impossible to get in the Warner Bros. Studio Tour, so most of my references are actually from the corresponding set, and some of the details can vary between the sets and the miniatures. Anyway, the modeling process looked much like building the arches above, so I won’t bore you with too many in-progress shots:

I also discovered how good Blender’s denoising has gotten, which means I can drastically speed up my renders. My poor machine only chugged for 15 minutes or so on these images, rather than an hour or more.

Anyway, as I got to the very bottom of the tower, where it meets the courtyard, I started feeling the need for more data. So I went on another photogrammetry spree, trying to create meshes from every possible shot of the courtyard/clock tower set in the film. (There are a lot of them!) Accuracy and precision are very important to me with this project – partly just so I know I’m getting something close to the “real thing”, and partly because I know from past experience that small errors have a way accumulating. You estimate the height of object B on object A, and then you estimate the height of object C on object B, etc., and before you know it, lots of small inaccuracies begin to add up…and sooner or later, those will clash noticeably with other estimations elsewhere on the model.

I’d like to avoid that, which is why I ended up with over a dozen photogrammetry meshes (with different lighting and even different seasons) thrown together to get a more complete picture of the courtyard!

Ugly, yes, but very helpful as I prepare to complete the clock tower and start on the courtyard.

P.S. Don’t let me forget to finish the hospital wing.

P.P.S. Happy belated Mother’s Day!