Golden eagles and moving staircases can get frustrating. Sometimes you just need to return to your comfort zone and make some turrets. That’s what led me to spend some time (for once) on a version of Hogwarts that’s NOT the one from the third film! We’re going all the way back to the beginning, to a simpler time before the back of Hogwarts got its elaborate clock tower and courtyard. We’re going back to Harry Potter and the Philosopher’s/Sorcerer’s Stone!
In addition to giving me some relief from the project’s more challenging tasks, this gave me a chance to play a bit with this project’s whole primary purpose: providing 3D comparisons between different versions of the model. So I built a new version of the quad’s outer wall, but in its original state, before the hospital wing and clock tower and so forth were added for Azkaban. It’s very difficult to find information about this area of the original model, but I think I’ve been able to get a pretty close facsimile:
Still woefully incomplete, of course, but the cool thing is that I could keep the camera in the exact same spot and render a direct comparison with the (also incomplete) POA version:
This is the kind of stuff I want to get into when the project is reaching its final stages. I’d even like to let the camera glide slowly around the model as things change from film to film…I think that would be visually appealing and very informative.
(Now’s also as good a time as any to point out that I’m now on Instagram; I don’t necessarily post a lot, but feel free to follow there as well if you’d like!)
Anyway, no idea how long I’ll be working on this SS version of the castle right now; I’ll have to get back to those statues sooner or later. We’ll see what my next post ends up being about!
Let’s continue building the ruined fountain from Harry Potter and the Prisoner of Azkaban! I developed a hankering for some texturing, so I created this new material for the fountain. I used the same basic procedural texturing principles in Blender’s Cycles render engine that I used for the castle’s main materials – lots of strategic layering of Noise and Musgrave nodes at varying scales, mainly. The trick is to get this one to work a little better for intricate objects seen at a closer distance while retaining enough low-frequency detail to still look interesting when seen from further away. I think we’ve got a decent start:
I may even end up using this for the surrounding courtyard; it was designed/built at the same time in real life, and probably “in universe” as well. We’ll see how well that works once we get there.
In the meantime, gotta build some columns for this pediment to sit on. This is where I start having to rely more on photogrammetry (and photo reference) for dimensions, so the precision does go down a bit. Should still be quite close, though.
As I described previously, this is the intact fountain, prior to the damage we see in the film. I’ll be matching the damage in my model, but first comes the finishing touch on the fountain structure: the statues! I recently learned that these are an homage to Alfonso Cuarón’s heritage; the image of a golden eagle devouring a rattlesnake is important in Mexican culture. I’ll try to do right by that symbology!
First I studied a bunch of images of the statues as well as photos of real golden eagles and sketched out extremely rough orthographic views in Photoshop. I dropped these into Blender and created a base mesh – just a very rough shape upon which to start sculpting.
The actual eagle statue is frozen in motion, twisting as it grabs the rattlesnake. But sculpting these things is much easier if you start with a symmetrical pose, so that’s what I’m going for here. Then I’ll actually use animation techniques to give it a dynamic, asymmetrical pose.
Or at least, I will once I stop being a whiny baby and get back to work on this bird. For now, I’m fed up with trying to get the feathers right, so I’ve temporarily retreated to my comfort zone to make more buildings.
Prisoner of Azkaban‘s clock tower courtyard has a large fountain in the center, featuring arched pediments and four statues of birds eating snakes. [EDIT: Many thanks to bentarr1 for pointing out that the golden eagle devouring a rattlesnake is an important symbol in Mexican culture, ostensibly a tribute to Alfonso Cuarón’s nationality.] Like the rest of the courtyard, the fountain has seen better days – whole chunks of it have crumbled away. This makes for a different challenge than the rest of the castle, which has an aged look but hasn’t actually fallen apart.
Thanks to a variety of folks who’ve taken photos of the technical drawings at the Warner Bros. Studio Tour, I’ve got a lot of detailed reference on the top part of the fountain, so I decided to start there. The fountain will be built in complete, pristine form first…then I get to go in and destroy it. (I’ll make a copy, don’t worry!) I started with some of the arches:
The intersecting curves are tricky to stitch together. I’m again very grateful for Blender’s TinyCAD add-on, which makes the job somewhat less painful, especially because there’s a lot of it here:
It looks great in gray, but it’ll look even better when I apply my standard stone texture from the castle, right?
Ew. Never mind. Looks like I’m gonna need to create a new material specifically for this fountain. I’ll put a pin in that for now. Back to plain gray as we give this thing some rotational symmetry:
Dang, kinda makes me sad that they went and destroyed half of the thing…the pre-eroded design is really pretty! Anyway, the top part’s also got a lot of detail, but this pediment’s no impediment:
Then all that’s left for the top part is to add some pinnacles to the corners – interestingly, not quite the same design as the pinnacles on the Great Hall, or even the nearby clock tower entrance. Voilà:
I dig it! Next up will be the base of the fountain, the columns, the bird statues, and the texturing – not necessarily in that order.
More staircase stuff to come, but for now, back to the main project! With my clock tower photogrammetry in place, I was able to finish up the clock tower’s entryway, again relying more on shots of the set than shots of the miniature, since that area is really only visible from above or from within the courtyard. Fortunately, the sets seem to match the miniature pretty well here. Even though the miniature as currently installed at Leavesden has the doors closed and portcullis down, I decided to keep mine nice and open. My Hogwarts is a welcoming, friendly place. Just look at all the people.
Awkward. Well, anyway, the details look cool, but it’s hard to see beyond the archway; it gets darker in the shadows. Let’s crank up the exposure a little and move beneath the arch to take in all this stuff that we’ll rarely see otherwise!
The actual interior is still dark and boring, but there’ll soon be big windows on the other side of the room.
Let’s talk about those doors, by the way. John Williams wrote a cue for the scene in which they’re locked to secure the school, and he called it “The Big Doors”. He wasn’t kidding. They’re HUGE – around 67 or 68 feet tall, by my estimation. I’m sure they only built the bottom portion for the set, but in the miniature, they just go up and up and up. Imagine the weight…imagine trying to open or close them by hand…
Anyway, the next step was to add windows on the other faces of the clock tower, as well as the details on the dormers along the roof. (Fortunately, these seem to be very similar or identical to the ones on the roof of the Defense Against the Dark Arts building, which I’ve already created, so this didn’t take long.)
With those finished, there are precisely three details left to add to the clock tower: the big window in the back, a small arch at one of the corners, and another door at another corner. Oh, and probably the clock pendulum, too. So four. But I can’t find good reference for the big window, and there’s no point in putting in the pendulum till I have the big window to silhouette it against…and the placement of the arch and door will depend on the placement of the courtyard, and I’m not going to build the courtyard till I’ve built the ruined fountain in the middle. (No sense in enclosing the courtyard and then having to constantly hide pieces to build the stuff inside.) So the fountain is up next!
All right…the main model is still going strong, but I’ve found myself intrigued by a side project: the grand staircase, AKA marble staircase. Much like a parking garage, its interwoven spiraling structures are hard for my brain to visualize, which makes them fascinating to reconstruct.
I’ve specifically focused on the version seen in the first two films…after that, it went through some changes, though those changes remained subtle until Deathly Hallows. But in the first two films, it seems to have been brought to life with the same miniature and full-sized partial set – with digital augmentation. (Incidentally, based off of the few images of the miniature I’ve found, I’m pretty sure it was built on its side at somewhere around 1:3 scale…but don’t quote me on that. If I’m right, that would make the miniature over 50 feet long.) [EDIT: I’ve now found a source that claims it was a 40-foot miniature built at 1:8 scale, which doesn’t seem to work mathematically. I’m not sure what to make of this.]
Initially, my primary goal was to replicate the set. I figured the miniature was kind of its own thing, and I got to work aligning technical drawings and photogrammetry and so forth just for the set. (Each of those small orange shapes is where the camera was for a specific frame from the film…pretty cool to see how the camera moved through the space!)
After more closely studying both films, I came to realize that the available reference material does consistently and explicitly establish the spatial relationships between the set and the miniature. (Thank goodness the different paintings and frames provide excellent reference points!) So I changed tack: the new goal was to create a single model that brought the set, the miniature, and the digital elements together. This was aided by a bit of photogrammetry from Chamber of Secrets that worked WAY better than I thought it would:
So the good news is that I had a lot of information to work with. The bad news is…it was a lot of information! This room is enormous and very repetitive, so it’s easy to get lost in the reference images and forget which staircase is which. I tried to just jump right in with the modeling, but confusion set in pretty fast, so I decided this would just be an exploratory first pass. I kept this mockup simple and not super precise. Still, I kept getting lost, so I spent a long while color coding flights of stairs in both the model and in my reference images. Here’s a glimpse of just part of that process:
It looks like a gaudy mess, but for the first time in my life, I understood the complex geometry of the grand staircase! Things I learned:
In plan view, the stairs form three adjacent squares. The flights that actually move are all part of the middle square.
There were definitely at least 36 flights in the miniature – more likely 38, but I can’t find a clear angle confirming the last 2. Regardless, these cover 19 different levels, each 10 feet high. Almost every levels has 2 landings on opposite walls of the room. (I’m hesitant to call these floors, since Hogwarts isn’t really supposed to have 19 of those…but each landing does have a door…)
In the miniature’s “default configuration”, so to speak, the flights are organized into two separate helical pathways. In the middle floors, these each spiral in a clockwise direction as they ascend on opposite sides of the room. Toward the top and bottom, the two pathways intertwine so they can switch sides. Through most of the model, the two paths are identical; they’re just rotated 180 degrees relative to each other.
The bottom-most level is a bit irregular and doesn’t follow rule #3.
If all the flights that form part of the middle square rotate 90 degrees from their bases, you end up with more of a DNA-like double helix, as opposed to two side-by-side helices.
In the first film, we look all the way up and the stairs seem to continue into infinity. The most distant stairs were added digitally to obscure the top of the miniature. These aren’t part of my model.
In the second film, the camera moves swiftly downward through the miniature; the set is composited in toward the bottom. Below the set are still more stairs; these were created by shooting the miniature again from a different angle and compositing it in as the bottom.
Clear as mud, right? Yeah, it’s hard to visualize. But the rough mockup was a success in that it gave me a clear roadmap for making a serious attempt at modeling the grand staircase. I’ve already begun, and I’m looking forward to sharing the details in a future post! In the meantime, here’s an orthogonal elevation-style view of the mockup, just for fun.
Something a little different today: I’m thrilled to share that I’m going to be providing Hogwarts visual effects for an upcoming French fan film entitled Les Fondateurs: La Quête de Gryffondor. This is the second film in a series about the founders of Hogwarts and a few shots are going to feature the castle…my castle! It’s still early on, but I’m excited to see this project come together. Here’s the very first promotional image of Hogwarts!
You can learn more about the project (and even help financially) here.
More updates on the main Hogwarts 4D project to come!
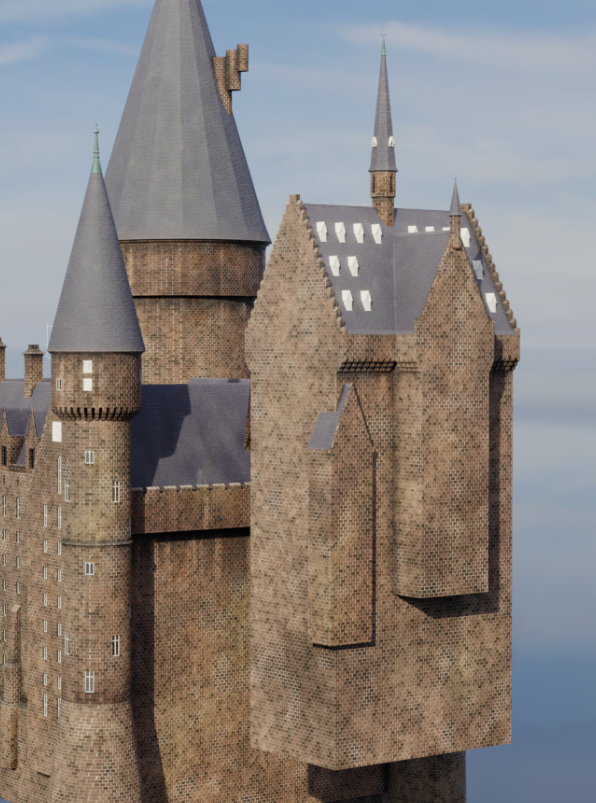
Let’s continue with the Prisoner of Azkaban clock tower! I created the columns and elaborate moulding below the clock. As you can see in this “work in progress” render, everything was still separate from the building at this point:
But as these areas became more complete, I began placing them correctly along the building. I also discovered some issues with how I’d built the facade last year, so I decided to simply redo some of it altogether. Below, you can see some of the old walls removed for replacement as I maneuvered the new elements into position:
I resisted the urge to simplify some of these details, and I’m glad I did. The results were worth it the effort! This has become one of the most detailed areas of the model so far, mostly because the original design has a lot of details, but also because the available reference material is so good. Maybe it’s a good thing I don’t have detail drawings for most of the castle…everything would take so much longer if I could get this precise with everything:
Fun fact, by the way: see that arch at the bottom of the last render? In the miniature, it’s just got open air behind it, but they created a full-sized set for a shot in Order of the Phoenix, and in that version, it’s actually a balcony. (Umbridge and Filch are standing up there.) They don’t appear to have changed the miniature; I’m going to leave the balcony out.
Moving downward, we arrive at this lovely Gothic pediment that frames the entryway. No technical drawings for this one, so I had to just rely on as many reference images as I could find. Shots of this spot on the miniature are virtually impossible to get in the Warner Bros. Studio Tour, so most of my references are actually from the corresponding set, and some of the details can vary between the sets and the miniatures. Anyway, the modeling process looked much like building the arches above, so I won’t bore you with too many in-progress shots:
I also discovered how good Blender’s denoising has gotten, which means I can drastically speed up my renders. My poor machine only chugged for 15 minutes or so on these images, rather than an hour or more.
Anyway, as I got to the very bottom of the tower, where it meets the courtyard, I started feeling the need for more data. So I went on another photogrammetry spree, trying to create meshes from every possible shot of the courtyard/clock tower set in the film. (There are a lot of them!) Accuracy and precision are very important to me with this project – partly just so I know I’m getting something close to the “real thing”, and partly because I know from past experience that small errors have a way accumulating. You estimate the height of object B on object A, and then you estimate the height of object C on object B, etc., and before you know it, lots of small inaccuracies begin to add up…and sooner or later, those will clash noticeably with other estimations elsewhere on the model.
I’d like to avoid that, which is why I ended up with over a dozen photogrammetry meshes (with different lighting and even different seasons) thrown together to get a more complete picture of the courtyard!
Ugly, yes, but very helpful as I prepare to complete the clock tower and start on the courtyard.
P.S. Don’t let me forget to finish the hospital wing.
Time travel plays a critical role in the climax of Harry Potter and the Prisoner of Azkaban, so Alfonso Cuarón decided to have some fun with elaborate shots that literally move right through a giant clock. Only one problem – the Hogwarts we’d seen in the first two films didn’t have any noteworthy clocks. So production designer Stuart Craig and his team created a new wing of the castle that comprised a crumbling courtyard, a rickety wooden bridge leading toward a new location for Hagrid’s hut, a new hospital wing, and…yes, an enormous clock tower.
These areas were realized as part of the main 1:24 scale Hogwarts miniature, as larger bespoke miniatures, and as partial physical sets. All of these were combined with visual effects to heavily feature this new area of the castle throughout the film, which is probably why this was the only film that really stood out to me in theaters as having redesigned parts of Hogwarts.
When we last saw the clock tower in my model, it looked a little something like this:
Not exactly the most detailed model in the world. I’m not really sure why I stopped working on it, but no matter. It’s about time I finished it up. (Get it? About time?)
Anyway, for today we focus on…well, how we got to this:
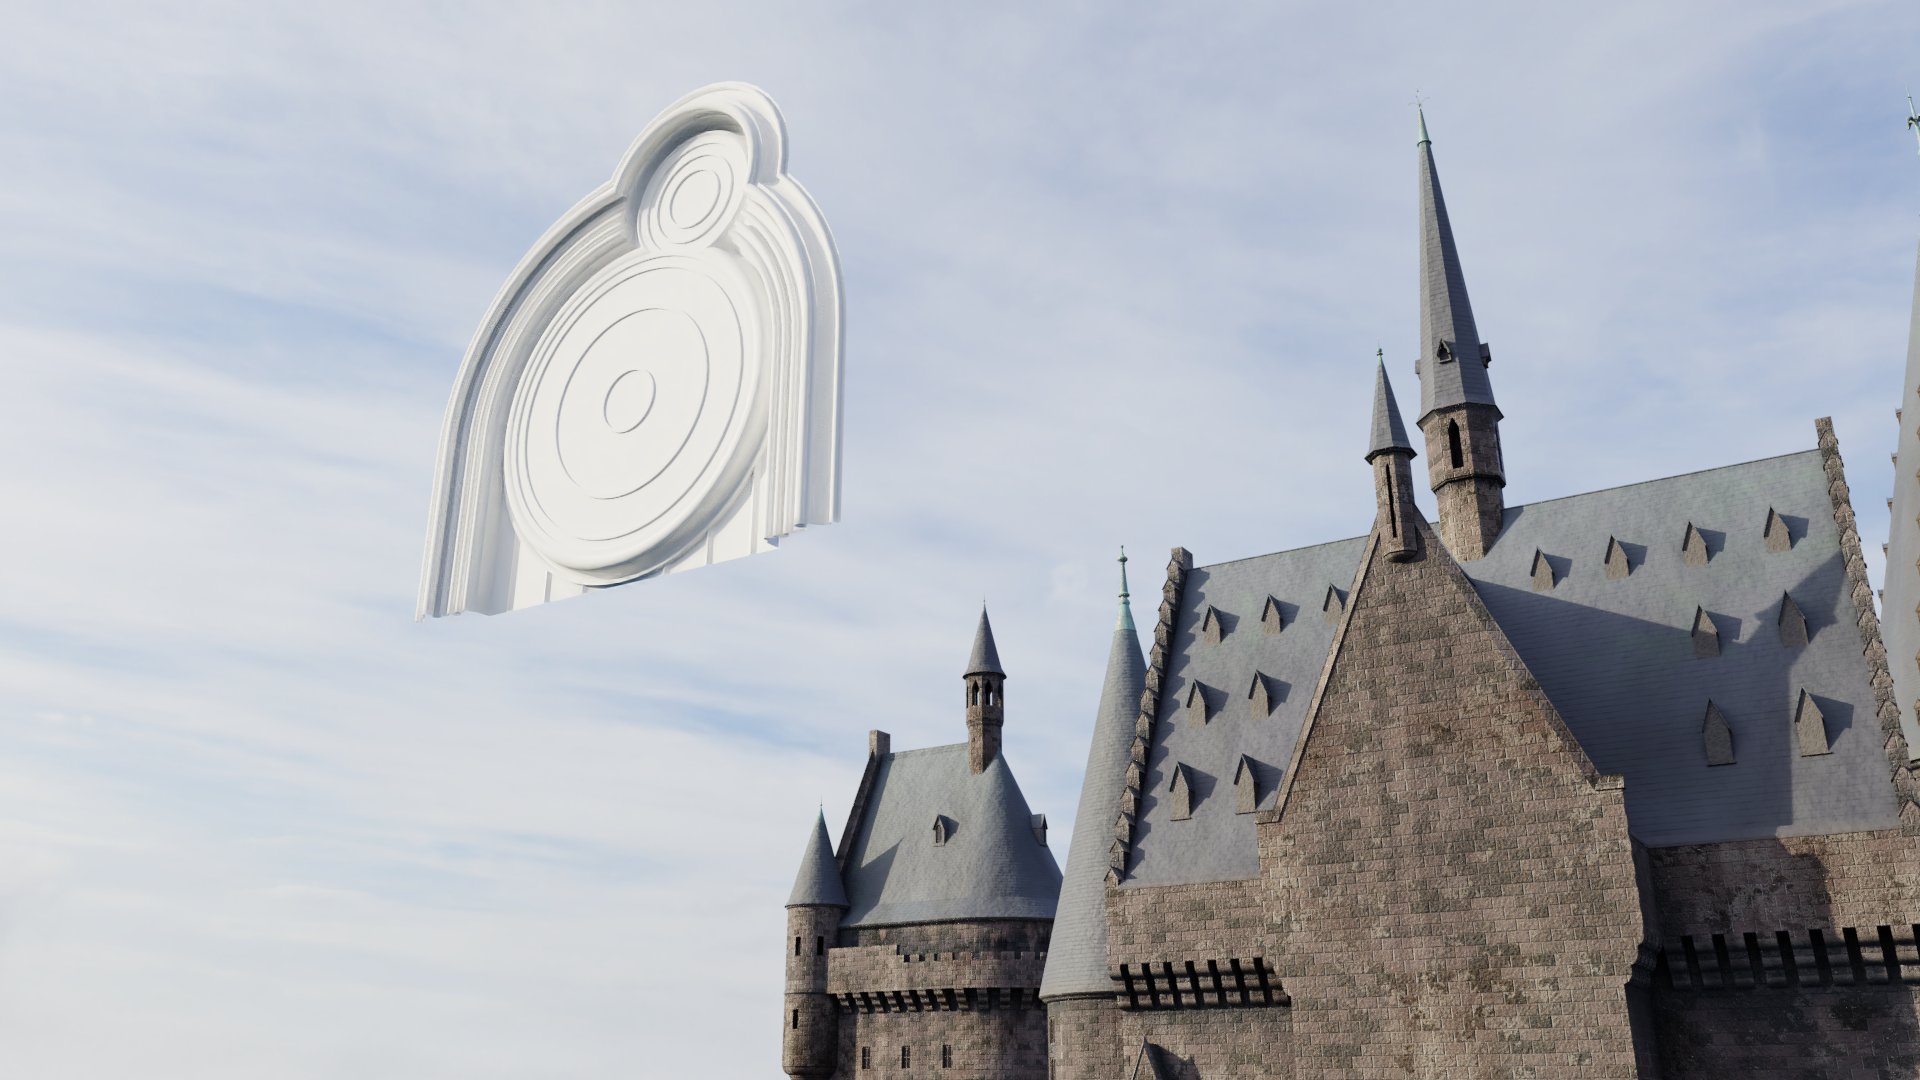
That’s right, today we’re covering the clock face itself. This is the part for which I have the most detailed technical drawings, thanks to various photographers who’ve documented their adventures at the Warner Bros. Studio Tour.
The clock actually has two faces, forming a pair of intersecting circular patterns. I started by building each one independently, not worrying about the intersections or textures:
The clock face is separate from the tower for now; it will later be moved into position.
Then came the hardest part by far: cutting out the intersecting areas of the moulding around the circles. I’m not aware of a particularly quick or easy way to do this in Blender, but the TinyCAD add-on did remove some of the hassle. Still, I had to step away from the mess repeatedly. Here’s what it looked like during the process.
Eventually it all worked out, with fairly minimal “cheating” of the geometry. I went to bed haunted by visions of intersecting circles. (Not even kidding!) But it was gratifying to see the results:
I next decided it was time to add some textures – not so much because I cared what it looked like at this juncture, but because the different textures would help me visually distinguish between different components as I worked:
The clock face moves a little closer to the tower, in part to help me gauge the transparency of the glass material.
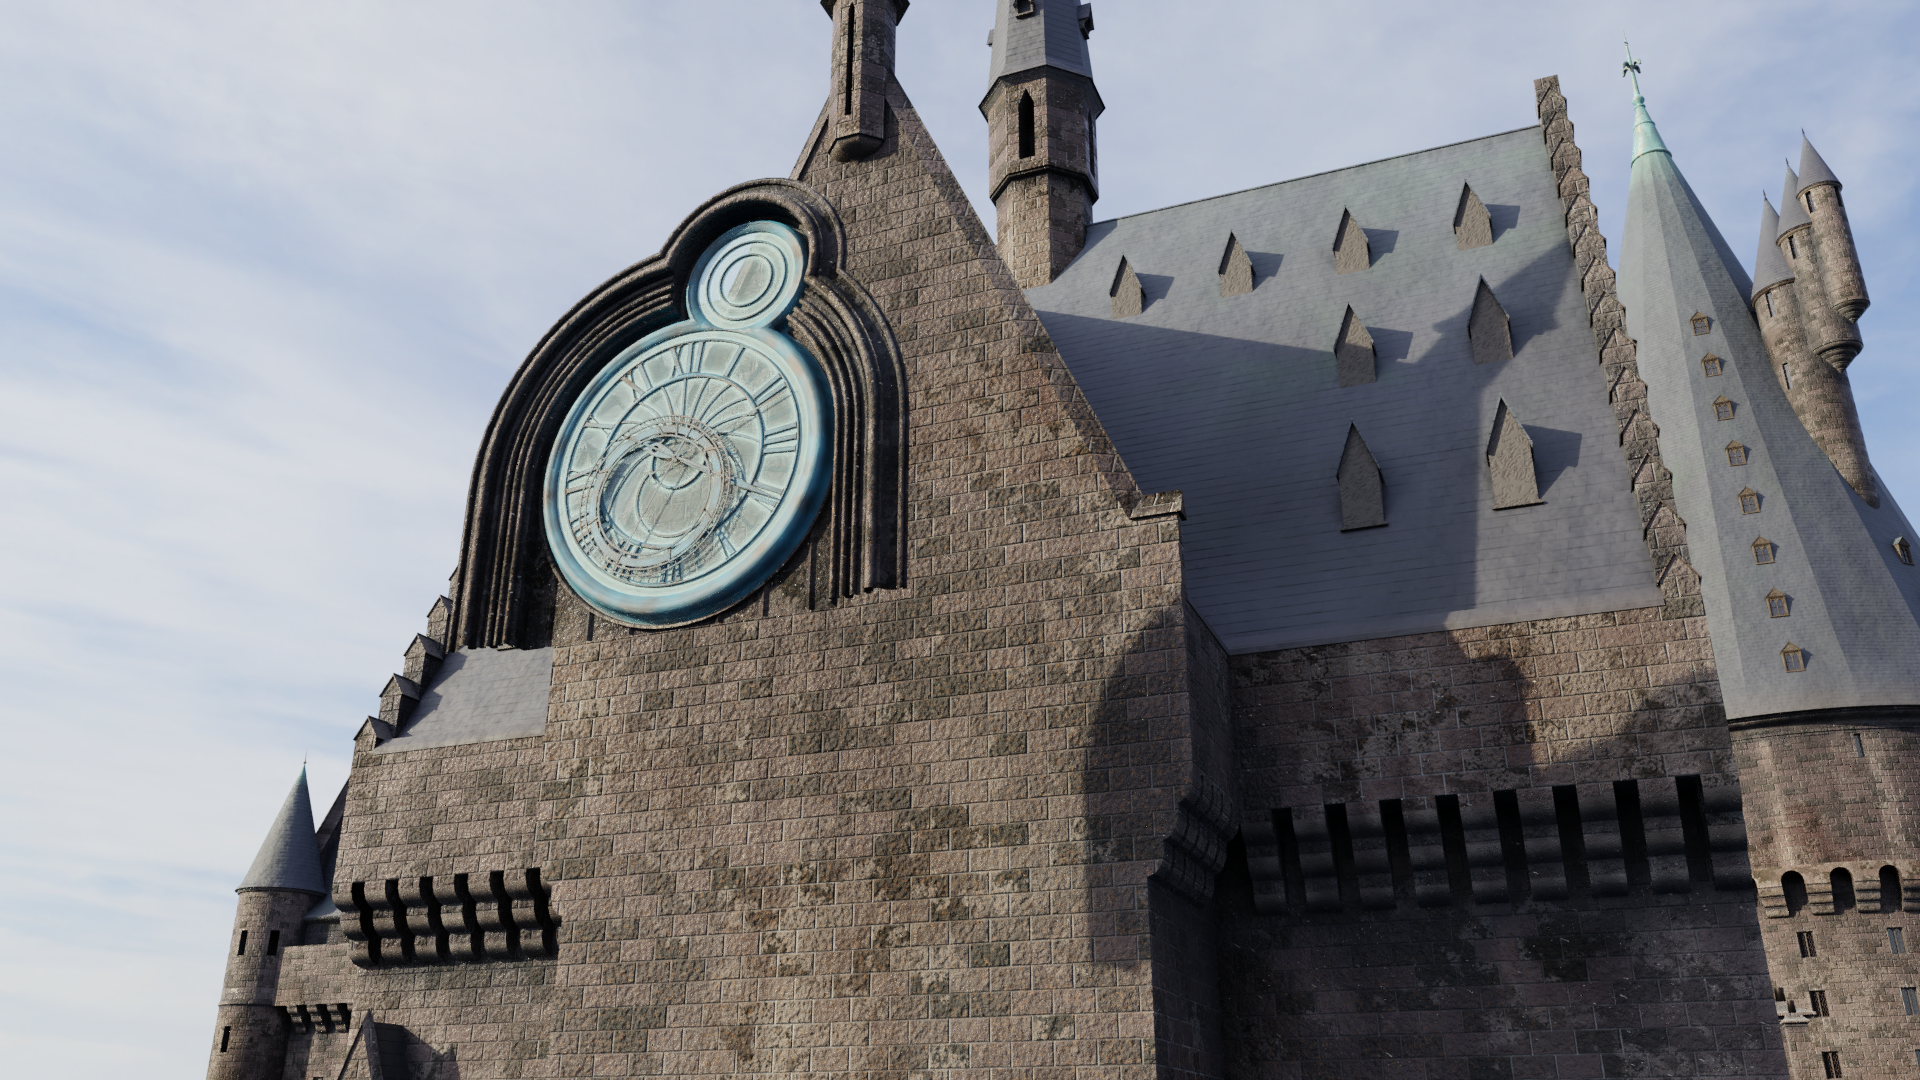
I wasn’t too sure how detailed I wanted to get when I first started the clock, but as I went, I became interested in greater and greater levels of detail. Soon, the complicated hands on the main face came together. (I stuck with the same time the clock shows in the beautiful transition to winter in the film, though I’m having some trouble figuring out exactly which hand is which…) EDIT: Just learned that this is an astronomical clock, and the extra elements aren’t just decorative! I think the smaller dial is for seconds, but they also had the minute hand move like a second hand in the film, probably to make the passage of time more visible. This also means I slightly fudged a few of the details…but oh well.
It’s worth mentioning that when it comes to the clock, the two differently-scaled miniatures and the full-scale practical element do have slight differences between them. Generally speaking, I’ve skewed toward the specific details seen in the larger miniature and the full-size version, but the level of detail is closer to the main 1:24 scale miniature. In other words, it’s missing the smallest bolts and grooves…this model isn’t intended to be examined SUPER up-close.
That brings us to the complete clock we saw earlier in the post. In addition to completing both faces, I added some basic gears back behind there; they probably won’t be visible 99% of the time, but perhaps they’ll give some visual hint of the inner workings we see in the film.
I’m not quite satisfied with the copper material, so I may go back and make some improvements at some point. But for now, I think the next step will be to build all the other detail on the front facade of the clock tower. There’s a lot – easily enough to fill up the next post. Be sure to follow for more updates!
I had a change of heart – rather than working on the textures or finishing the Prisoner of Azkaban clock tower, I decided to bite the bullet and just do my best with the original boathouse steps. I don’t have enough photographic coverage to be able to measure things out via photogrammetry, so I decided to just follow the floor plan and estimate the rise/run of the stairs.
The first step was to lay out the steps and landings themselves. This came together pretty quickly:
To my relief, the scale ended up being fairly reasonable. The next step was tougher…I had to create the walls along both sides of the steps, and they posed some challenges in terms of angles and intersections and whatnot. Halfway through, I started getting pretty annoyed…
The two circular landings were particularly difficult. But I stayed the course and eventually finished the walls, topping them off with the necessary flambeaux or torches. (Note that these walls are intentionally much taller than what you’ll see in the final model – the terrain will cover most of the height in most spots. I just wanted to make sure I had plenty to work with.)
Whew…all done! Here are a few more views for you to enjoy, including a nighttime shot looking up from the boathouse. This would have been Harry’s view of the castle immediately after disembarking from the boats.
With the boathouse steps complete, I also threw in the crenellated walls around the Chamber of Reception walkway.
What’s next? I’m already assembling my reference materials for the clock tower and courtyard that were added in the third film. Lots of intricate details here, especially since so much of it was also built as a physical set. Should be fun to finally finish that area!
As promised, this post is a lot lighter on the technical details and a lot heavier on the images! Getting better reference images for the link building was a big win. (Again, that’s the tiny linkage between the Great Hall complex and the marble staircase tower.) I knew what it looked like after the third film, but the first three films had a different design for the link building and there are no good shots of it in the films. I had nearly given up on accurately reproducing it.
But now that’s all changed! Feast your eyes on the SS/COS/POA link building!
It’s the short wall toward the bottom right. Okay, so, not a big deal in the grand scheme of things, but hey, it’s nice to solve that mystery. (Now if only I could find a good shot of the adjacent wall of the Chamber of Reception…) I also discovered that the link building roof is in fact just the end of the Great Hall balcony. Check it out from above:
I never would have guessed! After the third film, the link building had its own separate roof and the Great Hall was lowered so the balcony wasn’t level with it.
The next step was to finally close off the front of the quad building, just to the right of the link building and the marble staircase tower. There’s always been this gaping hole right there in my model and it was a joy to simply add a wall there, let alone all the cool details on top of it. I also put the finial on top of the tower in the corner at long last; it had been sitting there all open-ended and weird-looking for almost a year!
I even added in the stone bridge, visible at the bottom right. For now, it doesn’t go anywhere, but it’ll ultimately become one of the three walking paths between the two halves of the castle. Here’s a closer shot:
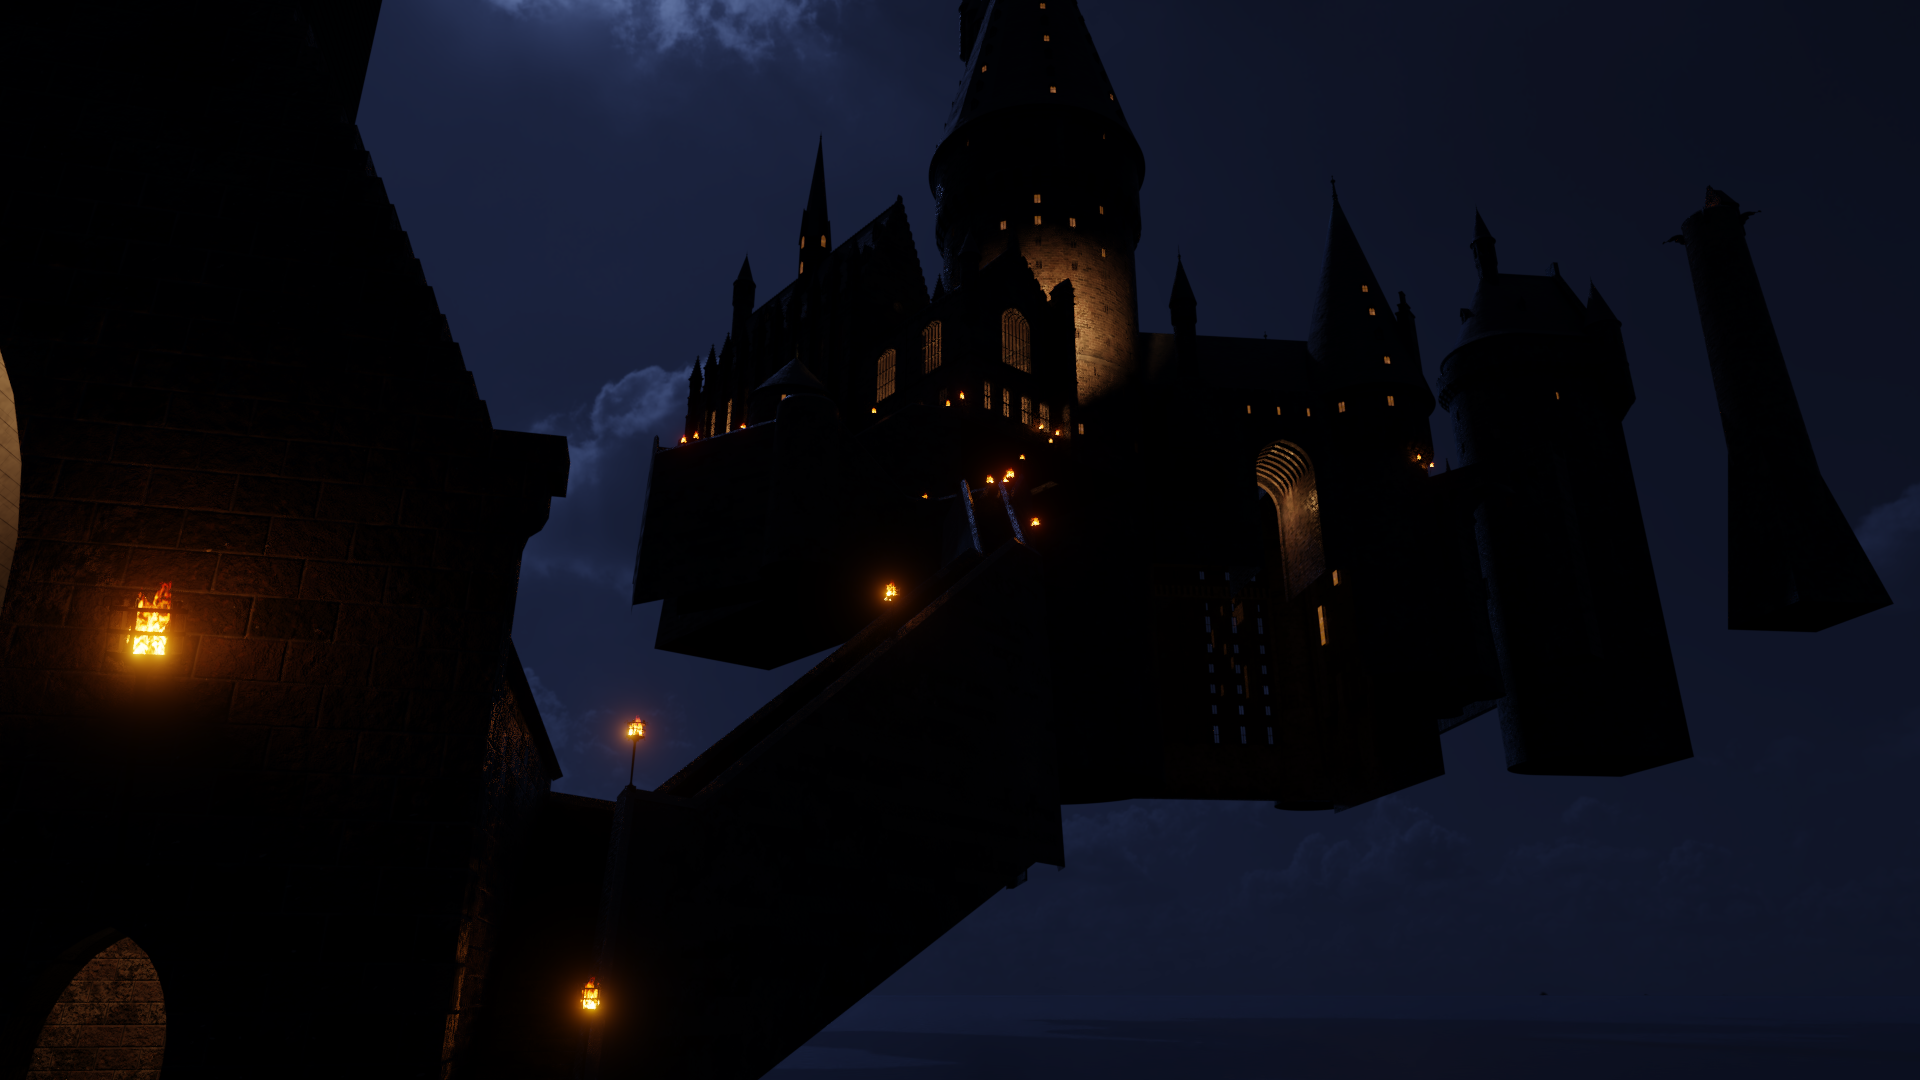
I also did a nighttime render of the angle from before. This inspired me to do some more work on the castle’s nighttime lighting, deciding which windows would be lit based in part on screencaps from the films.
I couldn’t help myself – I had to position the camera down at the water level to mimic some of those first shots of the castle in Sorcerer’s Stone. Not gonna lie, I’m really digging this look.
Next steps? Haven’t decided just yet. I do still need to detail the clock tower and hospital wing, around the back side of the quad building…I also think I’m going to need to start doing a bit of manual texture painting on the castle to get the vertical streaking caused by rain and so forth over the years. Currently, the castle textures are 100% procedural – in other words, the software generates them by following complex rules I’ve set up – but that doesn’t seem to be cutting it with the vertical streaks. Fortunately, Blender allows us to mix and match, so I can keep the overall look procedural while just painting in the vertical streaks by hand. Maybe I’ll try that next.