I’m back! I’ve been way too busy to put much time into Hogwarts, but I’ve been able to sneak in enough moments here and there to have an update for today.
Big staircases with lots of landings and odd angles aren’t necessarily super fun for me, but they’ve gotta be done. The GOF version of the boathouse stairs kept the same look as the original, but they were all reconfigured so they could meet up with the viaduct courtyard. They only changed once more, in DH, when the viaduct courtyard and boathouse both changed.
I started cannibalizing bits and pieces of my original build to create the GOF version, working from the bottom up:
At this point, it was just about getting the pieces in place. I knew I’d fix all the spots where they intersect once I had the overall setup right.
As I finished arranging the different flights and landings, I was surprised to discover that the steps were vertically overshooting the viaduct courtyard by a significant margin. On the left is the too-tall version; on the right is the same thing after squashing the whole thing down a bit:
Then it was just a matter of clipping off all the extra bits so the pieces actually fit together neatly – the most tedious step of them all – and adding the flambeaux that light the way. Here are the complete GOF steps on the right, compared to their predecessors on the left:
We’ll wrap up for today with an interesting plan view of the GOF castle, with the original boathouse steps superimposed as well:
If you’ve followed this project for a while, you know I jump around a lot. I’ve got a master “to do” list, but sometimes I get bored with an item – or, in the case of the walkways and cliffs from last time, sometimes I run out of references. So I decided to jump over to an all-new phase of the project: creating the Goblet of Fire iteration of Hogwarts!
I started with the south end, where the Great Hall is. Some of the surrounding structures didn’t change at all from the previous film, so I ported those over. But the Great Hall itself got tweaked and slightly repositioned. Let’s start with just the design changes – easier to compare the Halls when they’re still in the same spot.
Original on the left, GOF redesign on the right:
The main difference is that the front was lengthened. This section with the bigger window corresponds to the entrance hall, a set that didn’t really fit very clearly into any part of the original Great Hall/Chamber of Reception structure. When the length was extended, the dormer windows and central turret on the roof were adjusted to keep things visually centered. The turret at the back/top of the hall was also redesigned as well as duplicated at the front of the structure.
So that’s the new design. What about the new position? Well, it’s easiest to show that by overlaying the GOF Great Hall onto the original castle:
The original position is the one that’s higher up and closer to the big marble staircase tower. The new position allowed for a redesigned “link building” between the entrance hall and the marble staircase tower – again, better matching the interior sets – and put the Great Hall closer the same level as the viaduct and its new courtyard. (Originally, the Great Hall was significantly higher than the viaduct; students had to climb all those Oxford stairs in the Chamber of Reception to get up to the Great Hall.)
Here I’ve added the link building:
The reason the rest of the GOF castle is missing is simple: I’m doing it one structure at a time, whether that means simply making its previous version visible or actually building new stuff.
The next structures to tackle are the new front of the Great Hall/entrance hall building (replacing the Chamber of Reception) and the viaduct courtyard. I believe the courtyard was brought to life by redressing the clock tower courtyard set from the previous film. I started this area by duplicating and repositioning the corresponding elements from the clock tower area, resulting in…this:
Yeah, the clock tower is definitely taller than the Great Hall. Lots of other things to tweak, too. All that and more in a future post – make sure you hit the Follow button (at the bottom of the page on mobile, to the right on desktop) to get notified of new updates!
In the early Potter films, scenes in Professor McGonagall’s Transfiguration classroom were shot on location in the chapter house at Durham Cathedral. As part of their efforts to make the original exterior miniature somewhat consistent with the location shoots, Stuart Craig and his team adapted the exterior of the chapter house as part of their design.
I say “adapted” because the details don’t really match. Still, it’s very clear that this structure just south of the middle courtyard (also adapted from Durham) was intended to be the exterior of the classroom.
Here’s the basic shape of the structure:
My “reference board” for this structure is one of my smallest. This is partly because it only existed for two films and partly because it’s not that big or complex a structure…but it’s also partly because reference is really, really scarce. Like…a couple of shots in Chamber of Secrets and a behind-the-scenes photo from Sorcerer’s Stone, plus the floor plan that sits beneath the model. Still, it’s enough to reconstruct what most of it looked like…
…except I have literally zero shots of the far side of the structure, the one facing the courtyard. I’d be in heaven if I could find a shot of the original miniature from an angle like this:
It would clear up my questions about the side of the Transfiguration classroom facing the courtyard, not to mention the original training grounds tower roof on the right. Again…maybe someday. In the meantime, I’m leaving the wall facing the courtyard blank.
Anyway, here’s the less mysterious side with all the nice details:
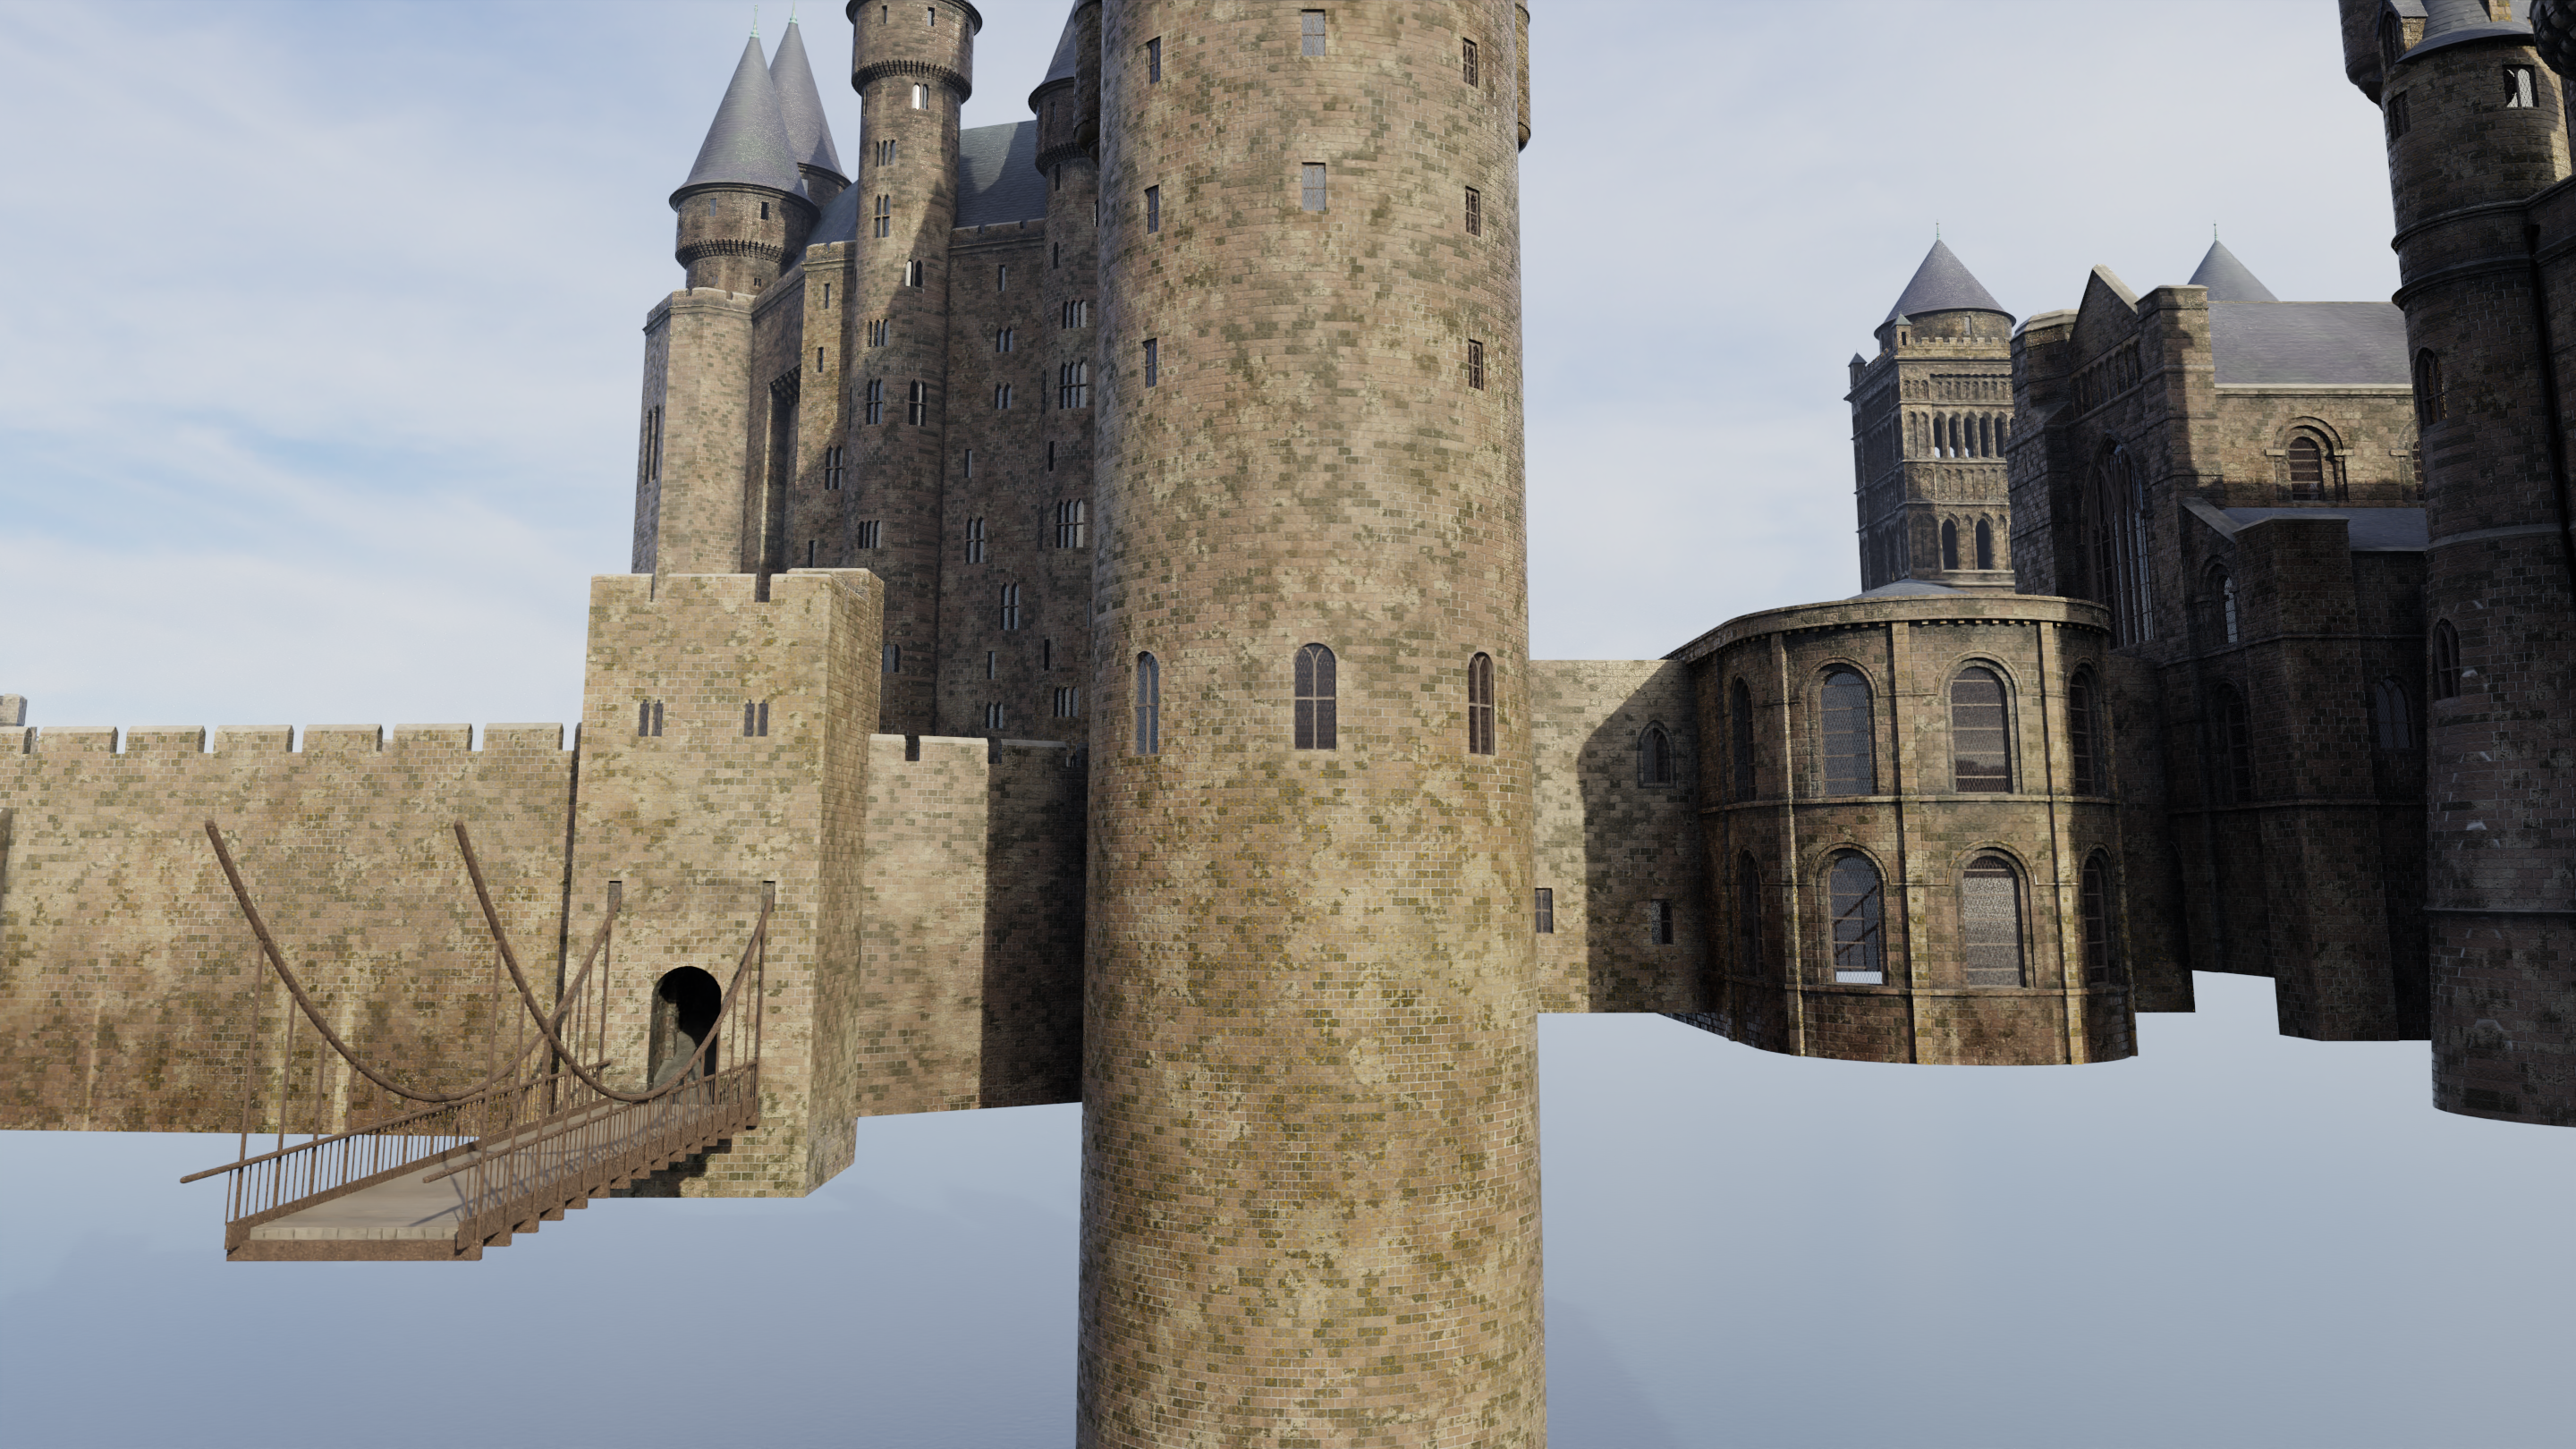
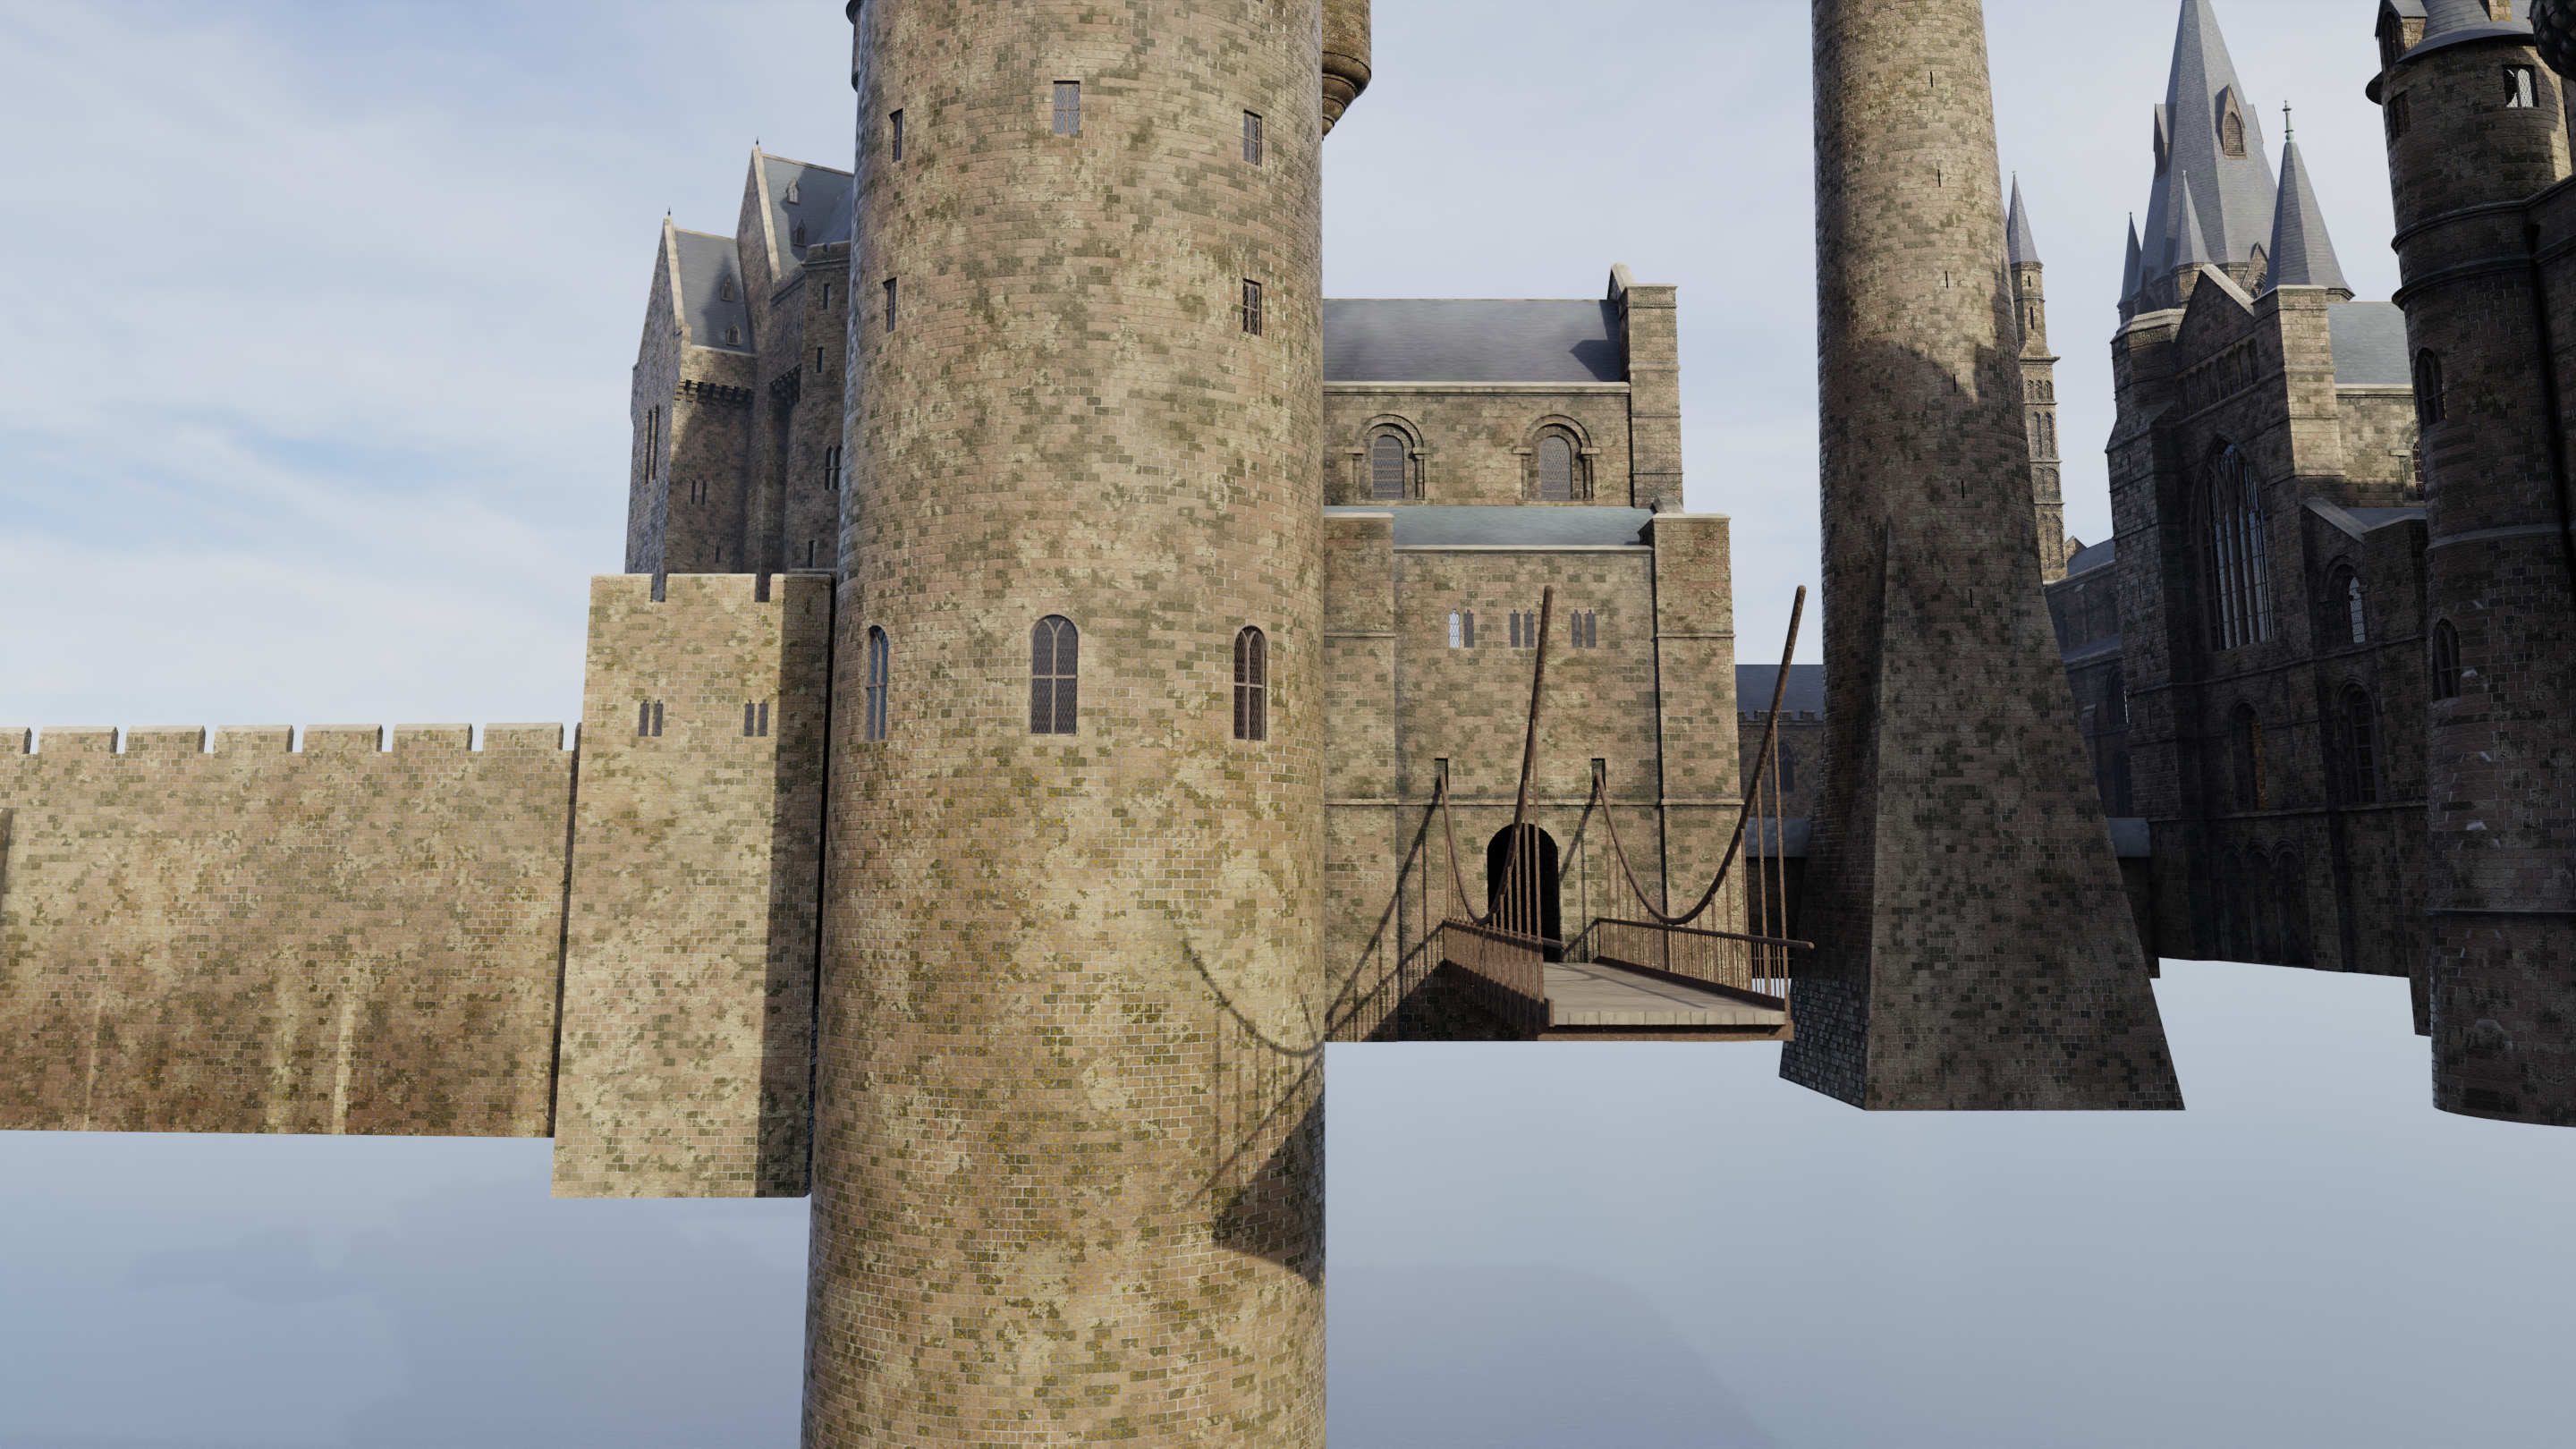
And, as promised last time, here’s a slider comparing the whole area in the first film (left) to the redesign in the third film (right), including the relocation of the suspension bridge:
Relatively short post today. We’ll start off with some orthographic views of the POA model, by request. This is the state of the model before the progress you’ll see later in this post.
I always enjoy these blueprint-style perspective-less views.
Anyway, onward to today’s update. Let’s start fleshing out the remaining walls surrounding the training grounds! I’m kinda doing the COS version, since most of this is covered by a new hillside from POA onward, but that’s okay.
I hadn’t touched this area since late March 2019…crazy to think that it’s now been over 2 years since I started this whole project!
There’s not a lot of reference for this area of the miniature, but I have found some shots. Between those and photos of the real thing at Alnwick Castle, I think my results are pretty accurate. Interestingly, that guerite (small lookout tower) closest to the camera seems to have been slightly redesigned partway through the construction of the model. I’ve gone with the final design that was glimpsed – if only barely – in the films.
The next structure along the walls is Alnwick Castle’s barbican and gatehouse. (This is the building from which Neville falls and breaks his wrist in the first film.) I had already done a bit of work on this structure as part of an early attempt at recreating Alnwick itself – here’s an old render from this post:
I built this to the same scale as the main Hogwarts model, so it was easy enough to drop that into place and add brick textures:
As we’ve seen with other areas, I’ve built the walls so they go quite a ways down. From this view inside the training grounds, the lowest parts will eventually be covered up by grassy lawns. But on the outside, the terrain is rocky and uneven, and in some areas it slopes downward to reveal the lower areas of the wall. It’s easiest to just make the walls really deep and then cover a lot of it up with the terrain later on.
Fortunately, there are some nice orthographic drawings of the barbican/gatehouse structure on a placard at the location. These provide some very helpful reference. As always, my goal is to capture at least one of these, in roughly descending order of importance:
The onscreen appearance and imagined reality of the castle in the films (which is achieved through a mixture of location shoots, miniatures, CGI, etc.)
The main 1:24 scale VFX miniature of the whole castle
The corresponding real-life filming location
These do not always agree, and there are significant gaps in the reference for the first two, so finding the right compromises can be tricky. For instance, this shot in Sorcerer’s Stone shows Neville’s POV as he nearly impales himself on a statue:
I’m not sure about the background, but the foreground architecture is all CG, and it matches neither the real-life location nor the miniature…although the corresponding spots at the location and on the miniature are never shown onscreen. To make matters worse, in the live-action location shots that follow, the statue (which I believe was installed just for the film) has moved to a different corner of the structure. So there is no single coherent reality for me to replicate.
In this particular case, my approach will be to ignore this quick shot altogether and aim instead for the real location with the added statues and other set dressings. But I’ll save that for the next post.
Whew, sorry for the long delay…the months of sitting at my home desk have taken their toll on my arms, and I’ve had to significantly limit my computer use. This will be a shorter post as a result. I’m starting physical therapy soon…if you’re feeling particularly generous and you want to help support my recovery, my Venmo handle is @Joe-Cardello, for what it’s worth. 🙂
Anyway, let’s continue with the version of the training grounds tower that was seen throughout the middle of the Potter series, including Prisoner of Azkaban. As we work our way around to the west facade, my reference material becomes even scarcer, but I’ve got just enough to piece it together in a reasonably accurate way. I started with plain walls, deciding to add the windows and so forth later:
Here’s a view from overhead once I’d roughed in the main shape of the building. At this point, I wasn’t worried too much about cleaning up the intersections between walls and objects…I just wanted to make sure the layout made sense three-dimensionally:
You can see just a bit of the tiny courtyard in the middle. That’s one area for which I truly have zero reference (other than the basic floor plan). It roughly corresponds to the cobbled inner courtyard at Alnwick Castle, which was actually used in the location shoots for the first film, but the version in the miniature is much smaller and it has a different shape because of the way the Alnwick floor plan was reconfigured around it. So the layout of any doors, windows, or other decorative elements on that part of the miniature sadly remains a mystery.
As I said, I have less progress to share because of my ergonomic issues, not to mention the simple fact that this is a tricky structure to figure out. But I’ll at least fill out the rest of this post with an aerial overview of my POA castle so far:
Take care of your body, take care of your mind, and don’t be an ass to people who identify as transgender. See you soon!
Unrelated to Hogwarts, but I thought it might appeal to a few readers – the Winchester Mystery House has made available a 3D-model-meets-Google-Street-View tour of its interior!
If you’re not familiar with this spot, it’s a bizarre mansion in San Jose, California. It came together over decades of unplanned construction under the direction of its owner, Sarah Winchester. Some people take the haunted house angle; personally, I have no belief in the supernatural, but I’m fascinated with the gargantuan house’s architecture – stairs to nowhere, windows from one room into another, doors that open to steep exterior dropoffs, etc.
I always wanted to see the layout of the whole house, but it was built with no master plan and I’d never found any attempts at creating one ex post facto. Now that’s all changed – Matterport 3D Tours spent a weekend capturing the house so that it can be explored digitally in the age of COVID-19. That also means you can get a sense of the floor plan, and although I’m annoyed that the orthographic floor plan view has been disabled, it’s still a dream come true.
Insert legal disclaimer about me not being affiliated with Winchester Investments LLC here, blah blah blah. I’m not getting a cut of their sales – I just think it’s cool as f$%#!
Time for a Hogwarts feature that’s right out of Durham Cathedral, at least in its original form. The cloisters were used as the filming location for the “middle courtyard” or “Transfiguration courtyard” in the early films, though it was later represented by a similar courtyard at Oxford and then by a set at Leavesden.
I first spent a morning working on under-the-hood tweaks to hopefully improve the file’s performance – downrezzing overlarge normal maps, replacing duplicated objects with linked proxies, decimating some meshes that had gotten too dense, etc. The hope is that my computer will be able to handle the file a little more easily moving forward. No sexy renders to share for that, though, so here’s a cute puppy photo instead.
Anyway, back to Hogwarts! A big question cropped up as I was compiling my references: How much detail do I put into the cloisters – specifically, the doorways that lead to other parts of the castle? These are seen in the location shoots in the first two films, but at least some of these were evidently left out the miniature. (They never would have been visible in the film, so I can appreciate the decision to focus elsewhere.) Furthermore, the south walk (which corresponds to the east walk at Durham) changed repeatedly over the course of the films, and I have no idea what the cloister interior looked like at that point.
I figured the most reasonable approach would be to create the complete courtyard without those doorways and then see if I could get away with it in my renders. I started with the tracery of the cloisters and a basic ground plane:
This part was easy because I’d already built the clock tower courtyard – its cloisters contain a lot of design elements adapted from Durham Cathedral.
The fountain in the center of the courtyard was next, and this one’s going to give me some trouble later on…not because it’s hard to create, but because it’s unclear exactly when it vanished. Let’s break it down:
It was created for the first film, apparently as a set dressing that sat on top of the lavatorium (monks’ handwashing station) that sits in the middle of the courtyard at Durham.
It’s still there in the second film, both on location and in a bespoke 1/8th-scale model of the courtyard used in an overhead establishing shot.
The center of the courtyard is never visible in the third film, so that one’s a question mark.
As I mentioned, goings-on in the courtyard were shot at Oxford instead of Durham Cathedral for the fourth film, so the location looks totally different and won’t be reflected in my model. There is an aerial shot during the First Task when we briefly see the Durham courtyard, but if the fountain is there, only the very top of it is peeking over the roofline.
No idea in the fifth film…
In the sixth film, the courtyard was realized as a set that included the base of the Astronomy Tower. (I suspect this was a revamp of the viaduct courtyard set, which I suspect was a revamp of the clock tower courtyard set.) There’s no fountain in that set, but that set is far from a perfect match to the miniature. I can’t find any shots of the center of the courtyard in the miniature, but the fountain is gone from the technical drawings and I’d imagine the same is true of the miniature.
In the final film, the fountain is again missing from the technical drawings, and this is confirmed with a CG overhead shot of the area.
With all that in mind…until I can find more reference that confirms which changes were made when, I’m just going to assume the fountain lasted till the sixth film, at which point it was removed and never came back.
Anyway, I added the fountain and started the sewer grate. I also added the benches, which seem to have been more set dressings. You can see in this render that I’ve finally mirrored the east walls of the Long Gallery onto the west side, too:
That’s the first render I did with the new Blender 2.90. It’s got some great new features, but it kept crashing when I attempted to render. After some troubleshooting, I figured it out: this version of the software doesn’t like my old smoke simulations. That’ll need to be addressed, but for now, I’m afraid the hearths of Hogwarts have gone cold.
That structure in the top left corner of that render is a newly-added Durham Cathedral transept, the last missing piece of the Long Gallery. In the first film, this one was a simple mirror image of the one on the other side, but when the Dark Tower (center) was added in Prisoner of Azkaban, this transept had to be shortened a bit, resulting in a slightly asymmetrical footprint that lasted right through the end of the series. Easier to see from the air:
As you can see, the one to the left of the central tower isn’t as long as its counterpart on the right.
One interesting thing about this courtyard is that each of its four sides has a different look. I next took care of the north wall, which corresponds to the west wall at Durham:
You’ve no doubt noticed that the cloister is still roofless – I decided to save that for after the surrounding walls were built. Speaking of which, here are the last of them:
It’s hard to find detailed reference for the wall on the right (above the two benches) in the miniature. Its design is similar to that of the corresponding wall at Durham Cathedral, but there are some differences. To make matters worse, there are some apparent discrepancies in the number of windows in the various Hogwarts images available, but there’s a good chance that what I’ve done is accurate to the state of the main miniature at the time of POA. And if not, it’s at least quite close – it could be that there are supposed to be six windows on the shorter part of the wall instead of five.
Anyway, the only remaining step was to add the cloister roofs! With these in place, the answer to my “big question” became clear: No, I didn’t need to add doors and other details inside the cloisters. They simply aren’t visible unless you’re actually inside the cloisters, and I’m okay with not having detailed views inside there. So with that in mind…voilà, the complete transfiguration courtyard!
Incidentally, I love that structure just above the center of that render, below the DADA tower. It was added in the third film when the DADA tower got shifted over a bit, and it’s basically just a Durham Cathedral transept, except, like…a standalone version. Something about it tickles me. Naturally, everything will look better once that wall next to it has an actual building behind it, but that’ll come with adding the final major piece of the main castle: the training grounds tower!
Haha! It’s finished – the version of the grand staircase from the first two Potter films! Join me for a complete video tour!
To get us to this state of completion, I had to add the remaining doorways on the landings:
Then came the big window at the back. Much of the molding is taken directly from that Oxford design I created in the last post. The scene beyond the window is a bit of a cheat…I just did a nighttime render of part of the main castle model, blurred it, and dropped it in like a scenic backdrop in a real set or miniature. It’s not perfect but it gets the job done.
With these elements in place, the only thing remaining was the paintings…but I decided they’d be too much work, I’m omitting them, at least for the time being. They don’t have anything to do with my main purpose (understanding the geometry of the stairs) or my secondary purpose (examining the scale of the space).
Speaking of which, here’s the long-awaited scale comparison between the castle exterior and the grand staircase interior!
They kinda almost fit together at the intended in-universe scale! Of course, if you include all the digital extensions at the top or the extra miniature passes used to extend the bottom, that all goes out the (beautifully mullioned) window. But I think that’s kinda okay.
This concludes my work on this side project…it’s been a fun one! Now back to the main castle model.
Short post today. I finished the clock tower! The only two pieces I still needed to add were the big window in back and the enormous pendulum that hangs down through the entry. Both are now in place! (I’d avoided the window for ages because I couldn’t find a clear shot of the tracery. Then I randomly came across a shot of a window at King’s College Chapel and realized that it was the exact same design. Problem solved!)
Around the other side of the building, I’ve been really hesitant to finish the hospital wing because the placement of the detailing toward the bottom will depend on the detailing of the surrounding quad walls, and I haven’t been able to add those due to insufficient reference. But I bit the bullet and at least took care of the top section:
I’ll still need to add the windows and so forth down below once I’m able to complete the quad. In the meantime, I’m gearing up to probably tackle the (gulp!) wooden bridge next.
More staircase stuff to come, but for now, back to the main project! With my clock tower photogrammetry in place, I was able to finish up the clock tower’s entryway, again relying more on shots of the set than shots of the miniature, since that area is really only visible from above or from within the courtyard. Fortunately, the sets seem to match the miniature pretty well here. Even though the miniature as currently installed at Leavesden has the doors closed and portcullis down, I decided to keep mine nice and open. My Hogwarts is a welcoming, friendly place. Just look at all the people.
Awkward. Well, anyway, the details look cool, but it’s hard to see beyond the archway; it gets darker in the shadows. Let’s crank up the exposure a little and move beneath the arch to take in all this stuff that we’ll rarely see otherwise!
The actual interior is still dark and boring, but there’ll soon be big windows on the other side of the room.
Let’s talk about those doors, by the way. John Williams wrote a cue for the scene in which they’re locked to secure the school, and he called it “The Big Doors”. He wasn’t kidding. They’re HUGE – around 67 or 68 feet tall, by my estimation. I’m sure they only built the bottom portion for the set, but in the miniature, they just go up and up and up. Imagine the weight…imagine trying to open or close them by hand…
Anyway, the next step was to add windows on the other faces of the clock tower, as well as the details on the dormers along the roof. (Fortunately, these seem to be very similar or identical to the ones on the roof of the Defense Against the Dark Arts building, which I’ve already created, so this didn’t take long.)
With those finished, there are precisely three details left to add to the clock tower: the big window in the back, a small arch at one of the corners, and another door at another corner. Oh, and probably the clock pendulum, too. So four. But I can’t find good reference for the big window, and there’s no point in putting in the pendulum till I have the big window to silhouette it against…and the placement of the arch and door will depend on the placement of the courtyard, and I’m not going to build the courtyard till I’ve built the ruined fountain in the middle. (No sense in enclosing the courtyard and then having to constantly hide pieces to build the stuff inside.) So the fountain is up next!